
Click to search for other posts here on webERP
Almost fully updated to webERP v5
Implementing an Enterprise Resource Planning (ERP) system for purchasing in a small company offers significant advantages, primarily by centralizing and streamlining the procurement process. This centralization eliminates manual tasks and reduces errors, leading to improved accuracy in orders and inventory management. Furthermore, an ERP system enhances visibility into spending and supplier performance, enabling better negotiation power and cost savings. It also facilitates automation of routine tasks like purchase order generation and invoice processing, freeing up staff for more strategic activities. Ultimately, an ERP system empowers small companies to optimize their purchasing operations, reduce costs, and make more informed decisions.
A manufacturing enterprise purchases raw material, converts the raw material to finished goods and services, and sells the finished goods and services to customers. This tutorial will cover manually purchasing a short list of items in a Bill of Materials – commonly known simply as the “BOM” (pronounced “bomb”, which itself is interesting since “exploding a BOM” means to consider the items on the BOM individually).
Purchasing can also be done semi or fully automatically based on demand (sales order, manufacturing order or forecast), which will be the topic of a seperate tutorial.
Features of using webERP for purchasing include:
- Efficiency. Items, Vendors, Purchase Orders, etc. are managed within one controlled system. Fix a problem once and it’s fixed everywhere.
- Visibility. Purchases must be approved before printing and payment must be approved before being issued.
- Scalable. Readily scales with users, items, vendors and orders, and adapts as your processes change over time.
The custom inductor in the Aircraft Wireless will be used as an example. Documentation will be stored in the webERP Knowledge Base (integration with WackoWiki CMS).
Goals
- Issue purchase orders to a vendor.
- Receive goods into inventory.
- Create a vendor invoice and pay the vendor.
Purchasing Terms
- A Vendor is a party who sells goods or services, other names often used are Supplier and Source.
- A Purchase Order is a request to purchase an item sent from the intended purchaser to a vendor. If the vendor accepts the purchase order, it becomes a legally binding contract.
Procure to Pay (P2P) Process
The complete purchasing and payment process cycle is commonly called Procure to Pay, or P2P.
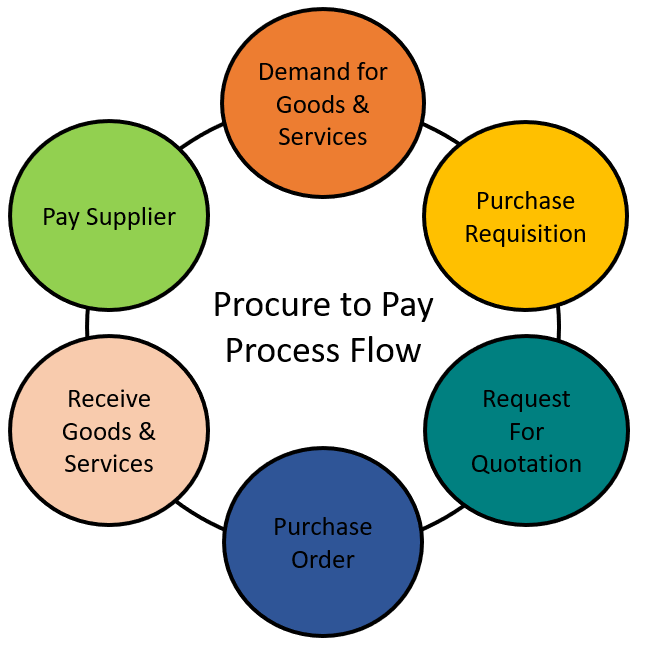
TODO re-generate image as original art with steps named per webERP convention and in style of O2C flowchart (see Sell with webERP)
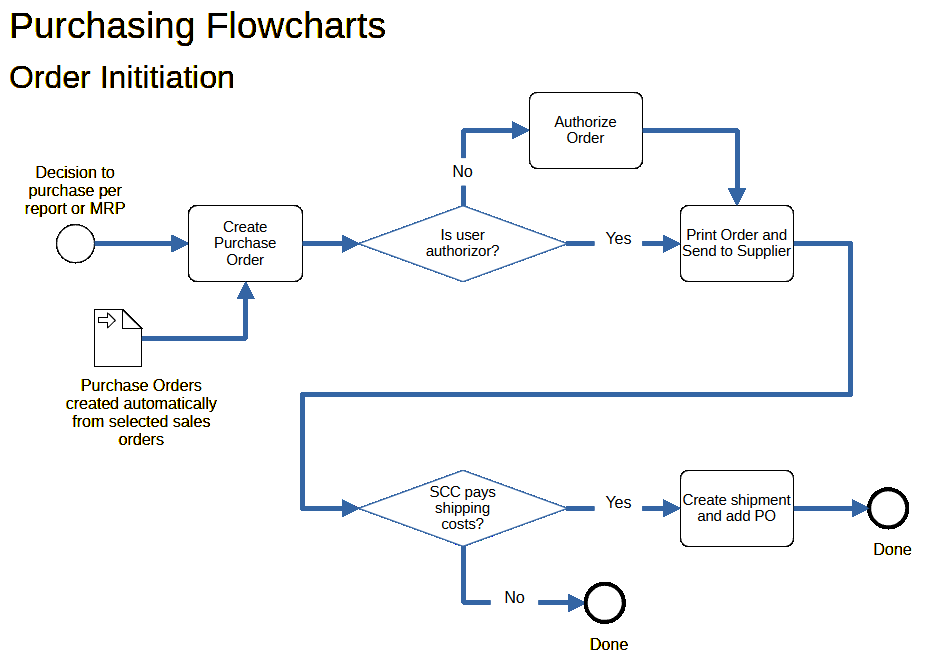
Purchasing Flowcharts
The general purchaing process in webERP is as follows:
- Step 1. Create, print and send a purchase order to a vendor. The order will be approved and can be printed if the creator has authorization permission, otherwise it will be queued for authorization by someone who does have authorization. “Printing” is a euphemism for issuing the order to the vendor, and an order must be printed before stock can be received against it.
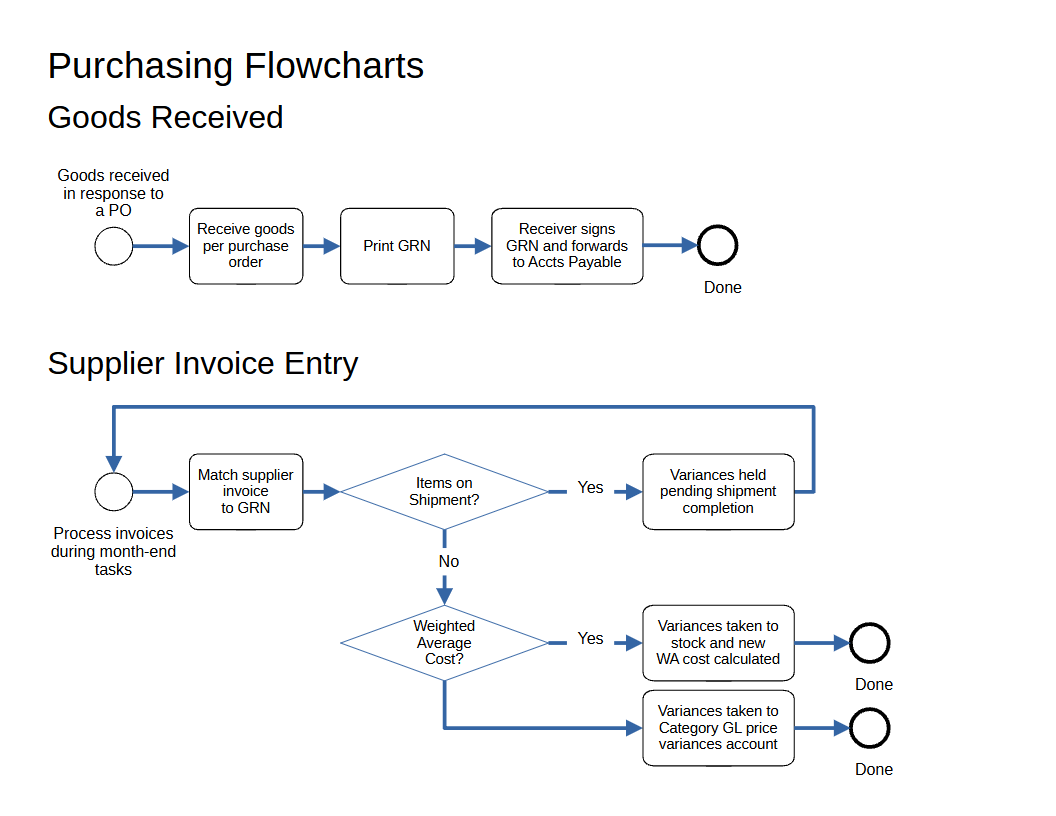
- Step 2. Receive stock against purchase order.
- Step 3. Print a Goods Received Note and submit to the Accounts Payable department for matching to the vendor invoice.
- Step 4. Print and attach QA labels to the received goods.
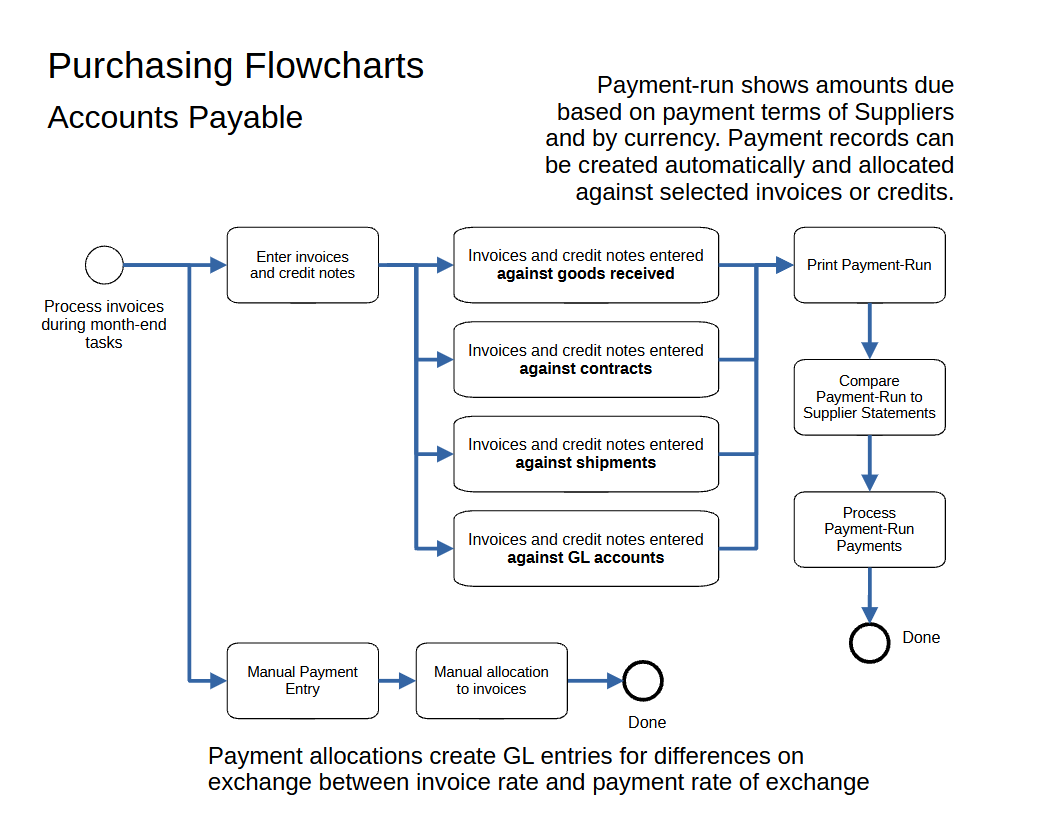
- Step 5. Pay Vendor. Payment is often made after goods are received according to the purchase terms (e.g. “30 day”) although other terms, such as prepayment and cash on delivery (COD), are also common. To pay a supplier, a supplier vendor invoice must be created and matched to the order and to the a goods receipt note (GNR).
TODO replace flow-charts with single swim-lane drawing
User Permissions
We will login as user “mnestor” (Mary Nestor), who is assigned the Administrator security role and has permission for almost all operations. If a user with a different security role is needed it will be noted.
In actual use each user should have their own login ID and configure a password that only they know. This enabled webWEP to correctly attribute transactions and other events for tracibility. While a single user ID with all security privileges could be used, it circumvents simple role-based user controls that prevent accidental errors. Also any business planning to scale rapidly based on standardized work flows, or that operates in a regulated industry, will require individual user login IDs.
The default (out-of-the-box) user permissions and security configuration will generally be sufficient to get you started. Eventually though you will want to create bespoke security roles and token assignments based on the structure, staff and relationships of your company.
Configuring user permissions is covered in more detail in the webERP User Permissions chapter.
Setup
Purchase Order Authorization
To simplify matters, we will follow the process as a user whose a security role allows purchase order creation but also to authorize them. While it is desirable to seperate these functions into different people for risk and security reasons, but this is not necessarily possible for a small company and approving an order would be an unnecessary and annoying second step.
Purchase order authorization was enabled via [Main Menu > Setup > System Parameters], each currency must be individually authorized via [Main Menu > Setup > Receivables/Payables Setup > Set Purchase Order Authorisation Levels]

Bank Accounts
Bank accounts must be entered before recording payment to a vendor is possible.
[Main Menu > General Ledger > Maintenance > Bank Accounts]
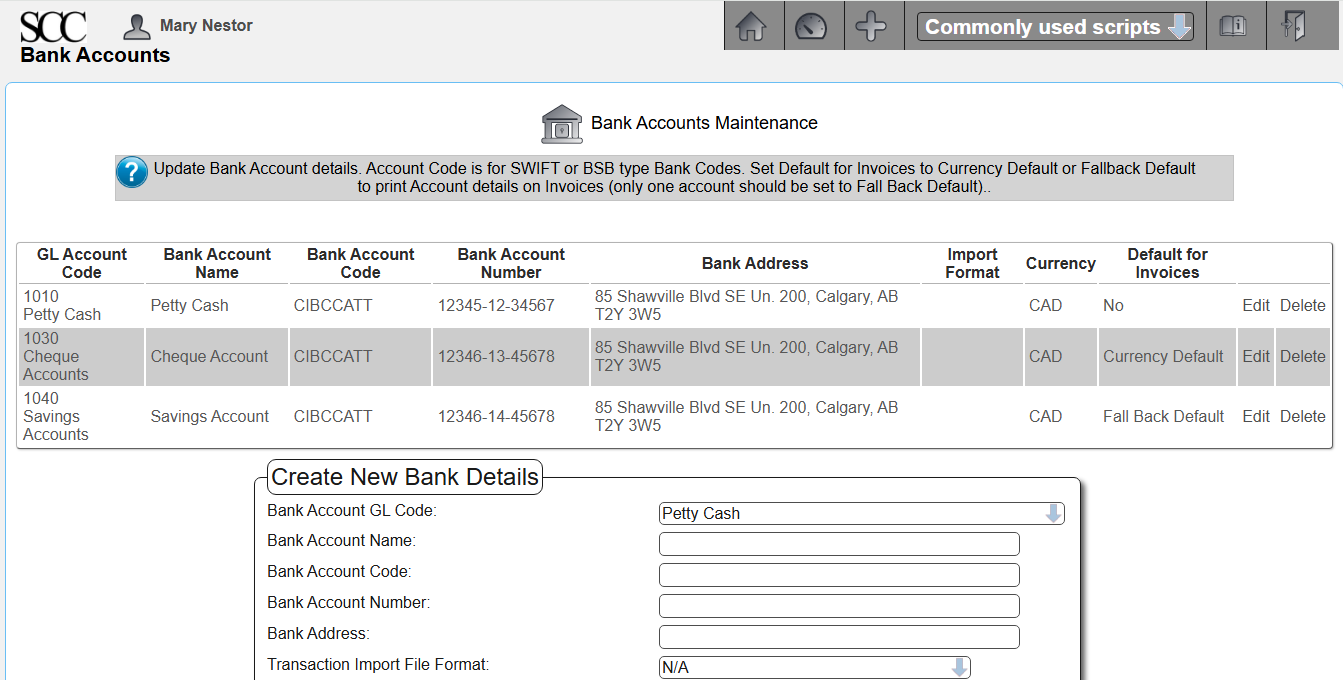
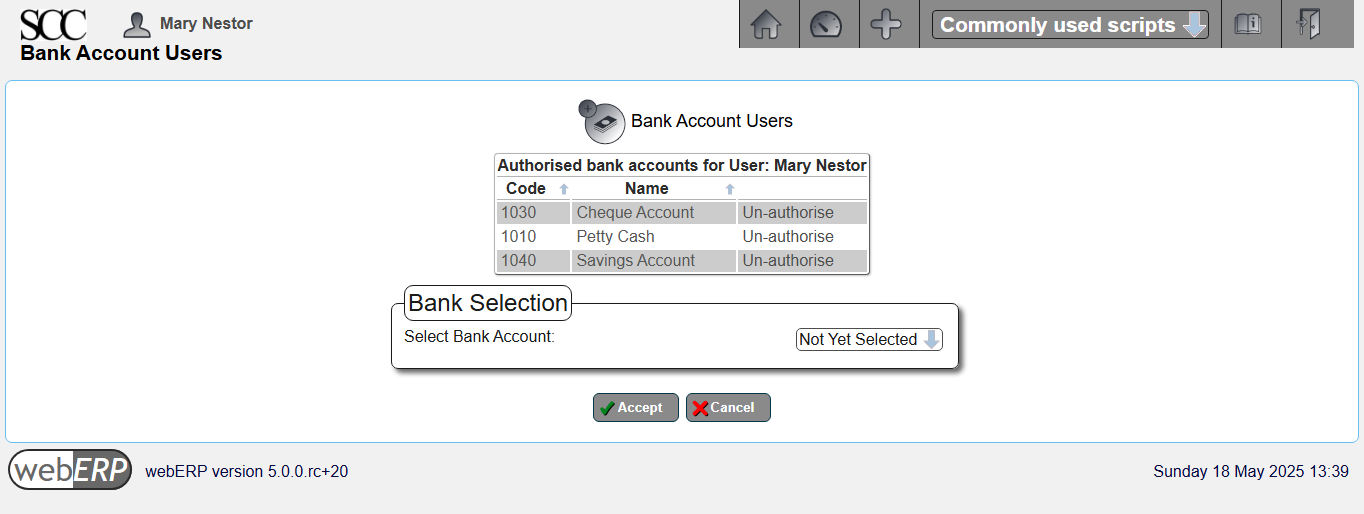
In addition to entering the bank account information, the user must also have authorization to use the bank accounts.
Bank account authorization can be accessed either by user or bank account.
[Main Menu > General Ledger > Maintenance > User Authorized Bank Accounts]
Tax Group
Although the Supplier is created when a bought-in Item is created in the PLM (Product Lifecycle Management) process, taxes are managed as a purchasing function.
The tax group determines the tax authorities to which the supplier reports and must collect taxes for. The tax group in conjunction with the inventory location record determines the rates of tax used in the automatic calculation of tax on suppliers invoices and credits. These rates can be over-ridden at invoice entry time.
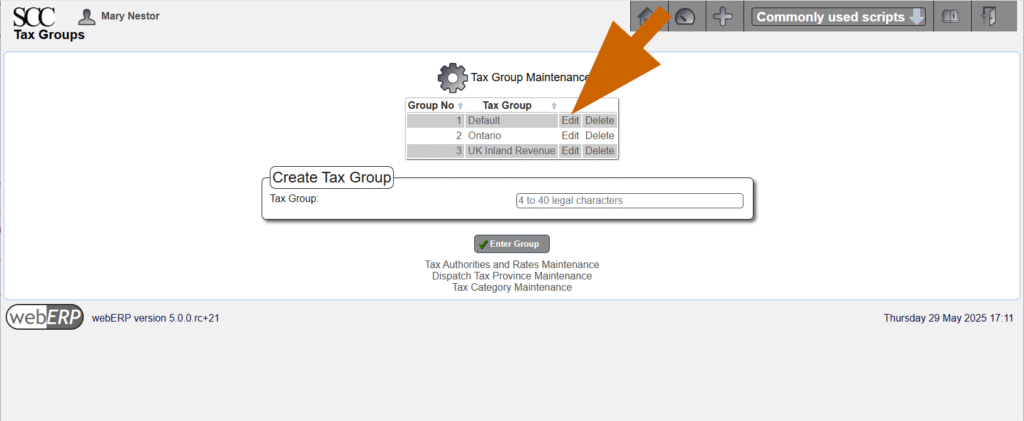
Tax groups are created using the Tax Group Maintenance menu selection, we have created a “Default” tax group for purchases from Canadian suppliers received at the SCC’s main address in Alberta.
[Main Menu > Setup > General Setup > Tax Group Maintenance]
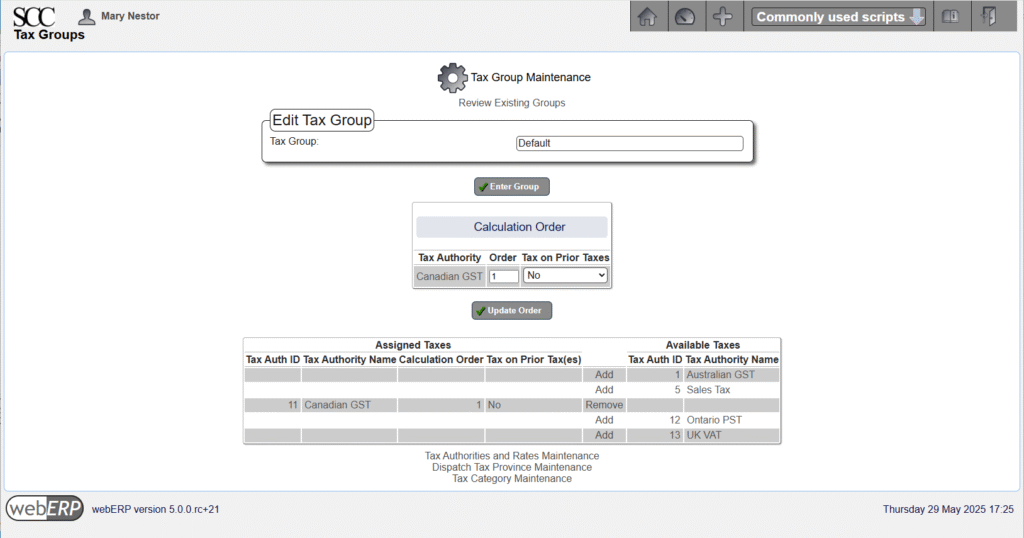
Edit the Tax Group to assign the appropriate Tax Authorities. You can see below that Canadian GST is the only tax authority assigned to the Default Tax Group.
Order Items
Before an inductor can be produced, the necessary raw material must be purchased.
For bought-in Items, it may be reasonable to insist supplier information must be entered when a new bought-in Item is created, which has already been done for the Items we will be ordering.
To see how a new supplier is created, refer to webERP tutorial “Manage Parts, Vendors and BOMs using webERP”.
This is the Bill of Materials (BOM) for item 100-0004 “IND, 830UH, AIRCRAFT WIRELESS”:
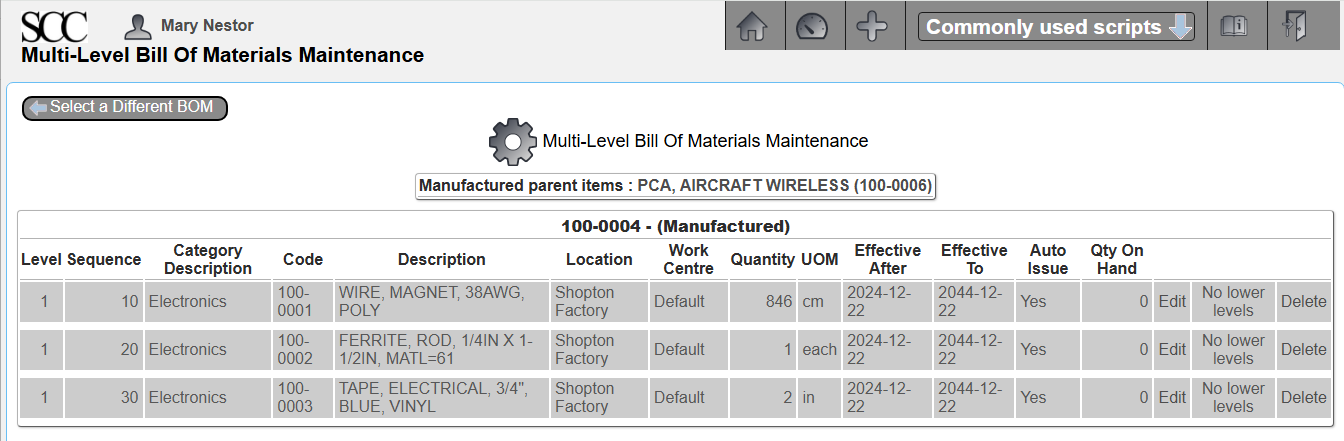
The unit of measure (UOM) for item 100-0001 wire is centimeters (cm), which means the wire will be received, stocked (kept in inventory) and consumed measured in centimeters. As we will see though, the wire will be purchased by spools, which is the vendor unit of measure, and the manufacturer’s datasheet shows there are 19,300 feet of wire on a spool (for more detail see my post Mange Parts, Vendors and BOMs using webERP).
Issue Order
One method to start the order process is by selecting the item to purchase.
[Main Menu > Inventory > Select Item > Search > Select]
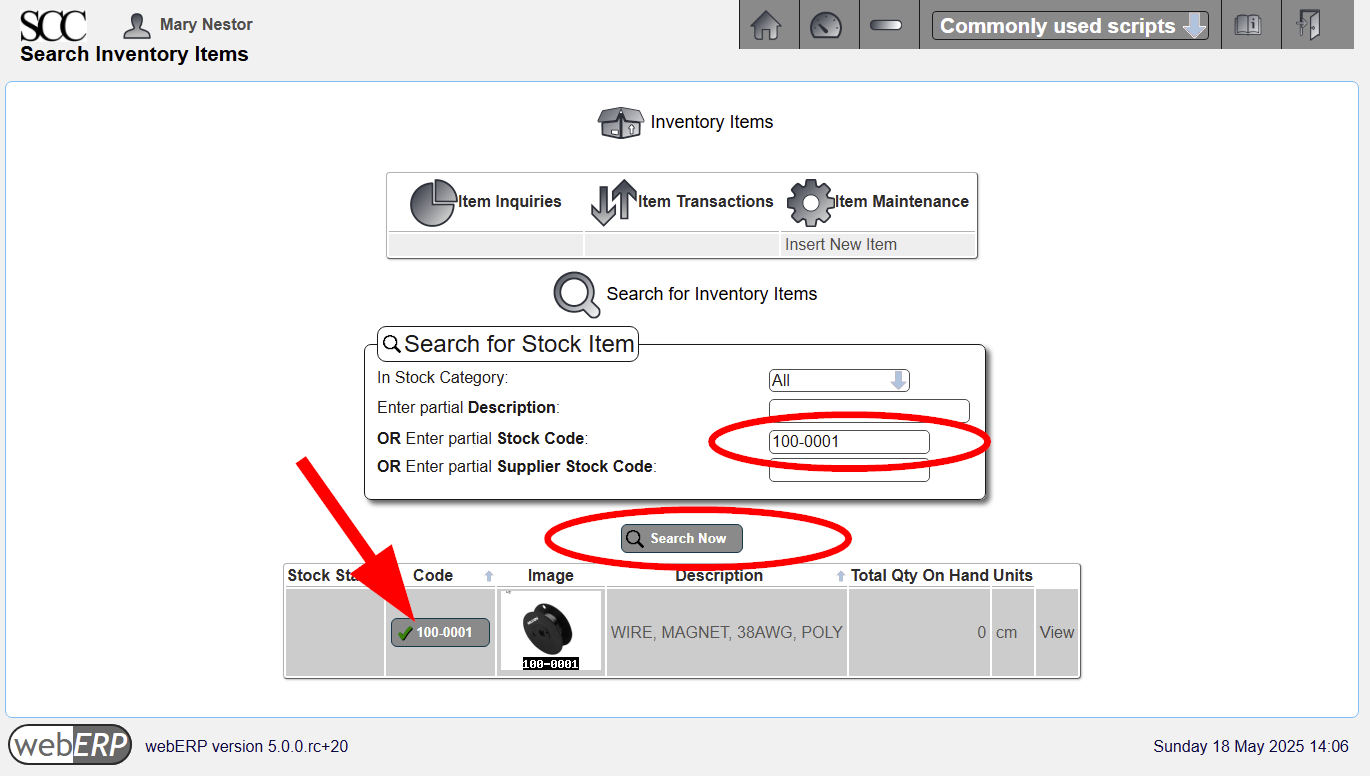
After selecting item 100-0001 an order can be initiated.

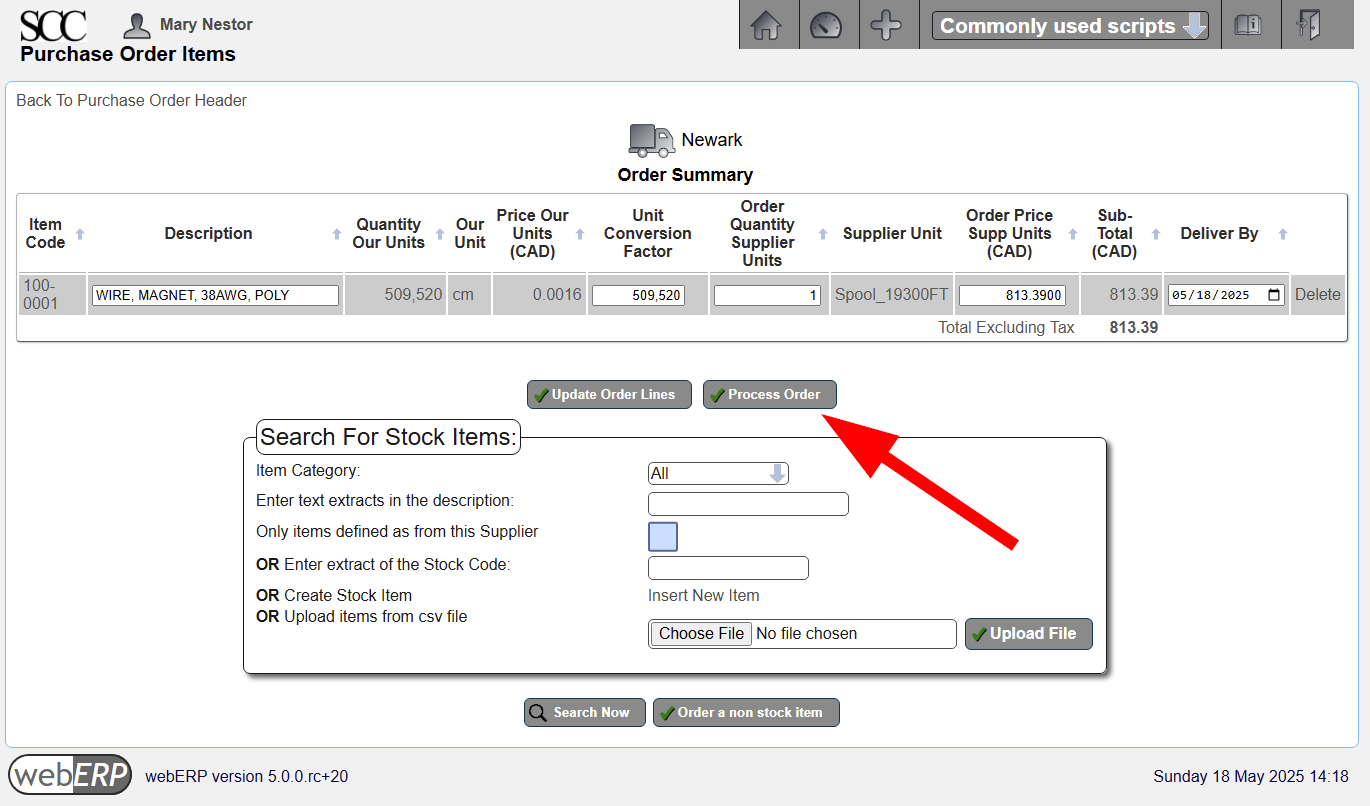
The order defaults to quantity 1 (spool), which in theory should be enough for 600 inductors. To place the order, click [Process Order].
If you change any values, you must click [Update Order Lines] before processing the order.
The order will be authorized automatically during processing because automatic authorization is enabled and the user Mary Nestor has purchase order authorization privileges. After processing, links are provided to Print Purchase Order or Receive and Enter Purchase Invoice.
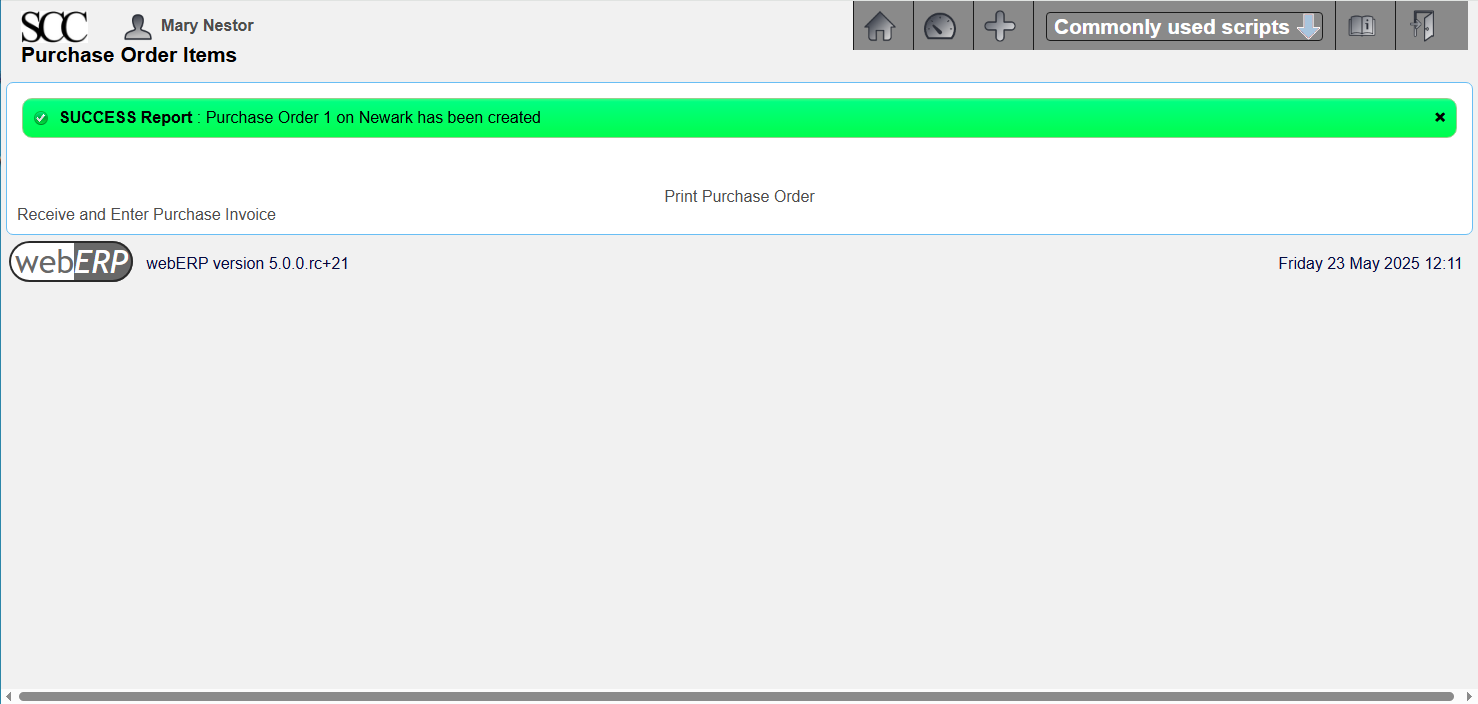
Printing the order creates a PDF document that can be saved or printed locally, or emailed to the vendor directly from webERP. More significantly, printing an order means to webERP that the order has been accepted by the vendor.
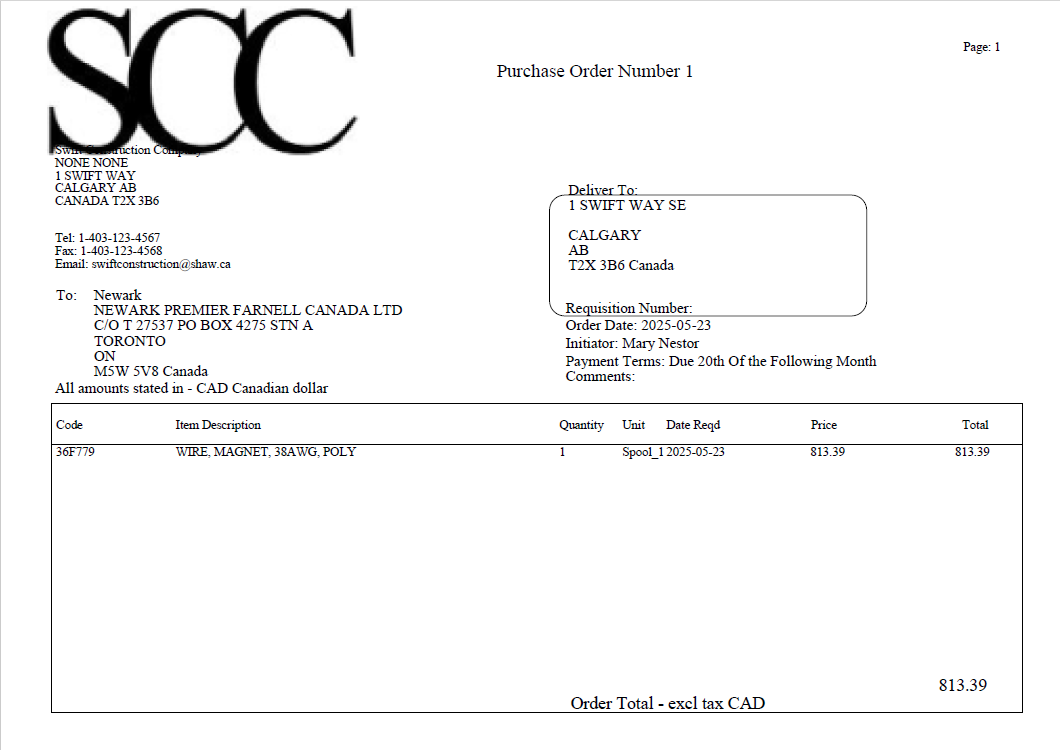
When a verbal order is given to a vendor, often the arrival of an invoice from the vendor is the trigger to create a purchase order. This is why a command to create a vendor invoice is provided. However, in this case, we will receive the order (i.e. recognise goods receipt) before creating a vendor invoice.
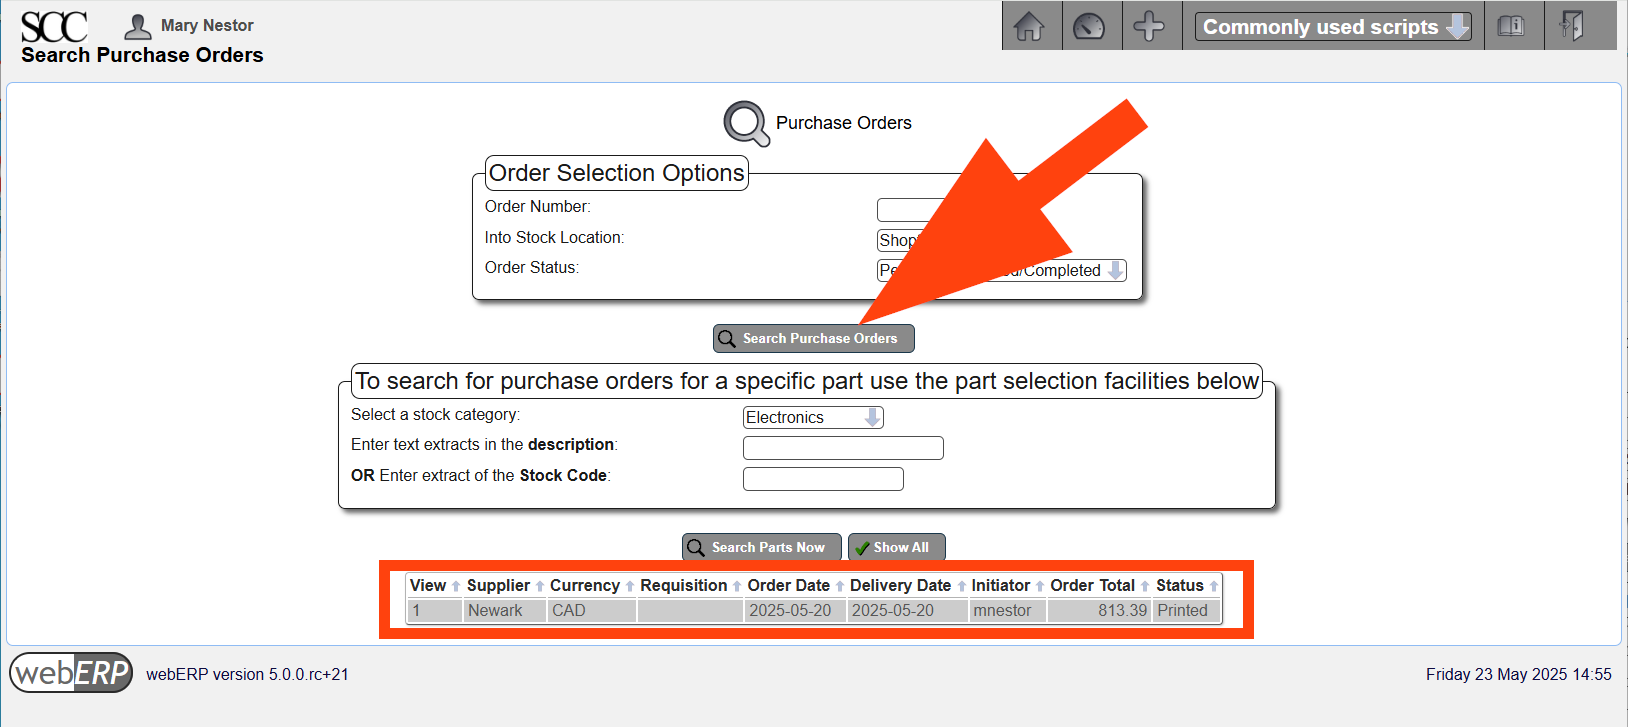
You can see that an order has been issued by searching for outstanding purchase orders.
[Main Menu > Purchases > Inquiries and Reports > Purchase Order Inquiry]
Receive Order
Orders are generally received after goods have been received or services have been performed. For physical goods, receiving can be considered to be when ownership of the goods transfers from vendor to company.
We will start the receiving process by searching for outstanding orders for item 100-0001.
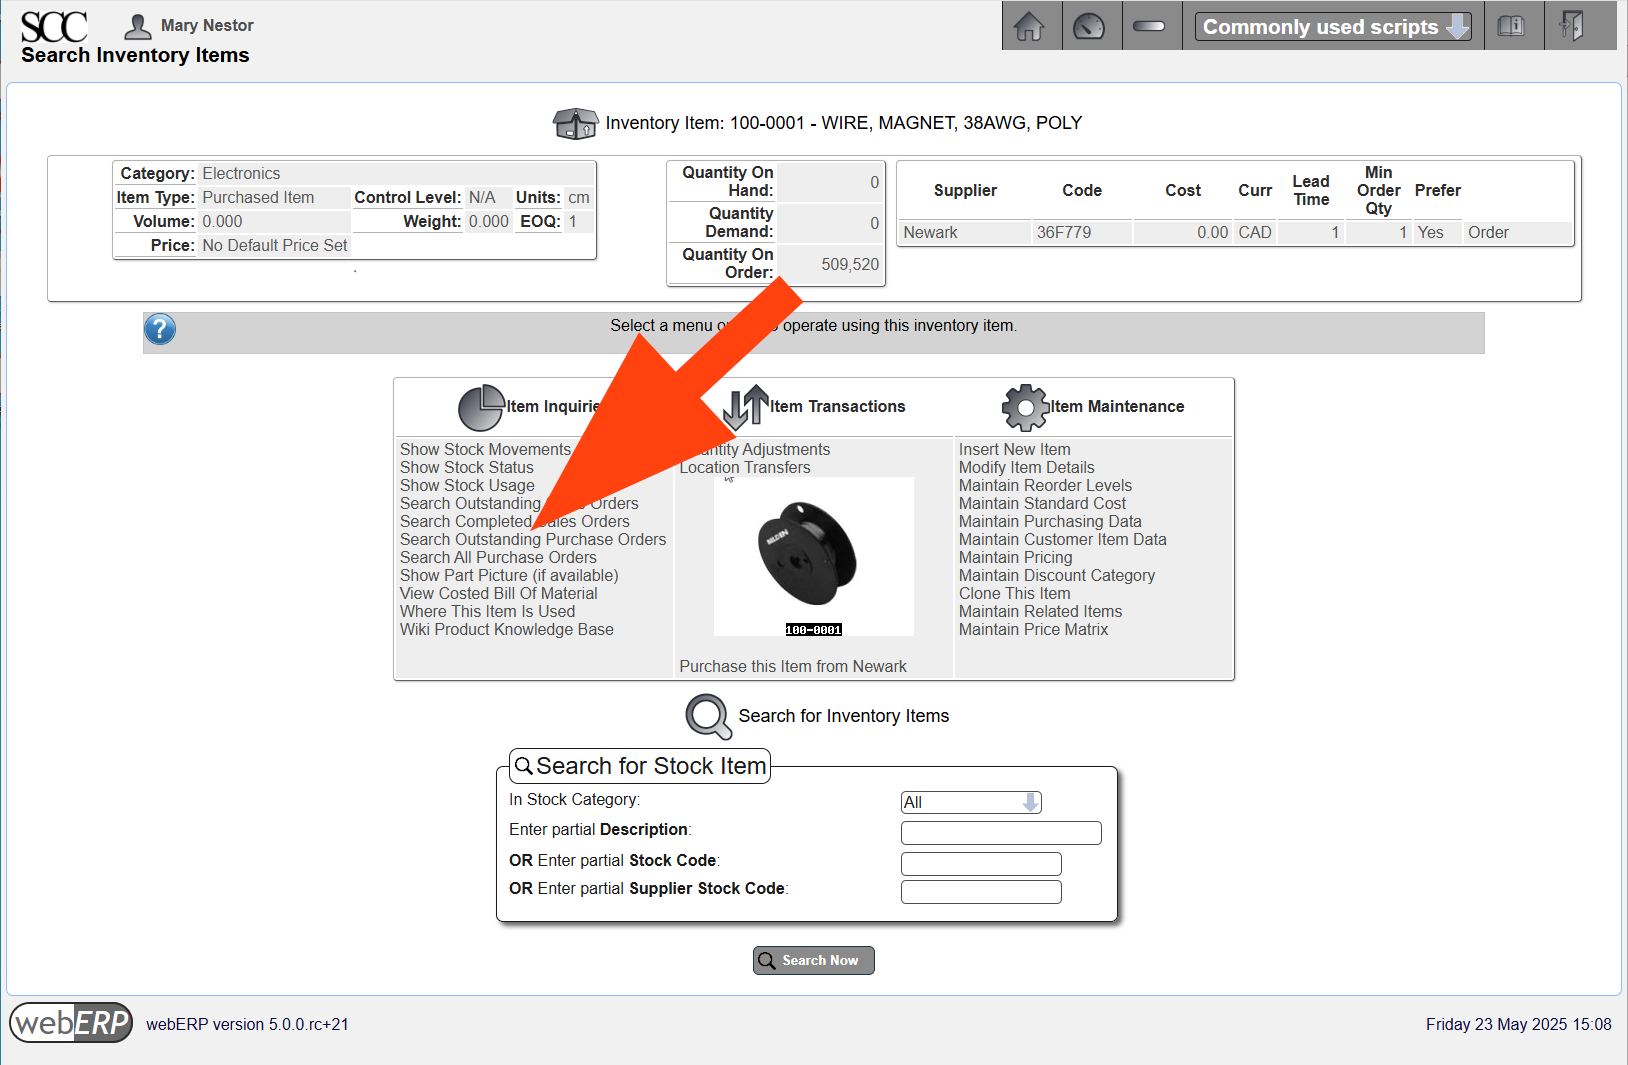
After selecting the appropriate purchase order, the order can be received so long as it has been authorized and printed.
[Main Menu > Inventory > Select an Item > {select 100-0001} > Search Outstanding Purchase Orders > {select PO #} > Receive]

The Goods Received screen shows and allows the quantities received to be entered. The quantity in purchase units is shown together with the conversion factor from purchase units to the item’s unit of measure. Enter the receive quantity must be entered in the item’s unit of measure.
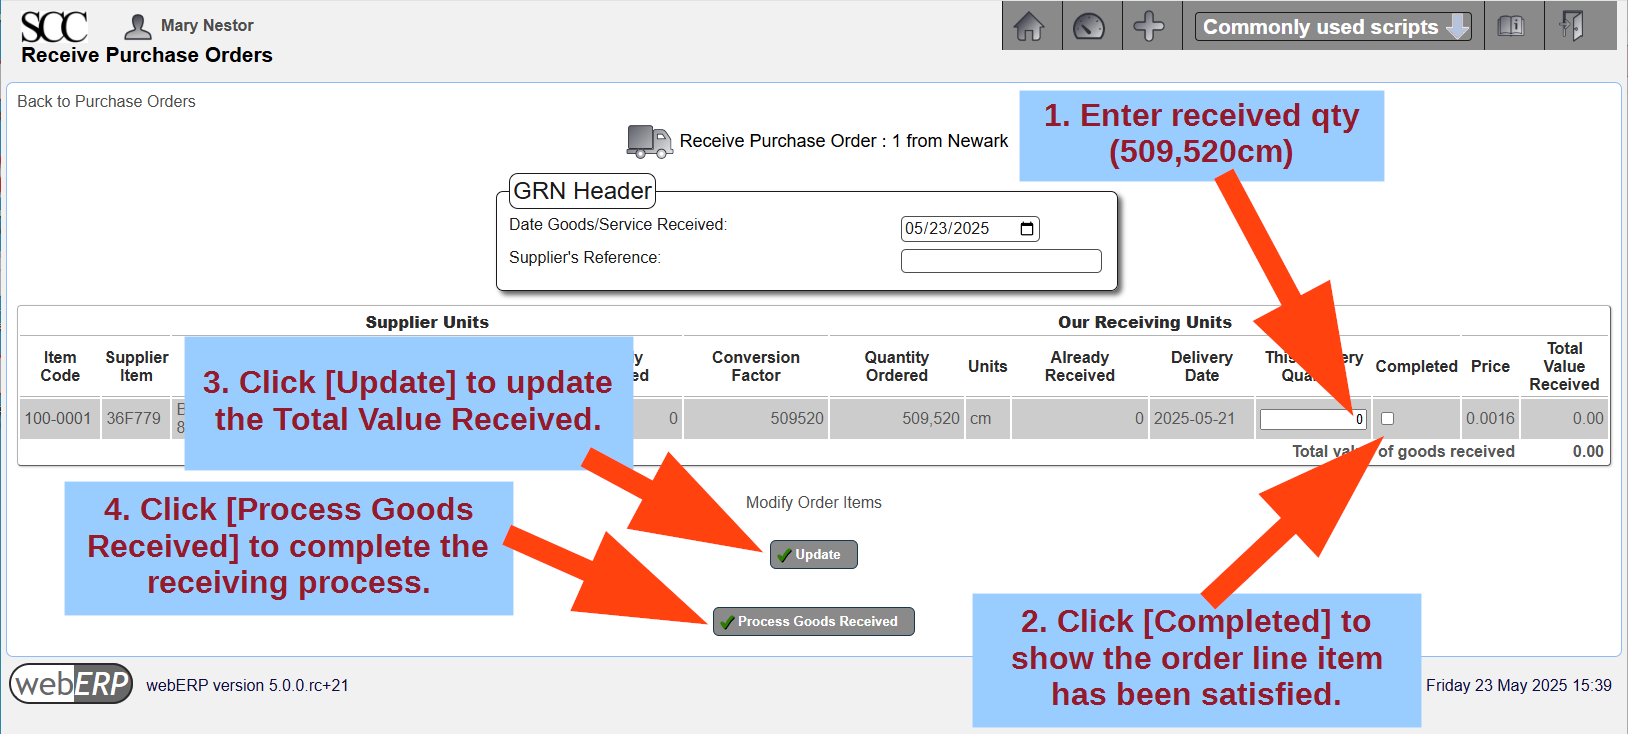
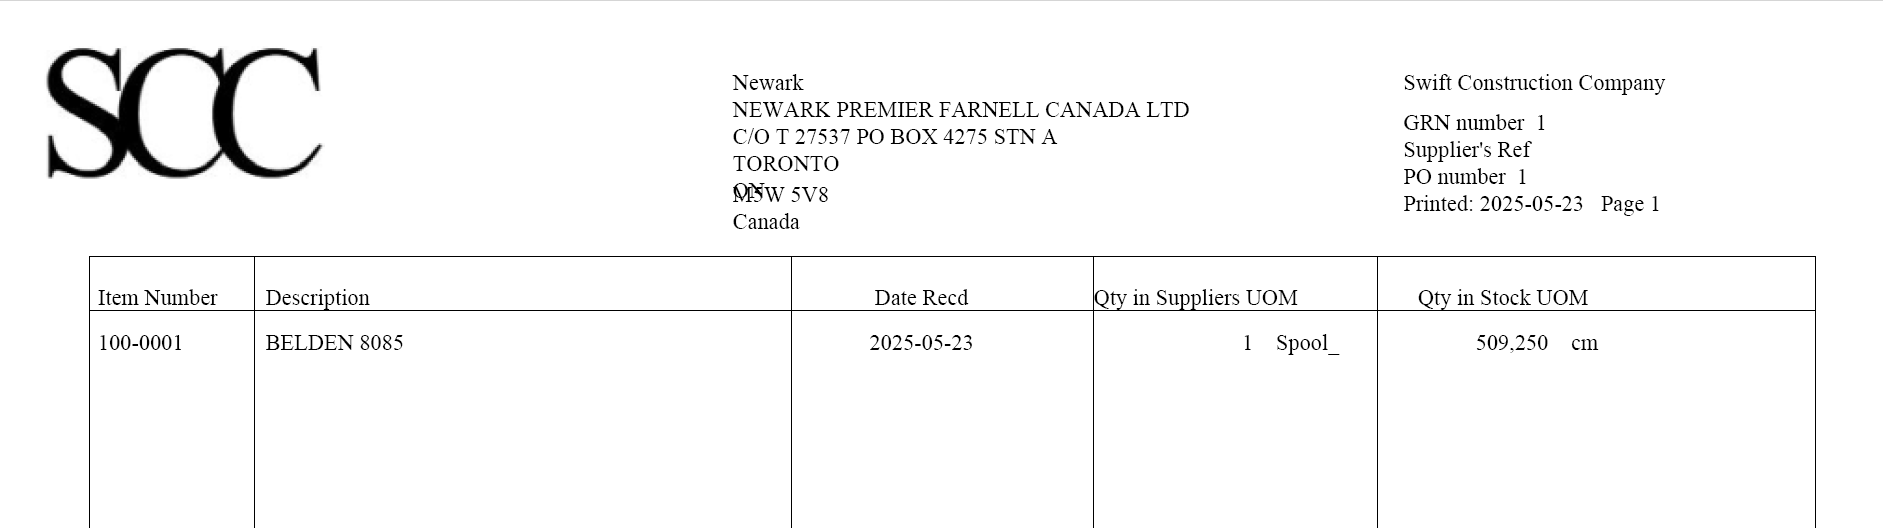
After processing, links are provided to print a Goods Received Note (GRN) and to print QA labels for sticking on the physical goods for identification.
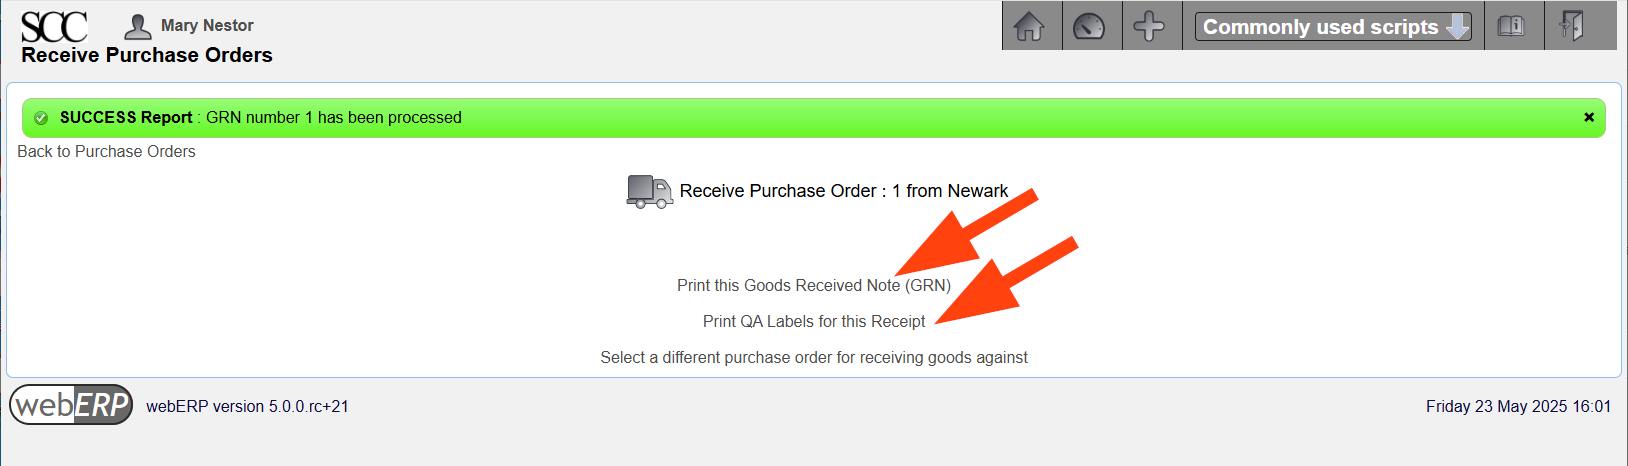
Per SCC protocol, the receiver prints, signs and sends the GRN to the Accounts Payable department, where it will be matched with the vendor invoice before payment is made.
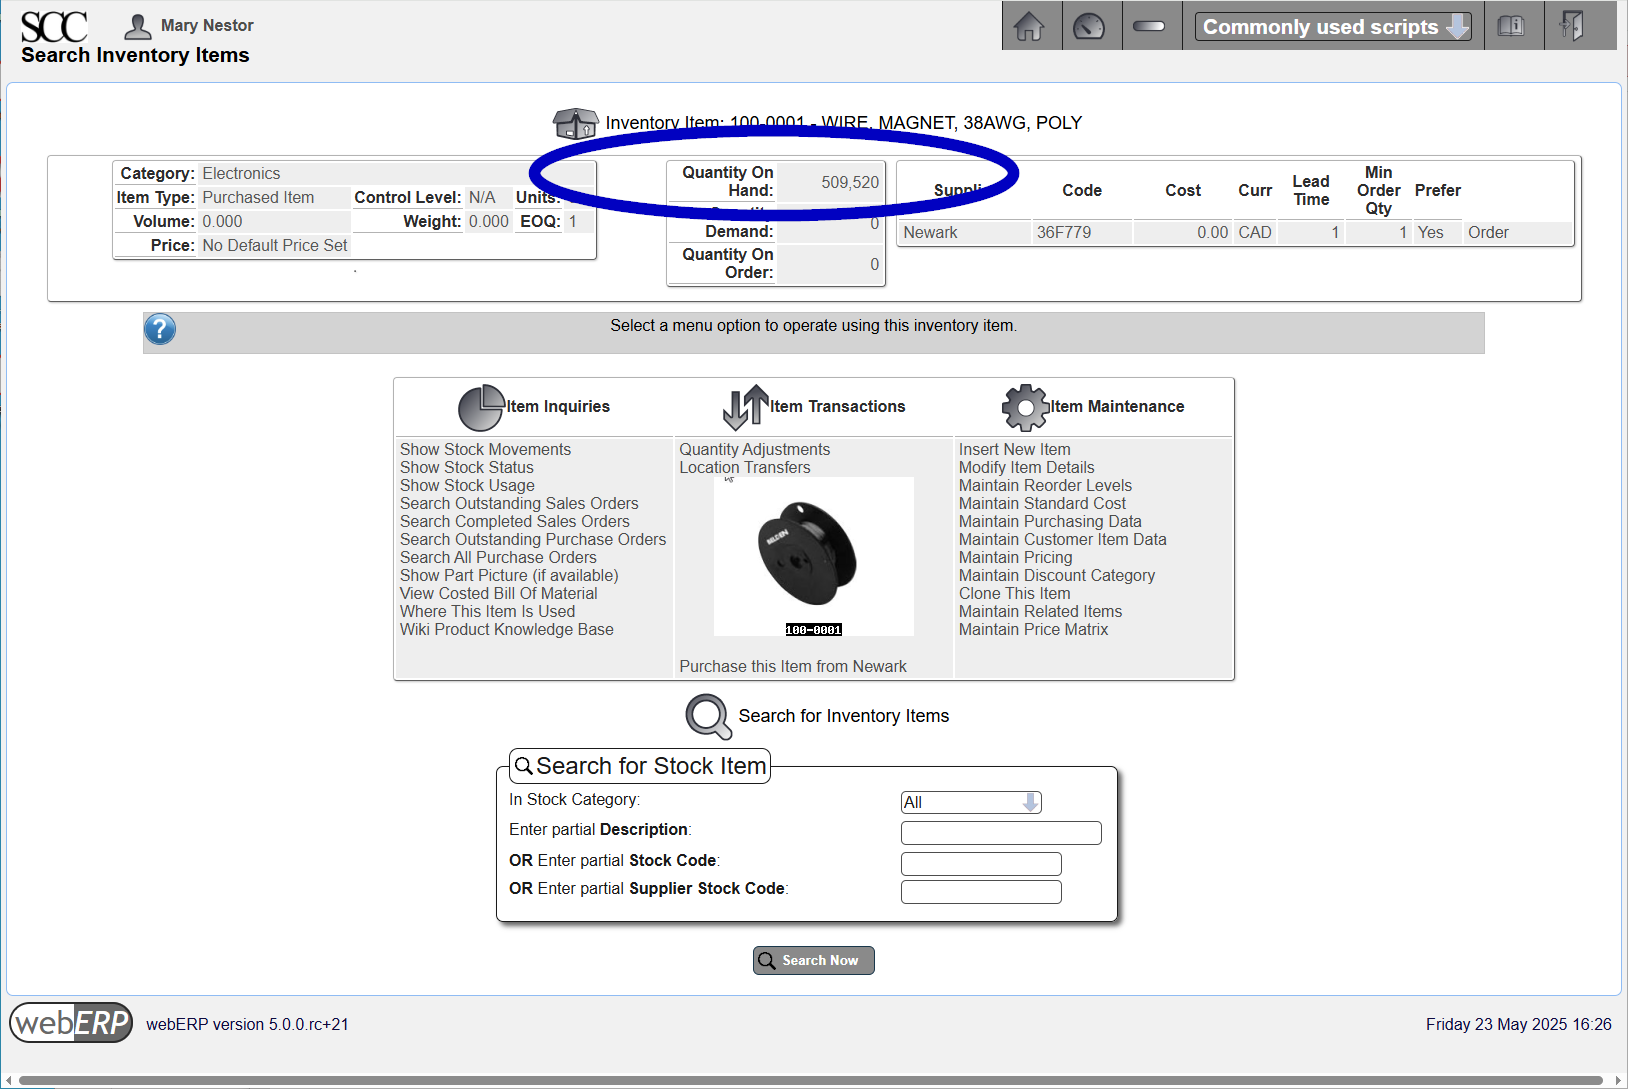
If you view Item 100-0001 again you will see the quantity on hand now reflects the received order.
Pay Supplier
Create Supplier Invoice
A supplier invoice is created to record an invoice received from a supplier for goods or services provided. A common industry process is to match the vendor invoice to 1) the purchase order and 2) a goods receipt notice (GRN), before issuing payment to the supplier.
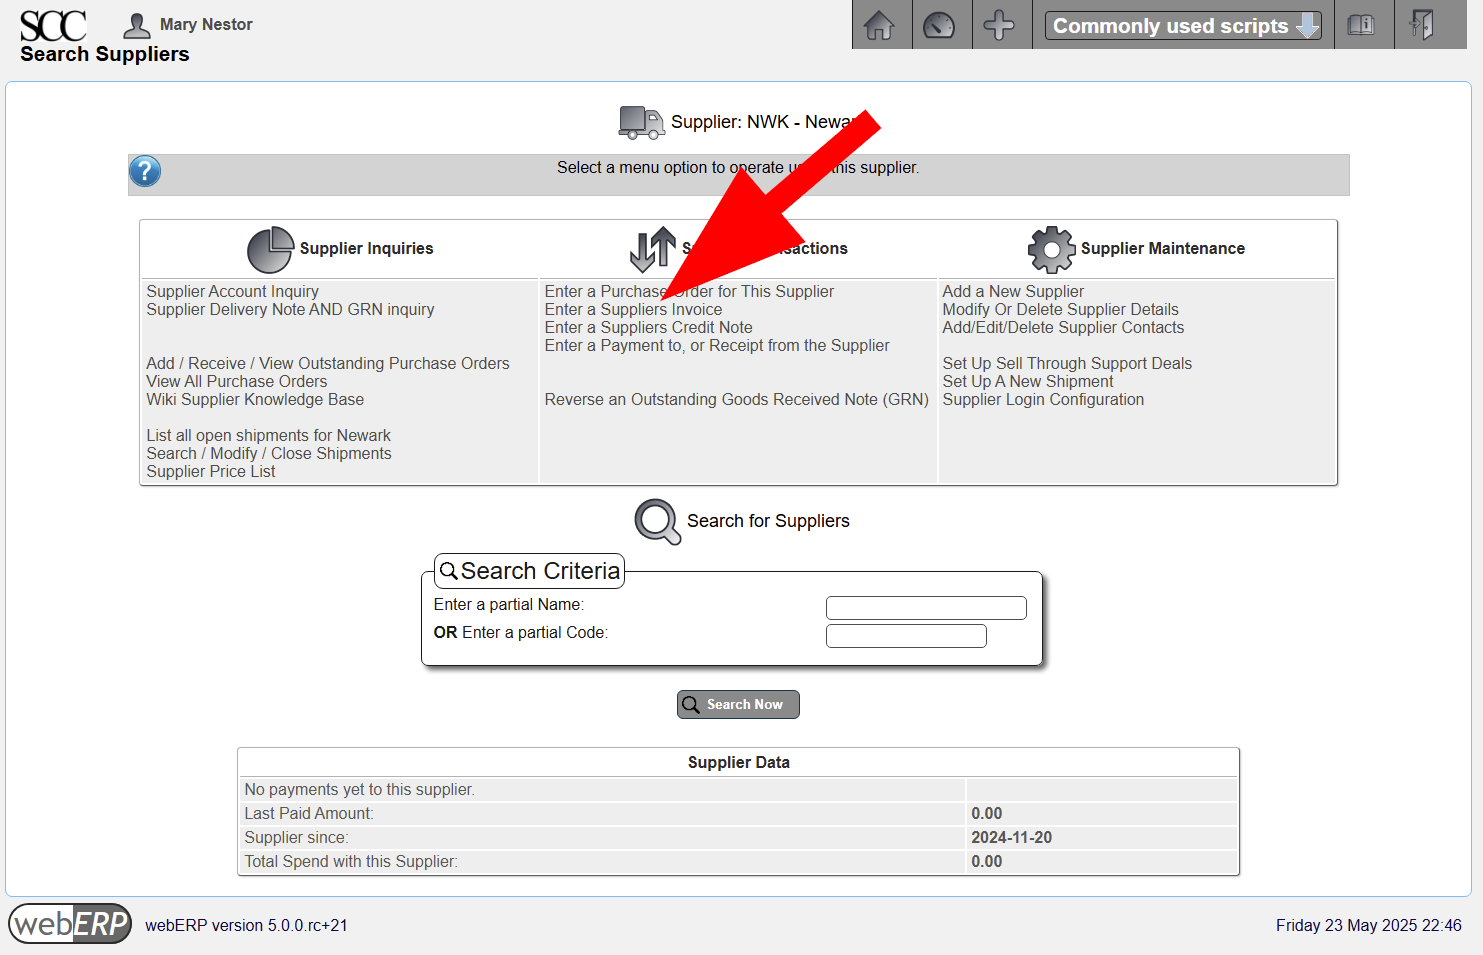
One way to start the supplier invoice process is to search for the supplier providing the invoice following [Main Menu > Payables > Select Supplier > Search > {select supplier}]
After selecting the supplier, click [Supplier Transactions > Enter a Supplier Invoice].
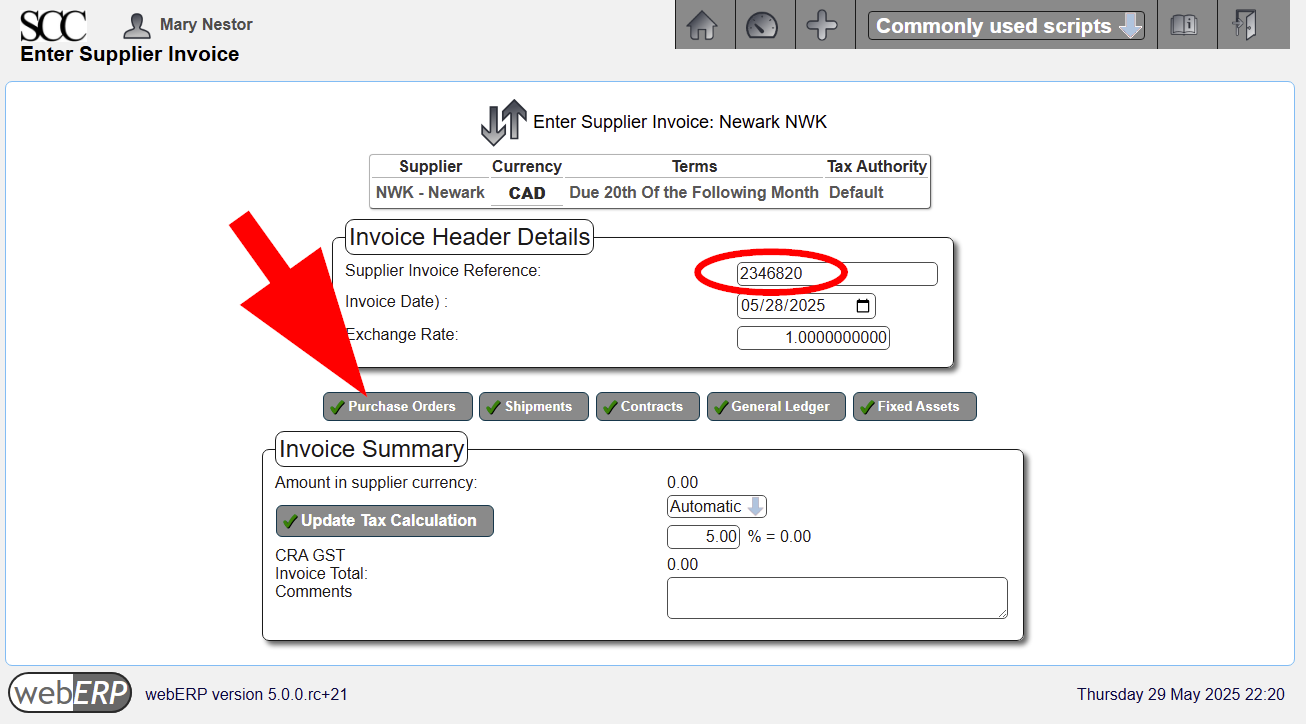
Enter a reference identifier for the supplier invoice if one is available.
Supplier invoice references must be unique for each supplier.
Next, click the [Purchase Order] button and match the vendor invoice to the purchase order.
[Main Menu > Vendors > Vendor Transactions > Enter a Vendor Invoice > Purchase Order]
Select the purchase order line item that the vendor invoice pertains to and add to the invoice.
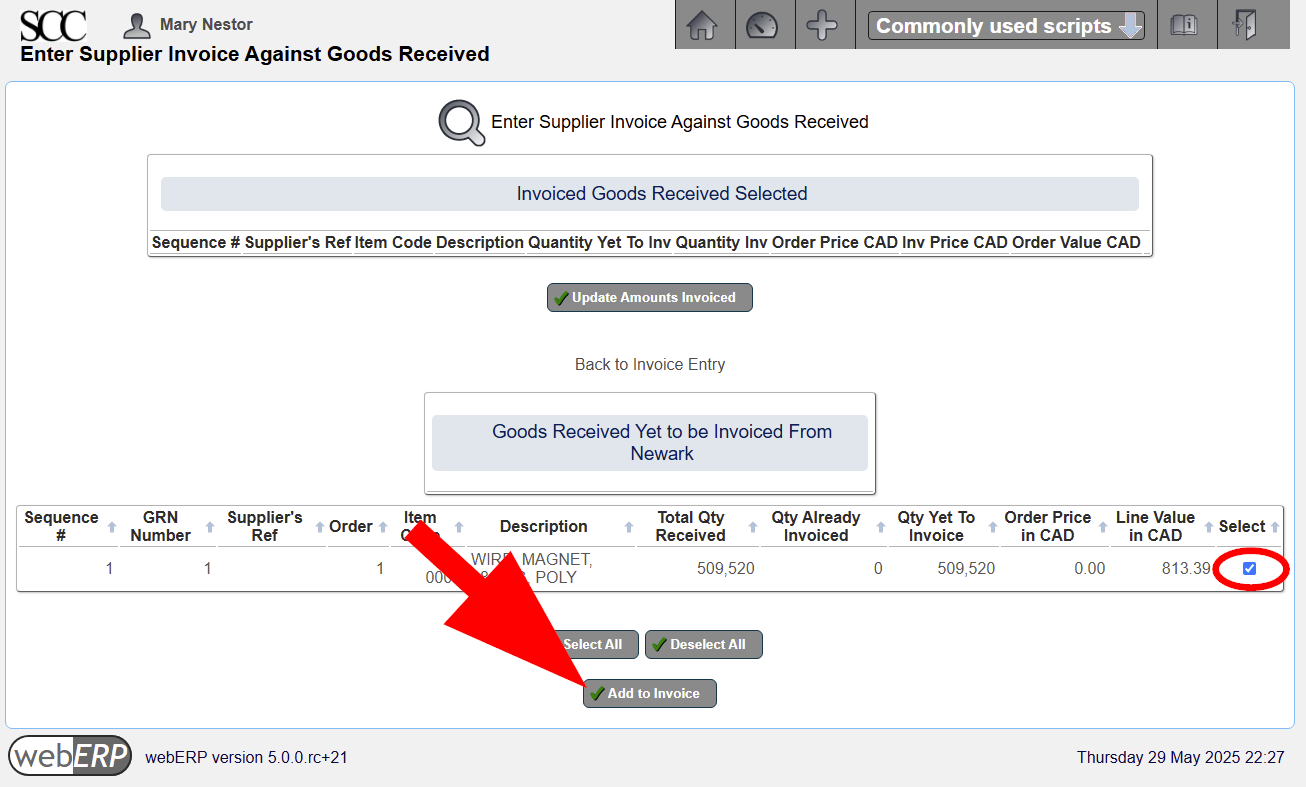
After adding the order reference to the vendor invoice, return to invoice entry.

Add a comment and enter the invoice.
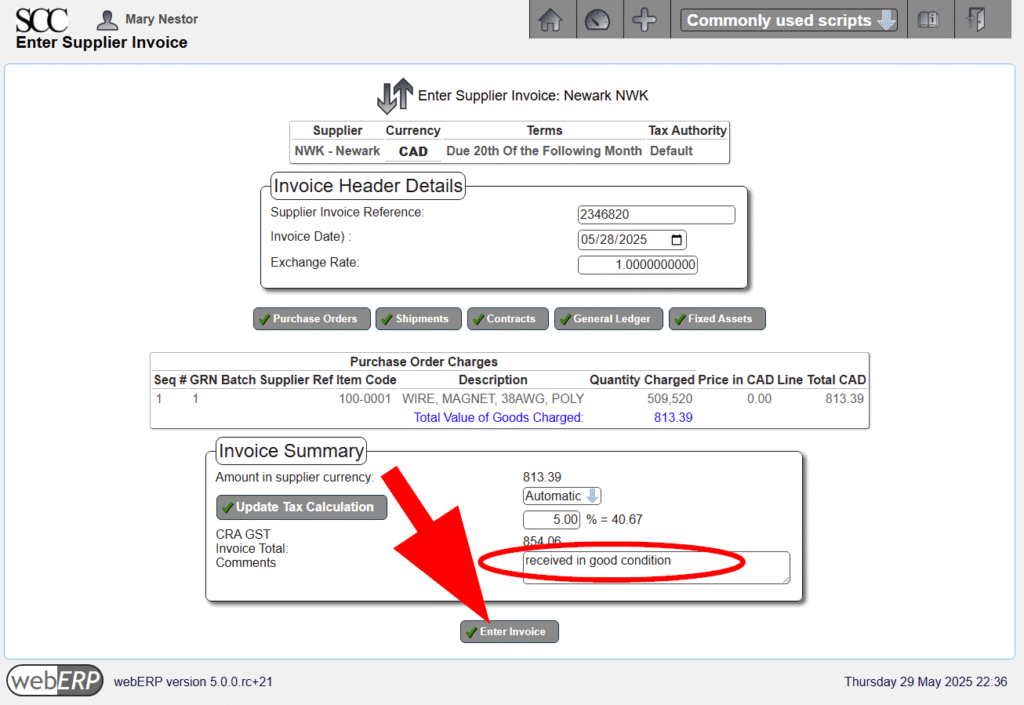
The vendor invoice has now been created.

You could next record payment of the invoice using the Enter Payment function, but we will start from the beginning to reinforce the procedure.
Issue Supplier Payment
FOLLOWING CONTENT HAS NOT BEEN UPDATED TO webERP v5 (images and text refer to v4)
The vendor can be paid as soon after a purchase order has been printed, a goods receipt notice has been created, and a vendor invoice been created. However vendors will typically be paid based on operational procedures and vendor payment terms. One way to start the vendor payment process is to select the vendor again.
[Main Menu > Vendors > Select Newark]
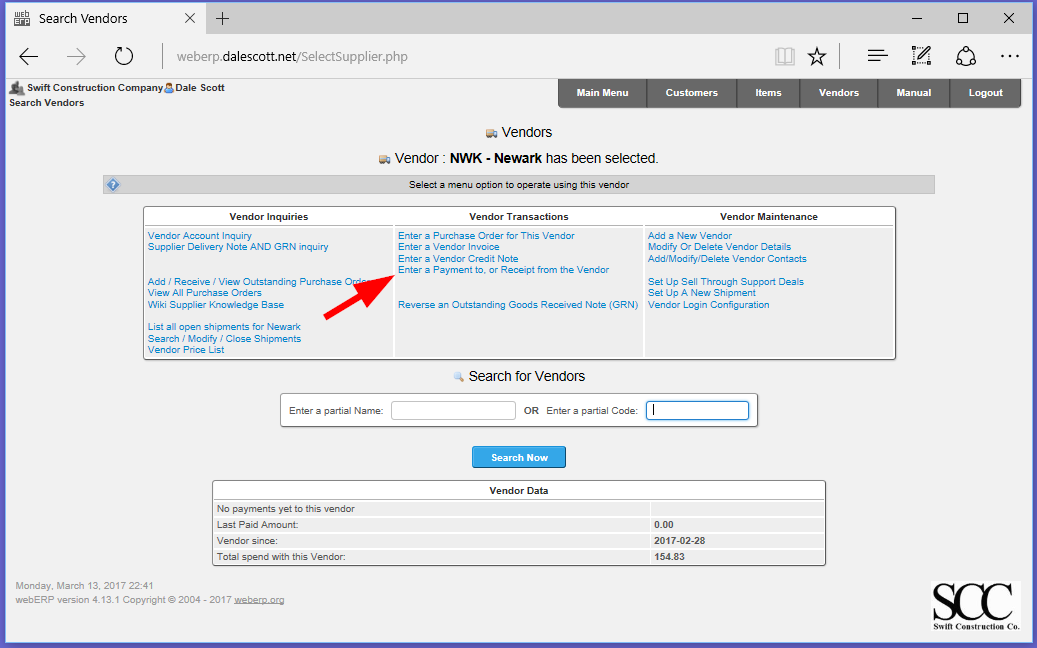
Use the Enter a Payment to, or Receipt from the Vendor command to access the Bank Account Payment Entry screen.
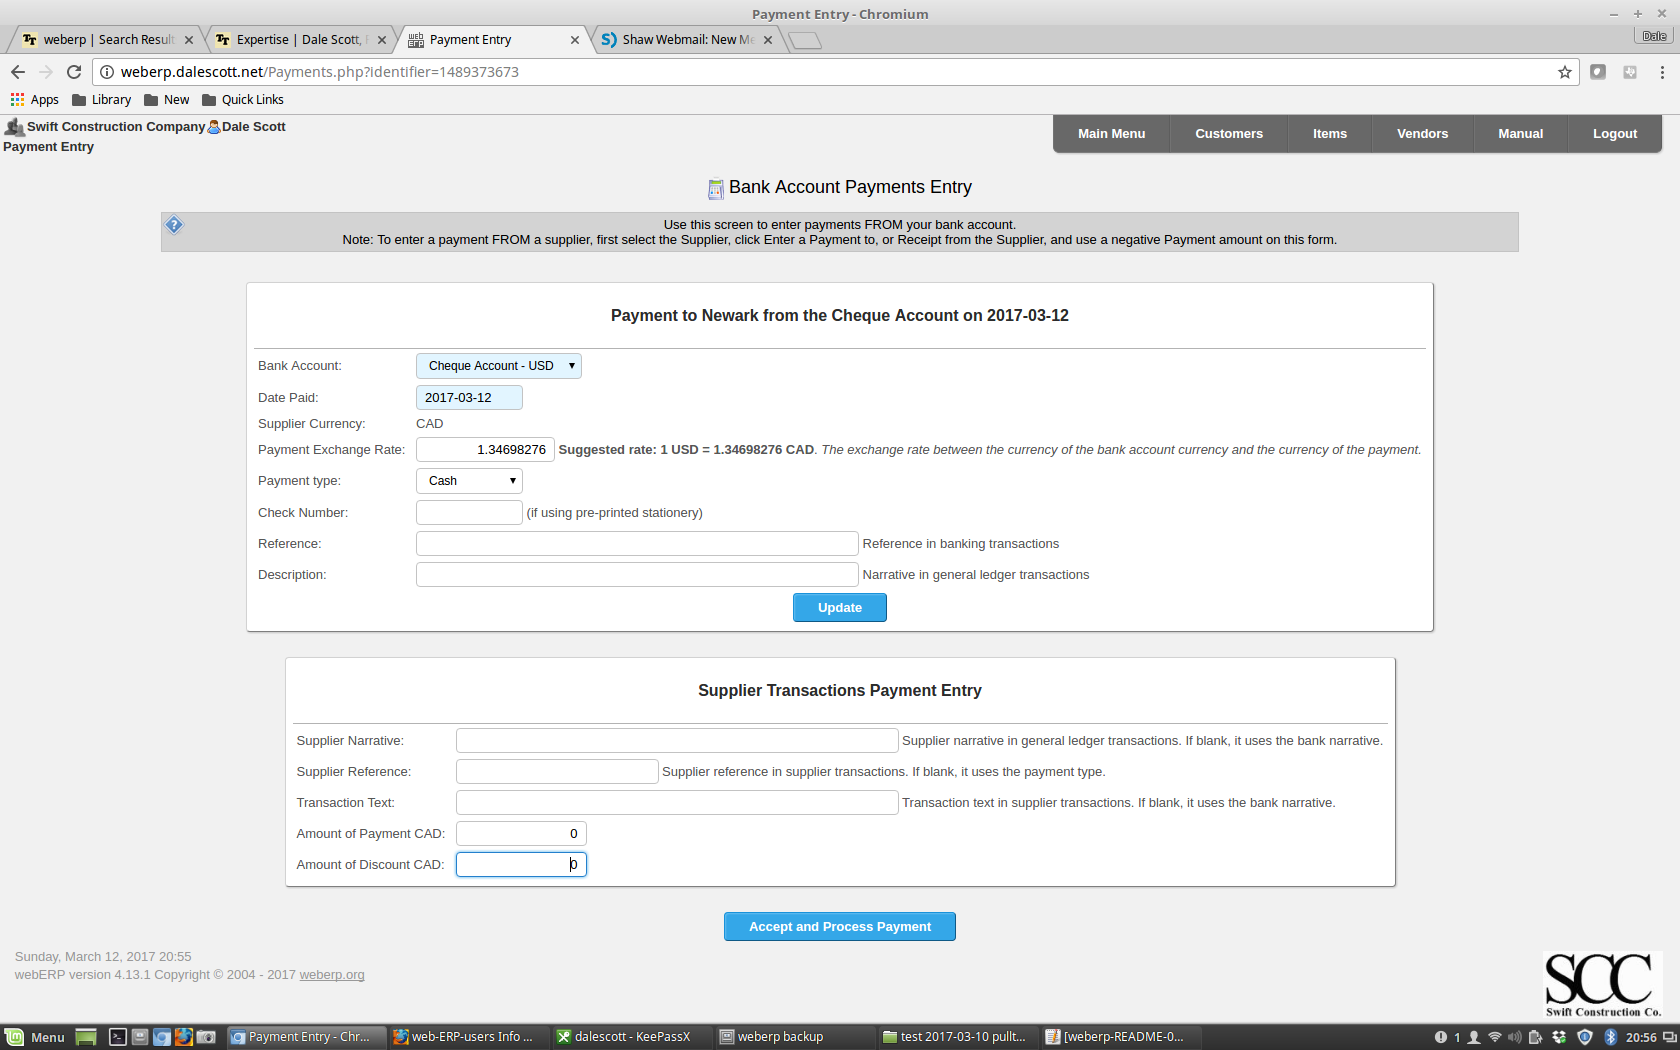
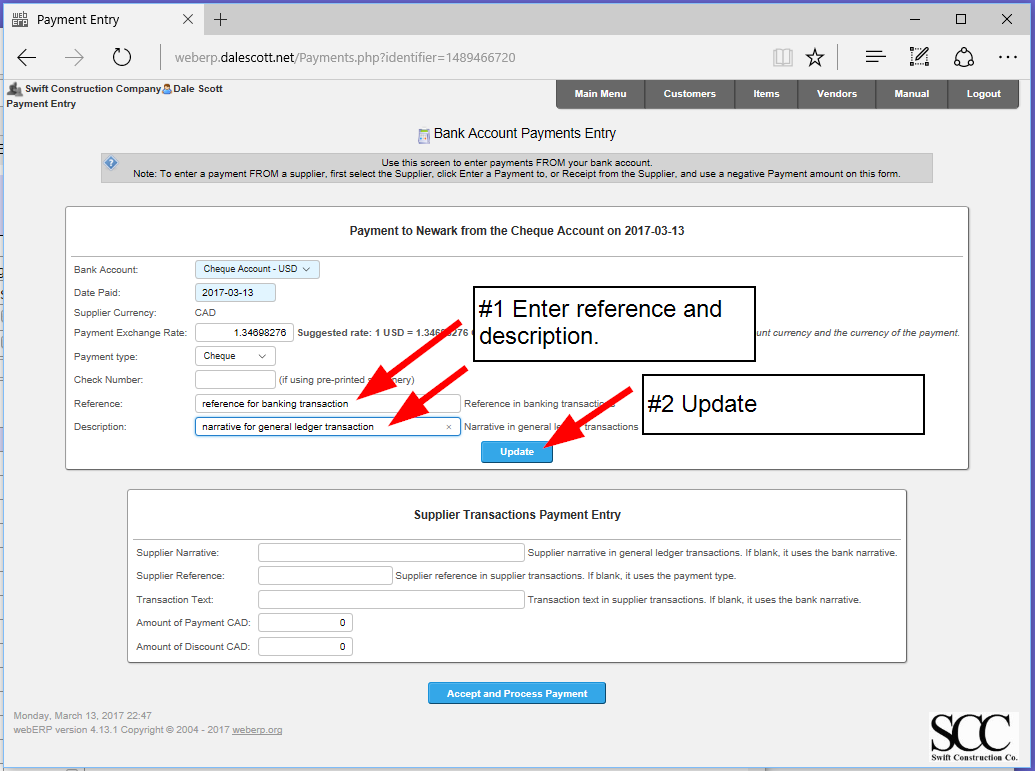
Enter the cheque reference and description.
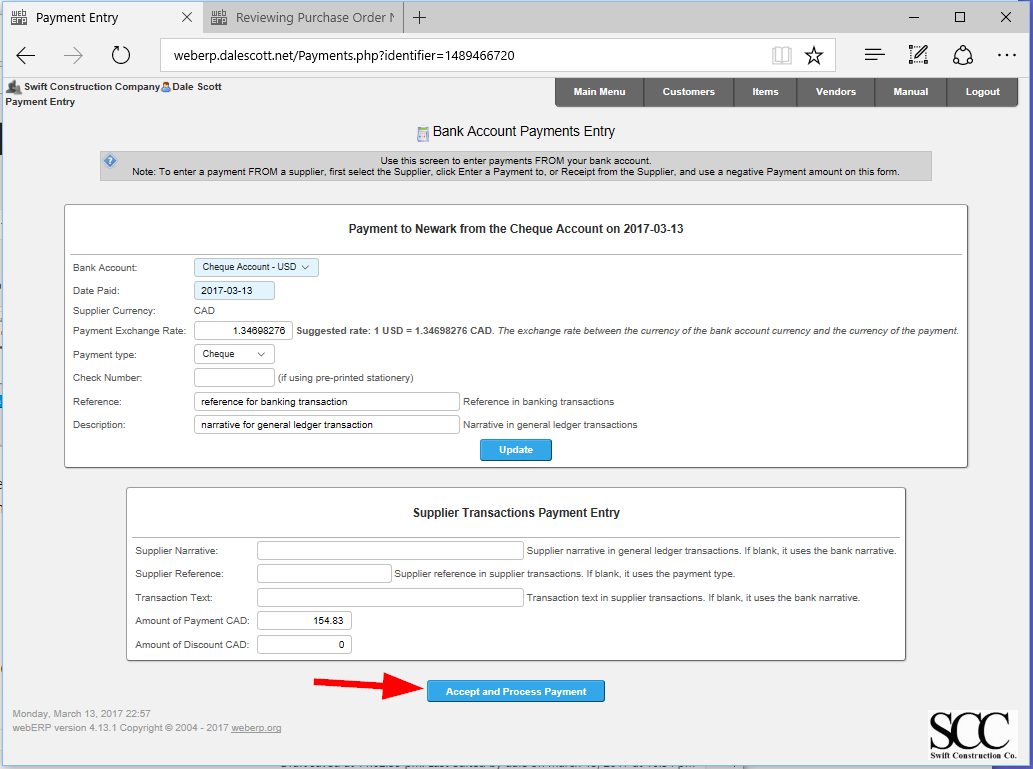
If desired, you can enter a Supplier Narrative, Reference and Transaction Text for the supplier transaction payment. I will leave them blank and they will populate as indicated. Finally process the payment.
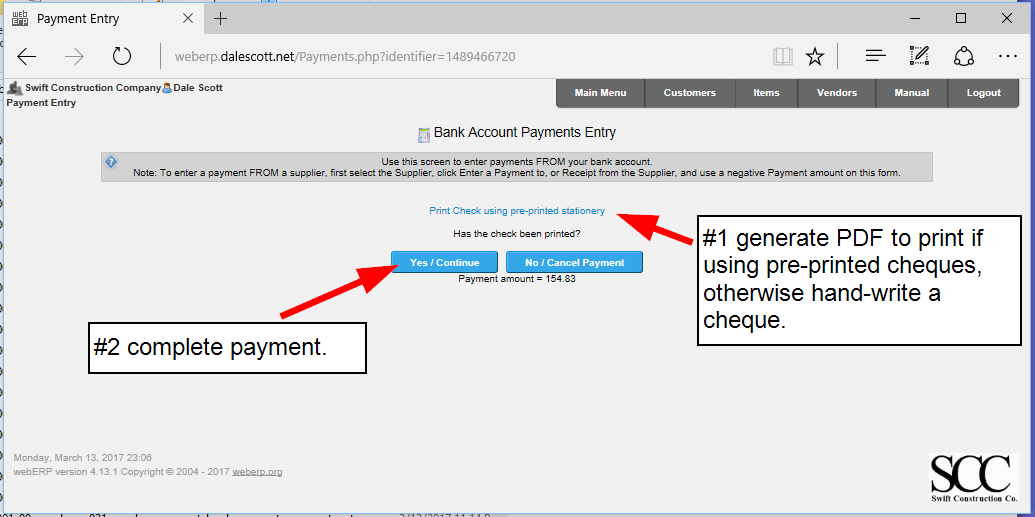
Optionally print the cheque and complete the payment.
The payment can be allocated from the final screen, but this is the end of the purchasing cycle for this example.

Rinse and Repeat
Now that item 100-0001 has been dealt with, I will order sufficient quantities of items 100-0002 and 100-0003 to manufacture custom inductor item 100-0004 (manufacturing will be described in a seperate post).
Reports
A variety of reports are available related to the materials procurement process.
For example, to find a supplier for an item or to investigate an item:
- Show all suppliers for a particular item.
- Show Where-Used for an item (parent BOMs that include an item)
- Show purchase orders for an item.
Further, a number of general reports list items that require ordering, or received orders waiting to be paid for.
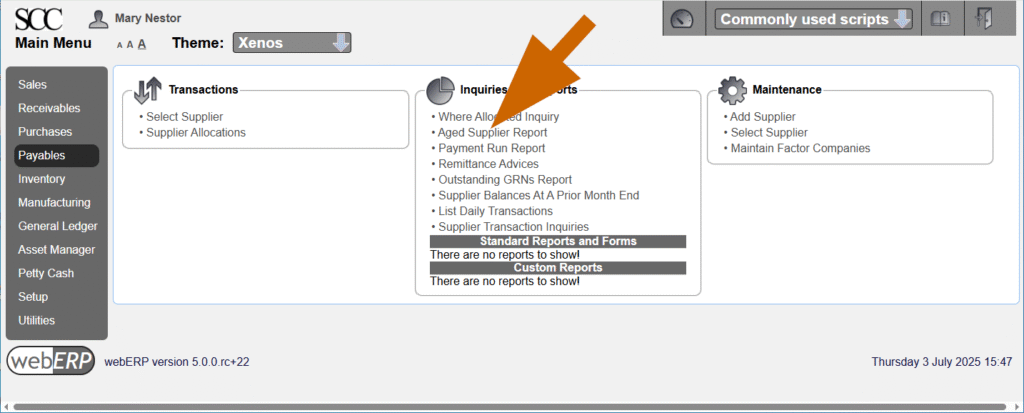
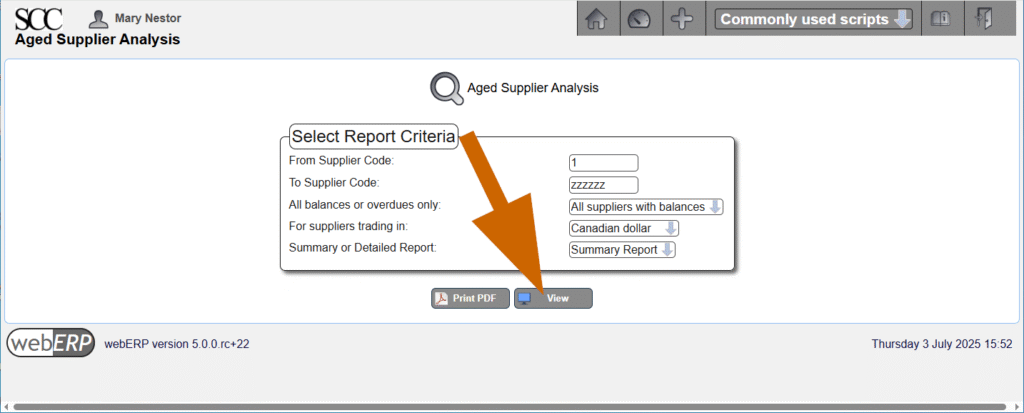
Aged Supplier Report
An Aged Supplier Report shows the amount owed to suppliers (Payables), and the amounts 30 days over due and 60 days over due.
For example, the wire ordered from Newark has been received and Newark’s invoice for $854.06 is due now.
[Main Menu > Payables > Inquiries and Reports > Aged Supplier Report]

Change Happens
When an custom item is revised, it may impact on items already purchased and waiting to be received, or items which are about to be ordered:
- Cancel POs if possible for items no longer required
- Modify POs to mitigate cost, possibly reducing quantities, extending delivery dates, stopping vendor work and paying only for work performed to date, and modifying vendor work to meet new requirements.
It can be helpful to proactively check for new part numbers, or new revisions of existing part numbers. Presumably they will need to be ordered eventually, and in the case of a revision may indicate changes coming for orders of current revisions.
Summary
This completes the overview of purchasing using webERP. A future tutorial will detail purchasing using a BOM (Bill of Materials) to save time. Instead of purchasing items individually, I will have webERP create purchase orders for all the items on a BOM.
I am freelance system advisor and must appreciate this effort of yours have been very helpful. I had been studying this software for a while, going through your tutorials have given me confidence to recommend to my clients.
Thanks. I’m glad the tutorials have been helpful!
Cheers,
Dale