“’Free software’ is a matter of liberty, not price. To understand the concept, you should think of ‘free’ as in ‘free speech,’ not as in ‘free beer’.” -Richard M. Stallman
Further reading: https://en.wikipedia.org/wiki/Free_software

Technology Project Management and Services
“’Free software’ is a matter of liberty, not price. To understand the concept, you should think of ‘free’ as in ‘free speech,’ not as in ‘free beer’.” -Richard M. Stallman
Further reading: https://en.wikipedia.org/wiki/Free_software
When your project isn’t just a temporary contribution but has its own identity (e.g., a “mod,” a “custom flavor,” or a “branded fork”), the workflow shifts from “temporary branch” to “long-lived integration.”
You are essentially maintaining a parallel product while siphoning updates from the original source.
In this scenario, you need two permanent branches that never die:
upstream-main (or vendor): A clean, untouched mirror of the original project. You only ever pull into this branch.prod (or custom-main): Your project’s identity. This contains your unique branding, features, and configurations.Think of the upstream project as the engine and your project as the car body. You want to be able to swap out the engine for a newer model without denting the car.
Periodically update your mirror branch so you have a clean base:
git checkout upstream-main
git pull upstream main
Instead of rebasing (which is for short-lived features), you will Merge the upstream changes into your custom project. This creates a “Merge Commit” that acts as a historical marker of when you synced.
git checkout prod
git merge upstream-main
Because your project has its own identity, you will likely have permanent conflicts (e.g., you changed the README.md or the logo.png).
If you find yourself resolving the same conflicts every month, your project is too “intertwined.” Aim for decoupling:
| Strategy | Action |
|---|---|
| Configuration Over Modification | Use .env files or config objects rather than hardcoding changes into the upstream source code. |
| The “Plugin” Pattern | Keep your personal code in separate directories (e.g., /custom) and hook into the main app via imports, rather than editing the original files. |
| Wrapper Scripts | If you need to change how the app starts, write a wrapper script (start-my-flavor.sh) instead of modifying the upstream Makefile or package.json. |
If you develop a bug fix in your “Identity” project that would benefit the “Upstream” project:
git checkout -b fix-upstream-bug
git cherry-pick <commit-hash-from-your-prod-branch>
Working with webERP is a soon to be released e-book that will be available on-line for free and a printed softbound book for purchase.
A number of draft chapters are available now (screeenshots are from pre-release v5 webERP unless noted):
1. Configure a company with webERP
Initial configuration before “using” webERP.
2. Manage Parts, Suppliers and BOMs with webERP
Create parts, identify vendor, configure unit-of-measure, create bill-of-materials.
3. Purchase with webERP (80% updated to v5)
Companies need to buy before they can sell. Create suppliers and tax groups. Issue purchase orders, receive stock, pay suppliers.
4. Manufacture with webERP (20% updated to v5)
Create work order, kitting, receive output goods, close work order.
5. Sell with webERP (incomplete work-in-process)
Configure a customer, configure taxes, price lists, basic sales to payment process, reporting.
Understand user security roles, page security tokens, page security levels and in-page security control.
Additional chapters will cover:
If you find this information useful, please say hello using the contact form and introduce yourself in a post to the webERP project forum. The community would love to meet you!
Click to search for other posts here on webERP
It is important each user has their own login with a password only they know. Also, each user must be assigned a suitable Security Role which allows only those operations within their scope of work to be performed. This is especially important if you will be using webERP in a regulated or controlled environment.
The default (out-of-the-box) user permissions and security configuration will generally be sufficient to get you started. Eventually though you will want to create bespoke security roles and token assignments based on the structure, staff and relationships of your company.
The webERP security model is comprised of four components:
Don’t think of the access a specific user requires to do their job, think of the role or job they perform, and assign it group (a “security role”) and make them a member of it, and then provide the group (the security role) with the necessary access.
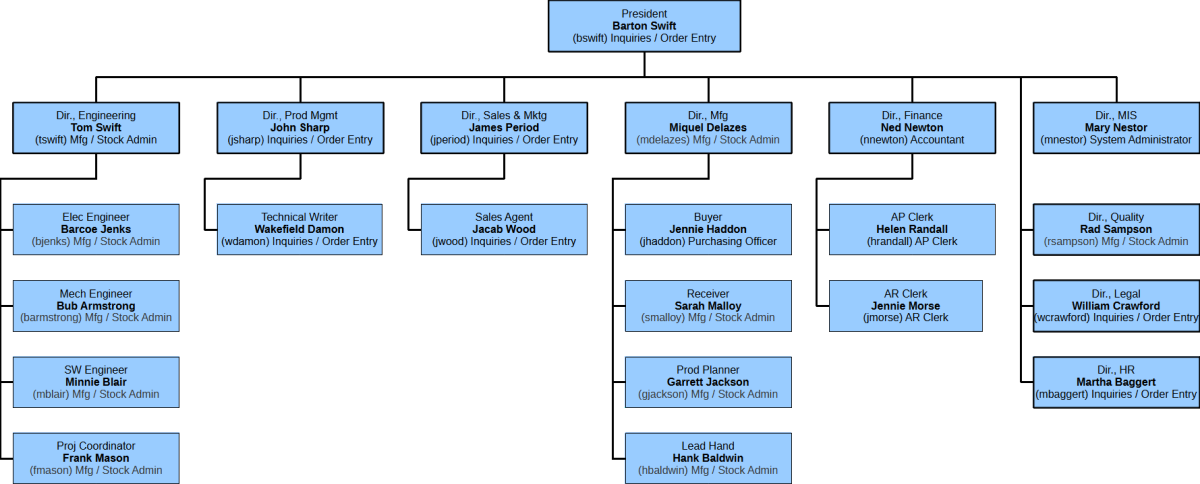
The following organisation chart shows SCC employees with their assigned security role.
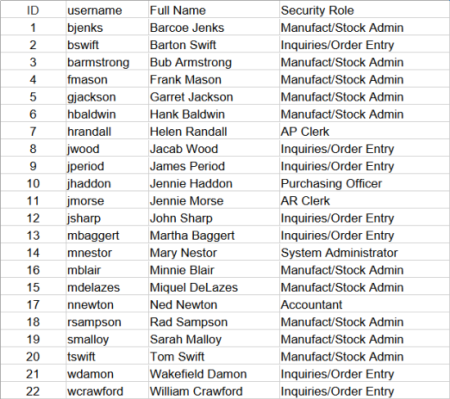
E.g. Miquel DeLazes > Security Role: Manufac/Stock Admin [Main Menu > Setup > General > Users Maintenance]
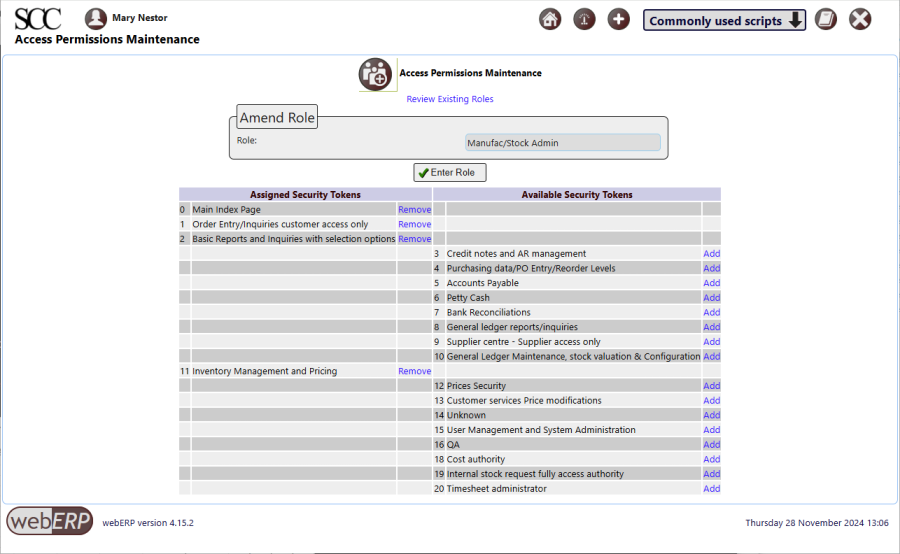
Miquel Delazes, by being assigned the role “Manufact/Stock Admin”, is given security tokens 0 (Main Index Page), 1 (Order Entry/Inquiries customer access only), 2 (Basic Reports and inquiries with selection options) and 11 (Inventory Management and Pricing)
To create or edit a user Security Role: [Main Menu > Setup > General > Access Permissions Maintenance]
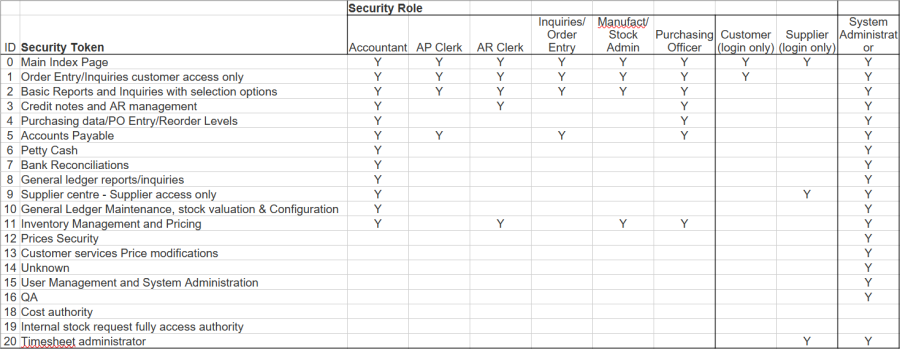
Examining the security role “Manufact/Stock Admin” shows which Security Tokens are assigned to Miquel Delazes through his Security Role “Manufact/Stock Admin”.
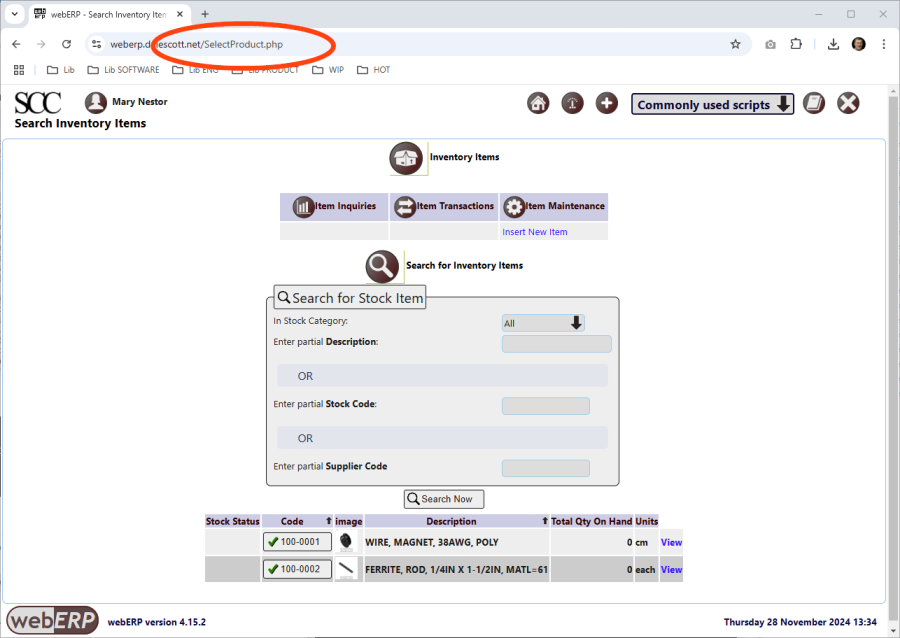
In his role as “Manufact/Stock Admin”, Miquel will need to search, create and edit Items, which is accomplished using the “SelectProduct.php” script.
E.g. [Main Menu > Inventory > Maintenance > Select an Item] and click [Seach Now].
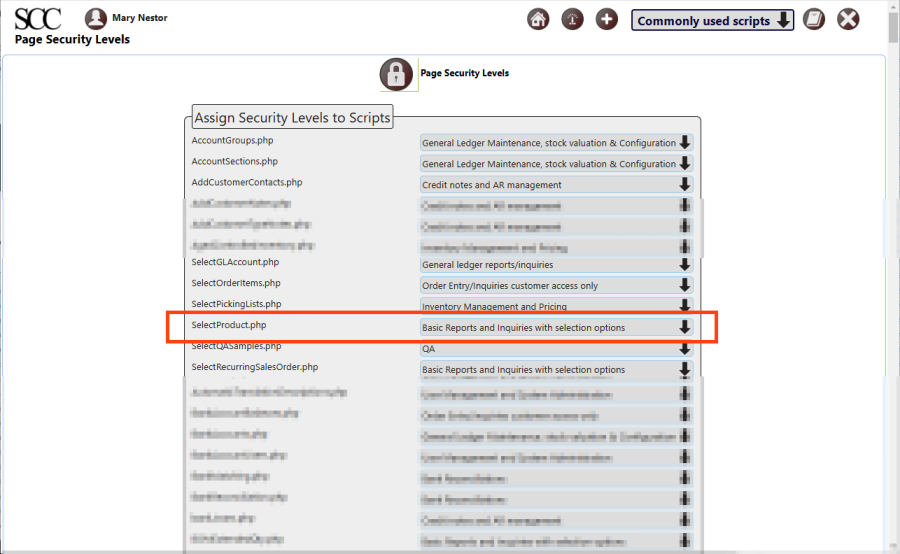
Access to the SelectProduct.php script is controlled by the Page Security Level.
To view or edit the page security levels (aka script security levels), click [Main Menu > Setup > General > Page Security Settings].
It can be see that the SelectProduct.php script (aka page) has been assigned “Basic Reports and Inquirires with selection options”, which is assigned to the “Manufact/Stock Admin” security role assigned to Miquel as we saw previously.
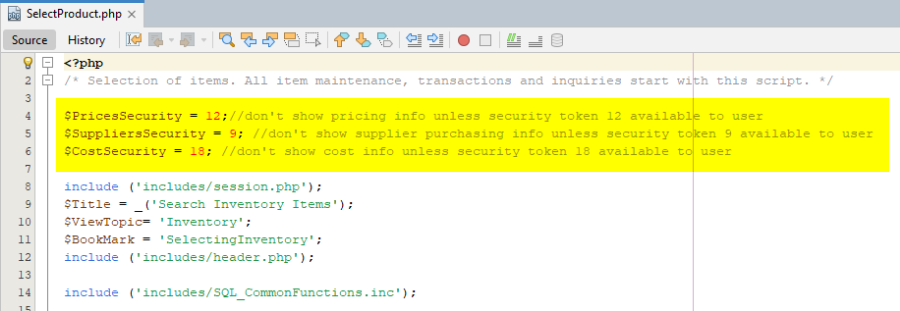
A page itself can restrict access and fine-tune security role, security token assignment and security level script assignment.
For example, examine the SelectProduct.php script. User Miquel will not be shown pricing, supplier purchasing or cost information because his “Manufact/Stock Admin” security role does not have Security Token 12 (Prices Security), Security Token 9 (Supplier centre – Supplier access only) or Security Token 18 (Cost authority).