Click to search for other posts on webERP
This post was written for webERP v4.15.2. Refer to weberp.org and current software for v5 installation (v5 is still pre-release).
webERP is mature web-based open-source ERP (Enterprise Resource Planning) software that supports best practises and multi-user business administration, purchasing, sales, manufacturing and standard double-entry accounting.
webERP can also be used with a wiki CMS (Content Management System) to provide an integrated Knowledge Base. I will be using WackoWiki, one of the supported wiki engines.
Goals
- Install webERP software.
- Install MediaWiki software.
- Configure webERP and MediaWiki for use.
Install Applications
I will install webERP and MediaWiki on FreeBSD, a Unix-like operating system (GNU/Linux is another popular Unix-type operating system). The server has already been configured with the Apache HTTP server and MariaDB database server.
webERP
Copy the webERP software files to the server and configure the Apache web server.
- Extract distribution to /usr/local/www/
- Rename extracted directory webERP/ to weberp-4.13.1
- Create soft link “weberp” to weberp-x.y.z
- Create Apache virtual server e.g. http://weberp.dalescott.net
Access http://weberp.dalescott.net with a web browser to run the installer.
- Language: US
- Db user and password: root (only for install, future access will be changed to a dedicated user after installation)
- Company name: e.g. Swift Construction Company
- Install demo data: YES
- User “admin” email: e.g. dale@dalescott.net
- admin user password: (keep this safe)
After the installer has completed, change the database access user to a new database user with privileges to webERP databases only.
- Create a new database user “weberp” with all privileges to the weberp and weberpdemo databases.
- Edit the webERP configuration file weberp/config.php and change the database access user and password to the new dedicated user.
MediaWiki
Copy the MediaWiki software files to the server and configure the Apache web server.
- Download a release archive.
- Extract the distribution to /usr/local/www/ (which will create mediawiki-x.y.z/)
- Create a soft link “wiki” to mediawiki-x.y.z/
- Create an Apache virtual server http://wiki.dalescott.net
Access http://wiki.dalescott.net/mw-config/index.php with a web browser to run the installer.
- Name of wiki: webERP
- User rights profile: Authorized editors only (public viewing is allowed)
- Enable file uploads
Configure Applications
webERP
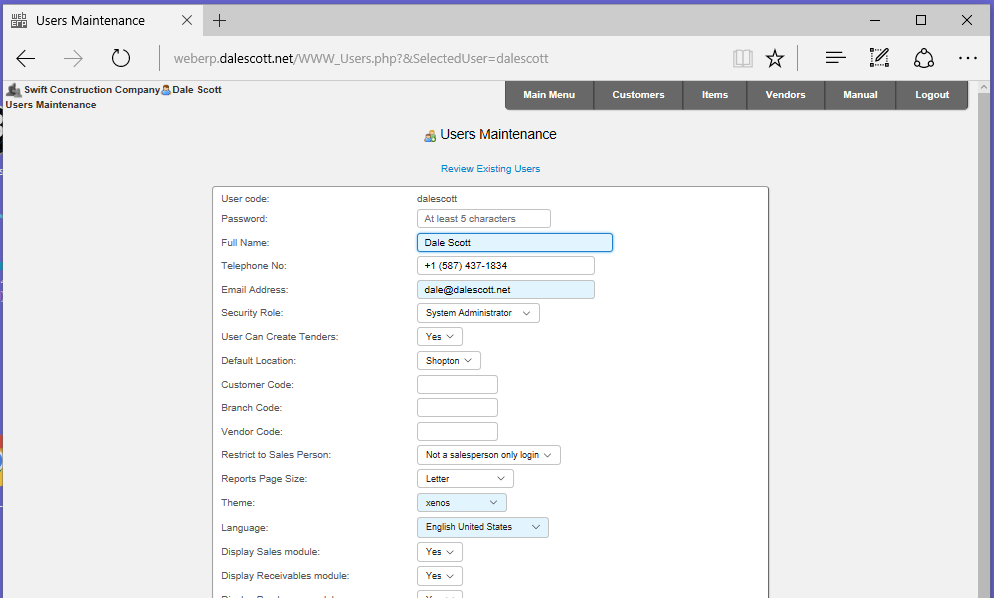
Log into webERP using the admin user credentials entered into the auto-installer and create new named user e.g. dalescott. The new user will be used for all subsequent work to identify the administration user specifically for audit purposes.
- email: e.g. dale@dalescott
- system administrator privileges
The original admin user (created by the auto-installer) cannot be deleted due to a now existing audit trail.
Location
I will create a new location “Shopton” for the SCC headquarters.
Main > Setup > Inventory Setup > Inventory Locations Maintenance
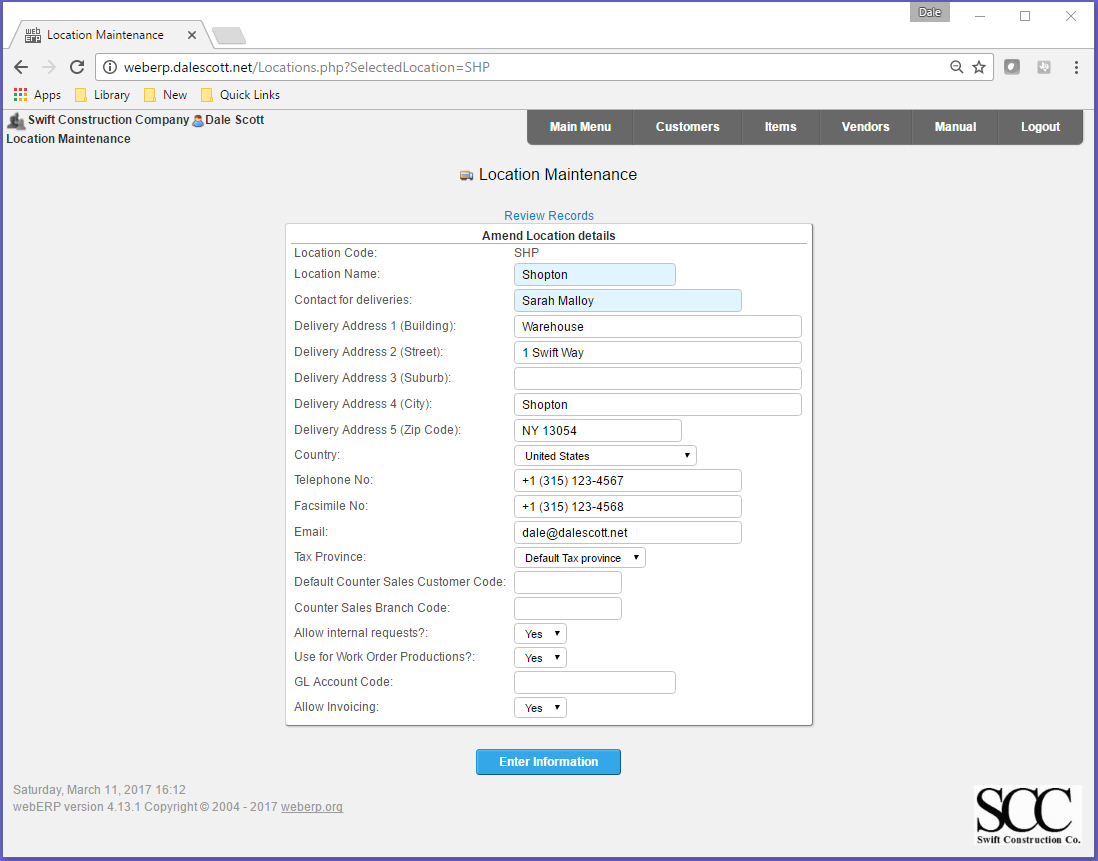
Note: Delivery Address 1 must be given a value, otherwise a “missing delivery address” error will occur when later attempting to create a purchase order.
After creating the new location, change the location of the administration user to the new location (and of any other users).
Currencies
I will create a new CAD currency as some items will need to be purchased in Canadian dollars. webERP will obtain currency exchange rates from either Google or the European Central Bank (Main > Setup > General > System Preferences).
Main > Setup > General Setup > Currencies Maintenance
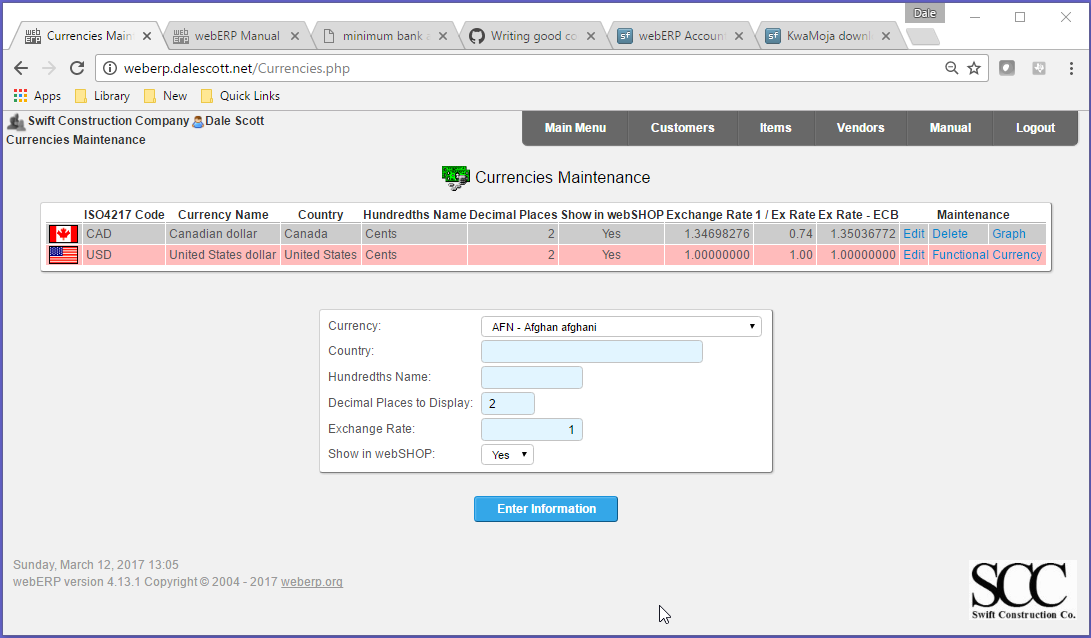
“USD” is shown as the “Functional Currency” because United States is set as the SCC company currency in the Company Preferences.
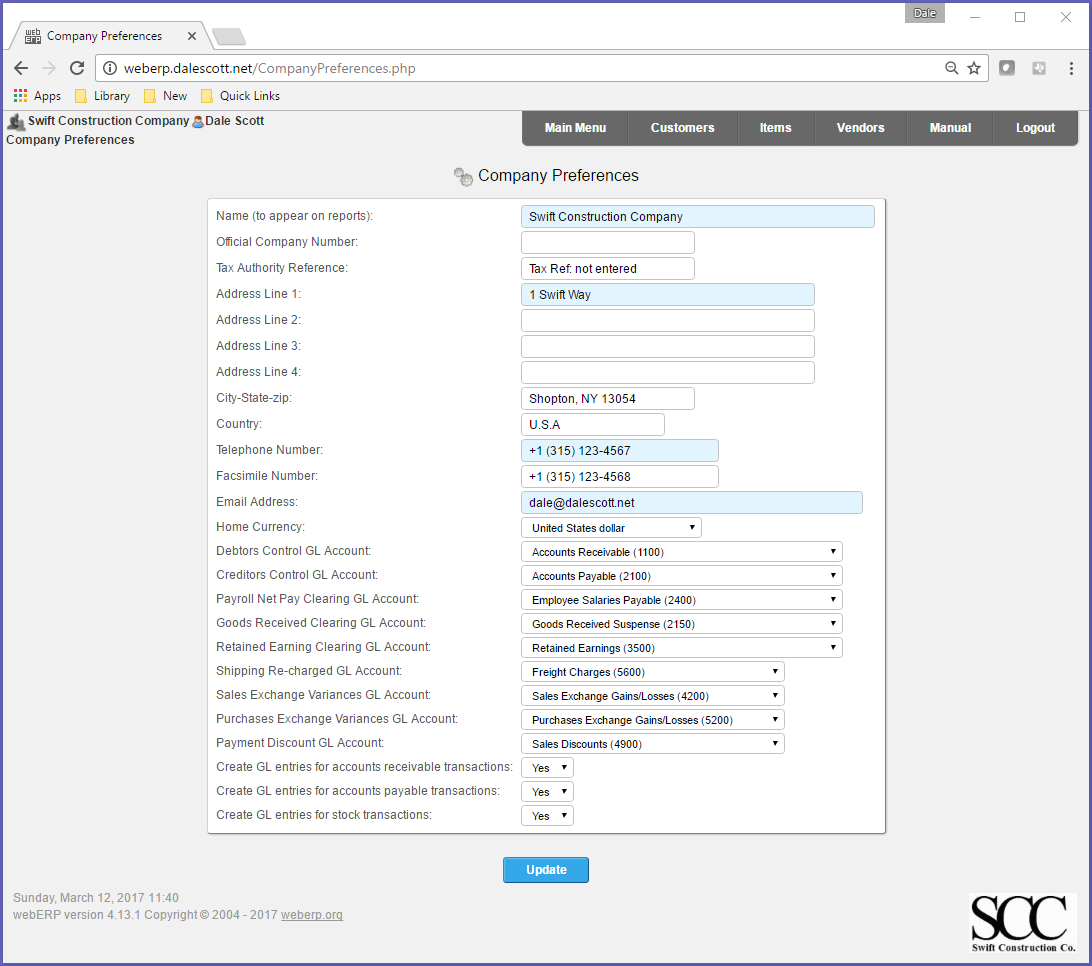
Company Preferences
Operating practices for a specific company are configured in the Company Preferences screen (webERP supports multiple companies and the desired company is selected at login).
Main > Setup > General > Company Preferences.
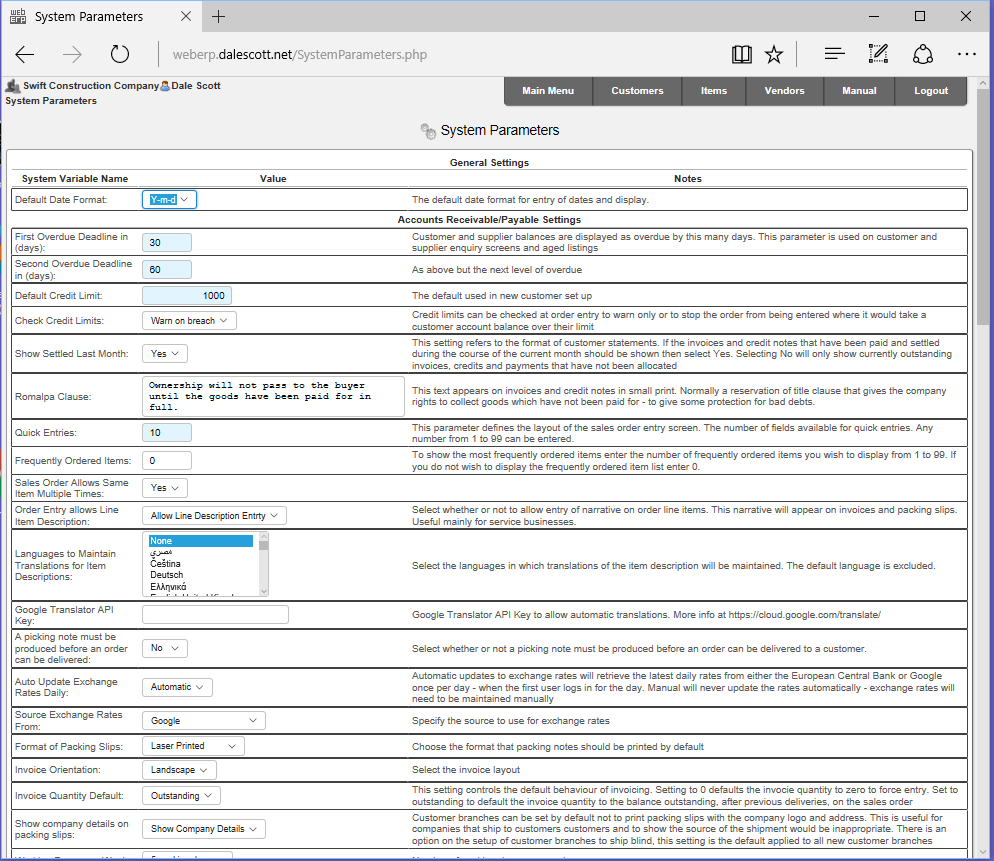
System Preferences
General system-wide behavior is configured in the System Preferences screen. I will quickly review some interesting parameters, and get into a bit more detail with a few specific parameters.
- Date format: Y-m-d. I prefer ISO 8601 dates for clarity over familiarity (e.g. 2017-03-08 for March 8, 2017), which avoids the ambiguity of d/m/Y and m/d/Y.
- Frequently Ordered Items: 0. I left this disabled but may experiment with it once the system has some orders entered.
- Sales Order Allows Same Item Multiple Times: Yes. I will revisit this later, but at least initially I don’t want anything to block operation.
- Languages to Maintain Translations for Item Descriptions: None. Don’t complicate things at least initially.
- Picking note must be produced before an order can be delivered: No. I don’t want to complicate the process too soon.
- Auto Update Exchange Rates Daily: Automatic. Source Exchange Rates From: Google.
- Create Debtor Codes Automatically: No. I want to use my own mnemonic codes, but set to Yes if you don’t care and would prefer to let the system assign a sequential integer.
- Create Supplier Codes Automatically: No. I prefer to use my own mnemonic codes.
- Country of operation: United States (used when calculating shipping costs).
- Purchase Order Allows Same Item Multiple Times: Yes. I will revisit this later, but at least initially I don’t want anything to block operation.
- Automatically authorise purchase orders if user has authority: Yes. I will disable this later so I can follow the approval process.
- Financial year ends on: December (if only to avoid having to answer of why not calendar years).
- Maximum Size in KB of uploaded images: 300. I left this at its default value, although some images and screenshots will likely require re-sizing before uploading.
- Directory to store images: part_pics (directory already exists)
- Directory to store reports: reports (directory already exists)
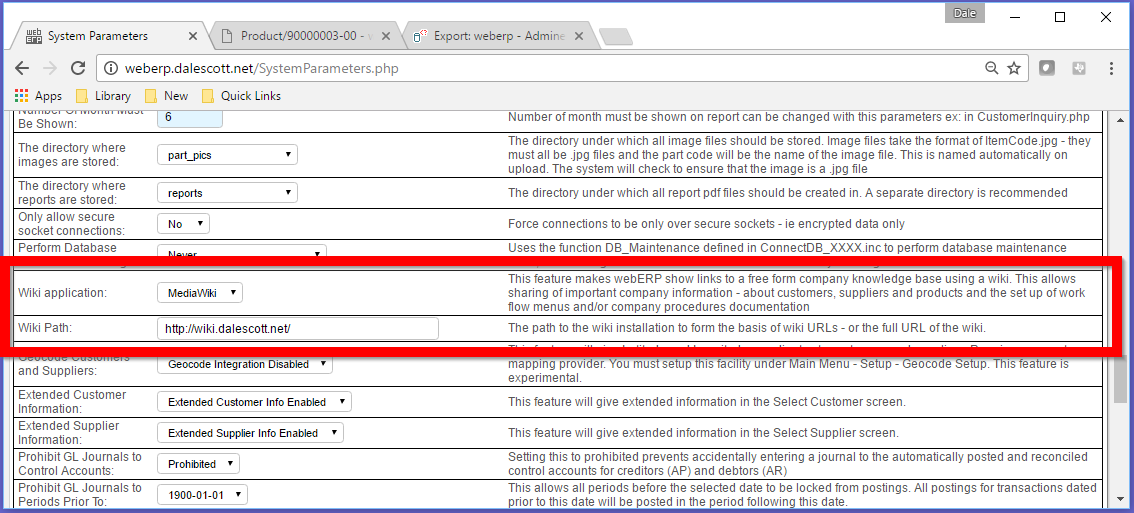
- Wiki application: MediaWiki (I’m already familiar with MediaWiki), Wiki Path: http://wiki.dalescott.net/
- Inventory Costing Method: Standard. webERP also supports weighted average, but Standard Costing behavior will be more obvious to start with.
- Auto issue components: Yes. Automatically decrement items from stock according to the BOM for an Item when it is manufactured to reduce admin effort.
- Prohibit Negative Stock: No. I’m pretty sure I will set this to Yes later, but prefer no blocking operations at least initially.
- Log Severity Level: All, Path to log files: log. I want to see all possible log entries initially and can be reduced later (I also had to create the “log” directory and set ownership of the directory to the www:www, which is the Apache http server user on FreeBSD).
- Controlled Items Defined At Work Order Entry: Yes. When set to yes, controlled items are defined at the time of the work order creation. Otherwise controlled items (serial numbers and batch/roll/lot references) are entered at the time the finished items are received against the work order
- Auto Create Work Orders: Yes. Setting this parameter to Yes will ensure that when a sales order is placed if there is insufficient stock then a new work order is created at the default factory location
- Default Factory Location: Shopton. This will be the default location for automatically created work orders.
- Factory manager email: dale@dalescott.net, Purchasing manager email: dale@dalescott.net, Inventory manager email: dale@dalescott.net. I’m setting all email addresses to me for convenience so I see the traffic.
- Using Smtp Mail: No. My server will route email from webERP out through my ISP’s mail server.
Main > Setup > System Preferences
Wiki Application
In particular, note the setting for “Wiki application”. When enabled by selecting a particular Wiki dialogue (MediaWiki, WackoWiki or DokuWiki), a link to the “Wiki Product Knowledge Base” will be shown in the Inquiries column of the main Items, Vendors and Customers screens (once an Item/Vendor/Customer has been selected).
You also need to set the root path to the wiki (that webERP will append to) in the system parameters screen. In my case, I needed a trailing “/” in the Wiki Path, but YMMV.
Database Maintenance
webERP can be configured to lock out users by setting Perform Database Maintenance at Logon to Allow SysAdmin Access Only. Only users with security profile “System Administrator” will be allowed to login or enter data when this is set, which is important when performing maintenance on the application code or database. A maintenance notice also appears on the login prompt when Allow SysAdmin Access Only is set.
Main > Setup > General > System Parameters

This parameter can also be used to periodically run the query “OPTIMIZE DATABASES” at set intervals. It is not clear how often this should be run, or even if there is a significant benefit. However, users will notice a slight delay during login when the it runs, it might have been a half-second with an almost empty Swift Construction Company database (on a older dual-core desktop PC with 4GB memory). If periodically running OPTIMIZE DATABASES is desired, you may consider creating an entry in the cron table to run the mysql command line interface, giving the query as a command argument.
MediaWiki
The webERP Knowledge Base, MediaWiki in my case, is a completely separate system from webERP, including separate users, user permissions, etc. webERP simply provides structured links into the Knowledge Base (with some variation depending on the wiki protocol selected in webERP Main > Setup > General > System Parameters > Wiki application).
I intentionally configured MediaWiki during install for public access, but required that a user be logged-in to create a new page, edit an existing page or upload a file. This allows anyone to see information, and in most cases get on with their job, without having to be concerned with logging into the Knowledge Base. For me, this is a nice balance of visibility and trust within a homogeneous organization. Users can also set their browsers to remember their login credentials and once set won’t be inconvenienced again (I wouldn’t necessarily recommend this when there are shared workstations, but then again many people use shared workstations and don’t control who the user is, it all depends….).
Upload File Types
I configured the permitted upload file types to include OpenOffice/LibreOffice files, dwg files and zip archives (see MediaWiki documentation).
$wgFileExtensions = array( 'png', 'gif', 'jpg', 'jpeg',
 'odt', 'ods', 'odp', 'odg',
 'txt', 'pdf', 'zip', 'dwg'
);
Site Logo
I also uploaded the SCC logo as a media file and edited LocalSettings.php to use new logo.

Summary
This completes basic webERP and MediaWiki installation and configuration.