Embedded Command Line Interface (CLI)

What’s a CLI?

A command-line interface (CLI) is a way to interact directly with a software program in the form of text commands and responses. Just as source code is a typed set of commands to produce a result, the CLI is also a typed set of commands to produce a result. The difference is that the commands are typed in real-time by a person (although may be captured for replay later). 

In embedded system development, a CLI is often developed to aid initial driver development and debugging. This CLI may become the interface (or one of the interfaces) used by a sophisticated end-user to interact with the product. Think of typing commands to control a machine, such as a spacecraft or NC mill, or perhaps for low-level access to the control system of an undersea ROV as a development tool, tweaking time-constants and monitoring low-level system performance during testing. 

One of my current projects, a scientific instrument, incorporates a home-grown CLI that has evolved with the project. It has limited functionality and supports simple commands only.  However, the potential exists that eventually a sophisticated end-user might appreciate more advanced functionality, including command history, variable substitution and simple scripting, akin to a unix shell such as csh or bash.  Should that become true, the current CLI will need to evolve, which will have a cost in time and effort. There is no customer demand now that would justify the effort, but it made me wonder if there was any open-source off-the-shelf CLI code that could be used.

CLI projects

Some concerted web searching identified the following projects:

Some general articles on creating a CLI interface are:

Future work

Once the project at hand has passed the basic data collection milestone, I think it will be time to think about the future of the CLI. The complexity of the home-grown solution will not have increased significantly, and there will be time to think through the amount of work to switch to any of the shortlist candidates.
 

Code Composer Studio v7

Code Composer Studio (CCS) is an excellent free IDE from Texas Instruments for TI processors.  CCS is based on Eclipse and TI recently released CCS v7 in December 2016 based on Eclipse 4.6 with CDT 9.0 and JRE 8. This is reported to be the first CCS release both free of charge and without limitations for all devices and debug probes, although I started using CCS just after v6 was released and it was free then, including the debug probe for the MSP432 and without code limitations when compiling using gcc (included). 

I had been put off Eclipse by its complexity several years ago when settling on an IDE for web app development (at the time I selected NetBeans, and still like its simple elegance), but the MSP432 was the processor of choice for a project and that meant using CCS/Eclipse. Although I was initially apprehensive, TI had made CCS extremely accessible by providing Simple, Edit and Debug perspectives. CCS is now my preferred development environment for embedded work, which works great since I’m also a fan of TI’s 32-bit ARM Cortex-M4 MSP432 and 16-bit MSP430 processor families.

CCS is not without its foibles though. For one, it takes a long time to start up. For quick or limited editing I prefer NotePad++, and if I double-click a file in Explorer, NotePad++ is launched not CCS. Also I continue to use TortoiseSVN and GitExtensions outside of CCS. I’ve read there are Plugins available, but that means more learning. NetBeans came with a git GUI built-in and I rarely needed a separate tool.

Here is a quick a refresher for starting a new project after having been away from CCS for a while (it should also apply to CCS v6). 

Tabs vs Spaces

The coding standard followed by the msp432logger project stipulates using tabs to indent code, with a tab width of four spaces. This can be difficult due to how CCS manages tab vs spaces.

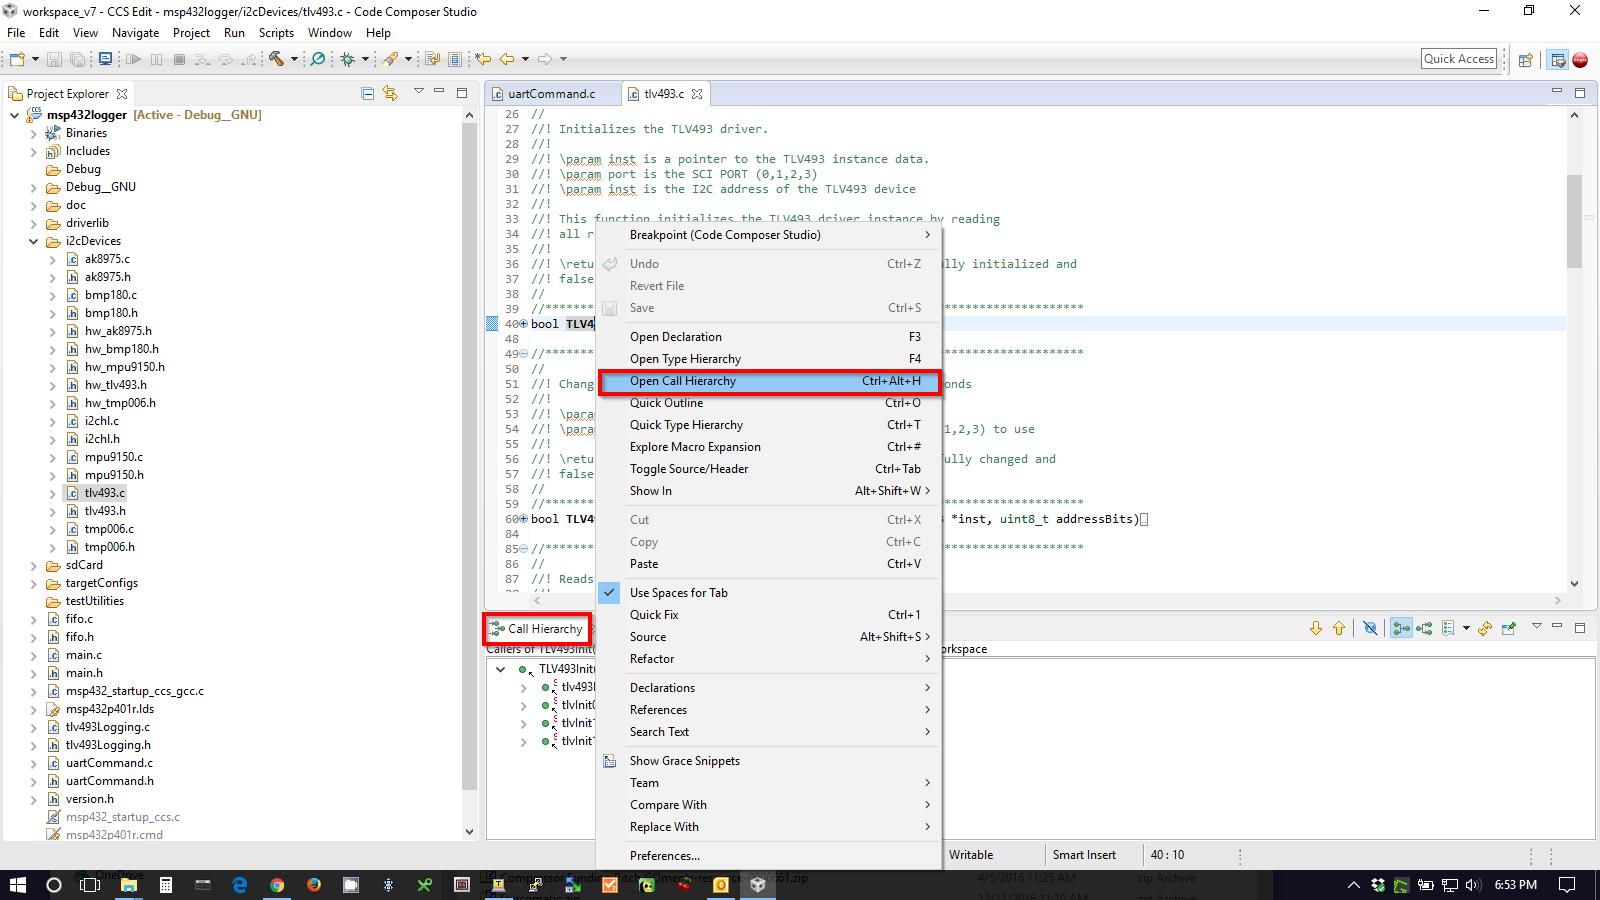
CCS provides tab vs spacing preferences (Window -> Preferences -> General -> Editors -> Text Editors “Insert spaces for tabs” enabled or disabled). However, CCS appears to indent a new line according to the convention of the old line (whether tabs or spaces) when Enter is used to create a new line, or when CCS automatically indents based on parentheses (at least with C files). This is regardless of the Preferences setting, and in addition, there is a context menu selection “Uses Spaces for Tab” which must be disabled (right-click in an editor).

Because of the various settings affecting whether indenting will be done with tabs or spaces, it is easy to accidentally introduce and propagate space-based intending within a file. Time will tell if I’ve finally got my preferences set correctly, and it may be simpler to use space-based indenting with CCS if you have the choice. I’m currently watching for spaces in pre-commit diffs, and manually searching and replacing 4-spaces with a tabs using Notepad++ (I haven’t figured out how to specify non-printable characters in CCS search & replace yet). 

Code Folding

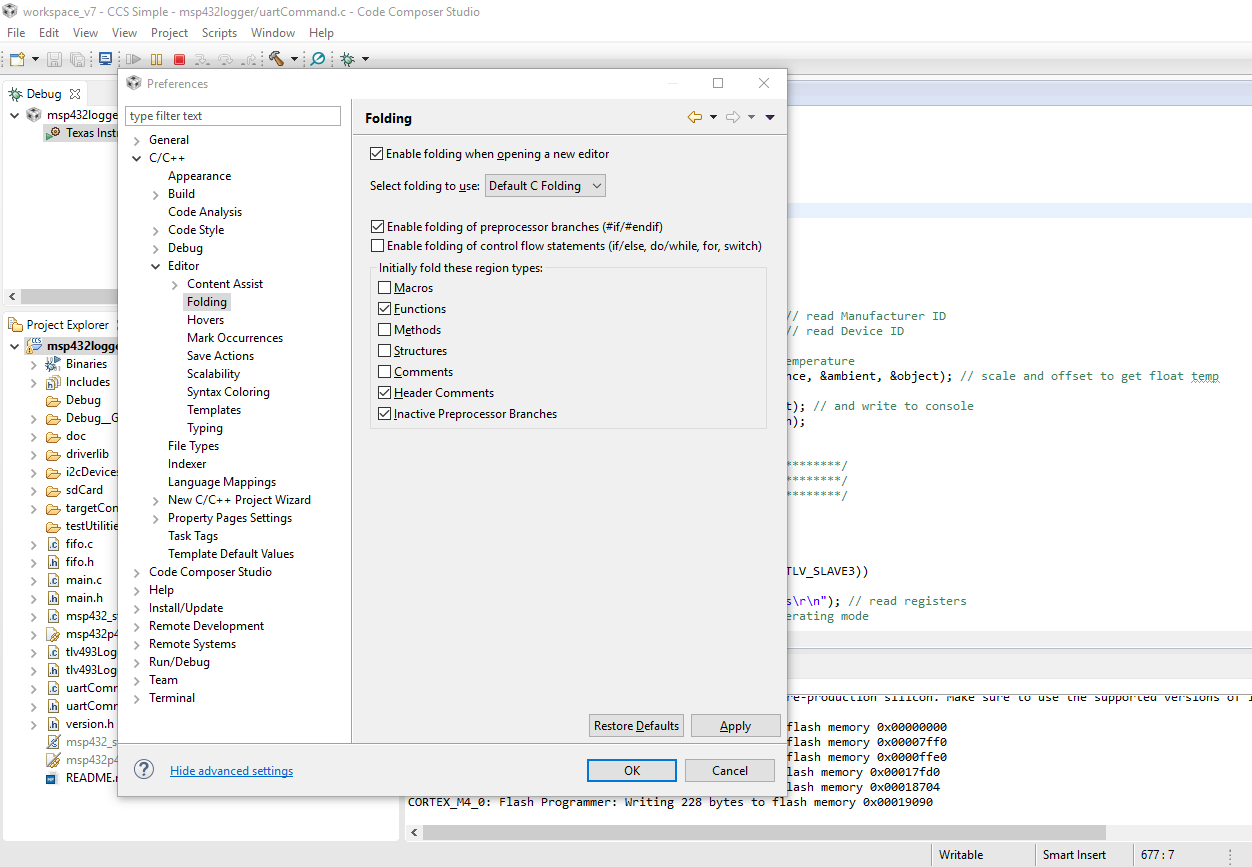
Code folding must first be enabled in the Preferences window (Window > Preferences > C/C++ / Editor / Folding) with Show advanced settings selected. Open edit windows must be closed and re-opened before folding will be available.

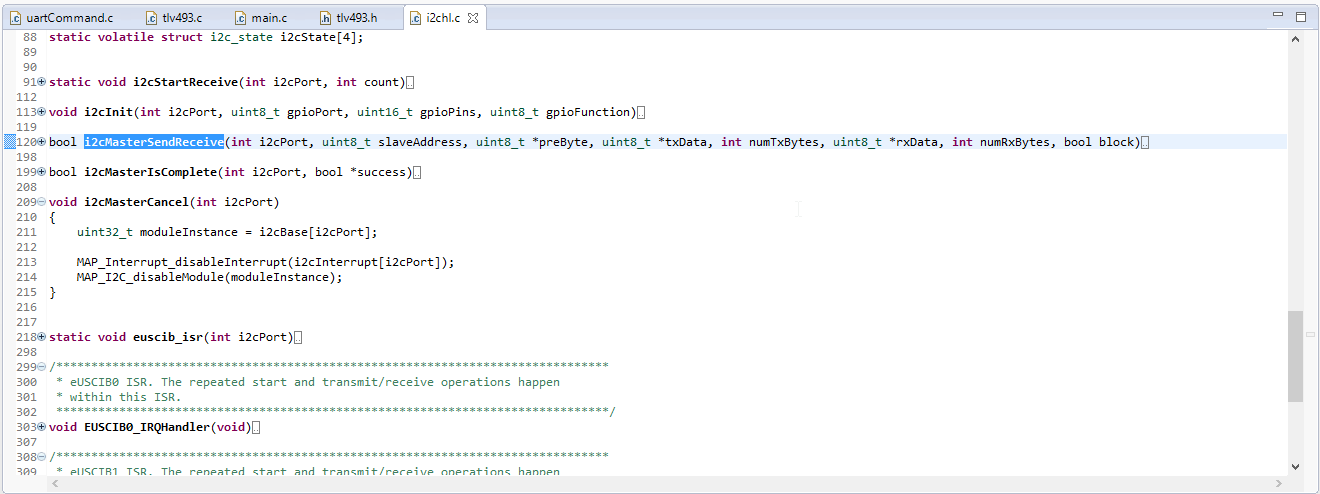
The configured preferences specify that functions and header comments are to be initially folded. In the screenshot below, the i2cMasterCancel() function has been  expanded.

To quickly expand or collapse all folding, right-click in the left margin of an editor and select Folding from the context menu. 

Split Edit Window (different files)

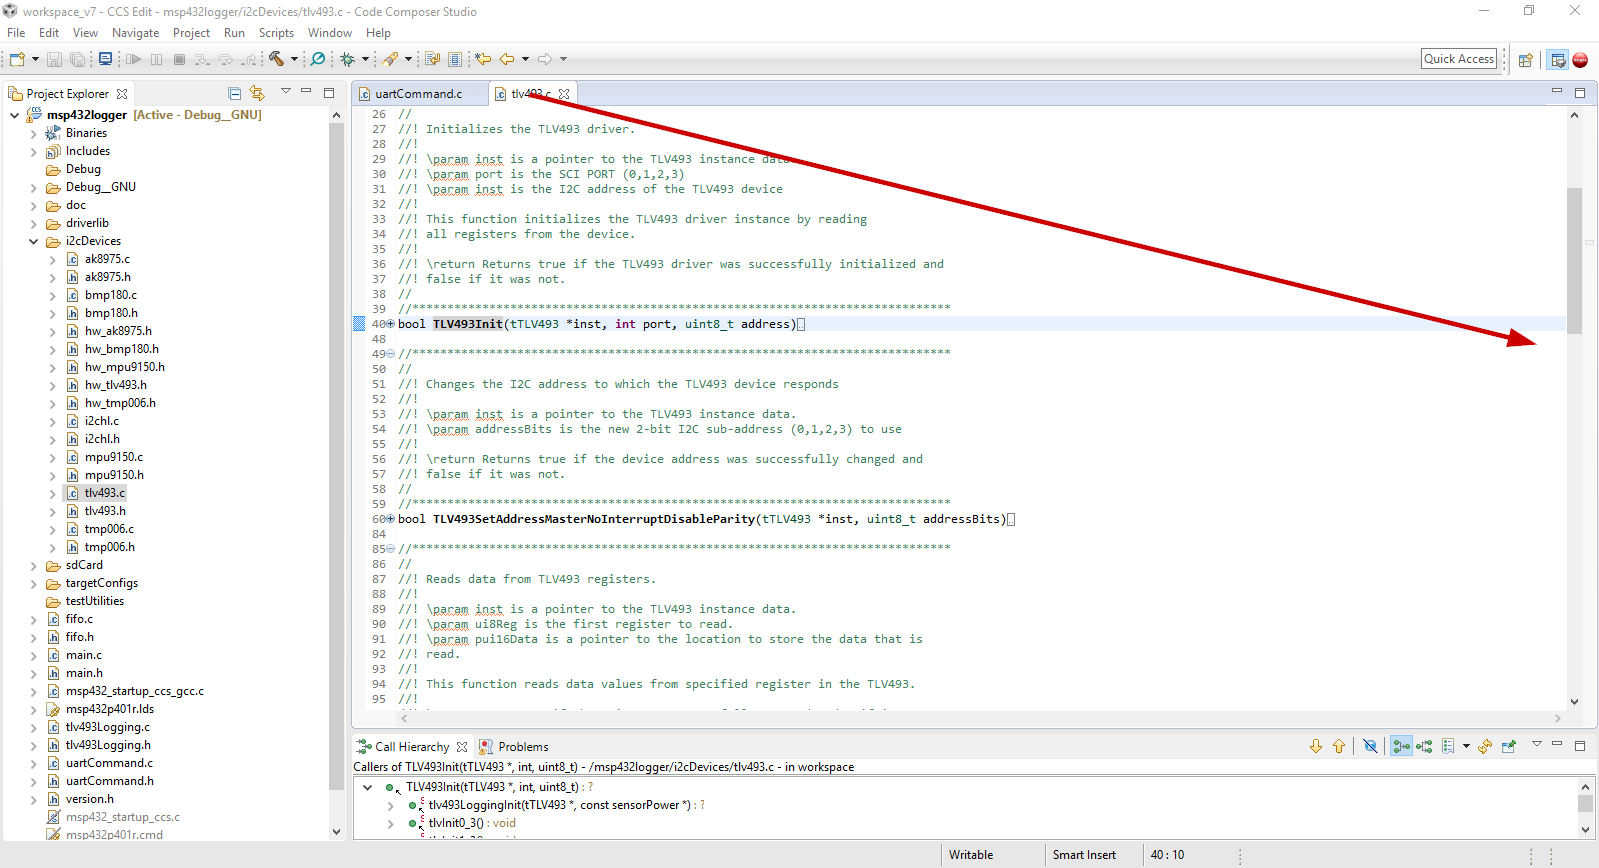
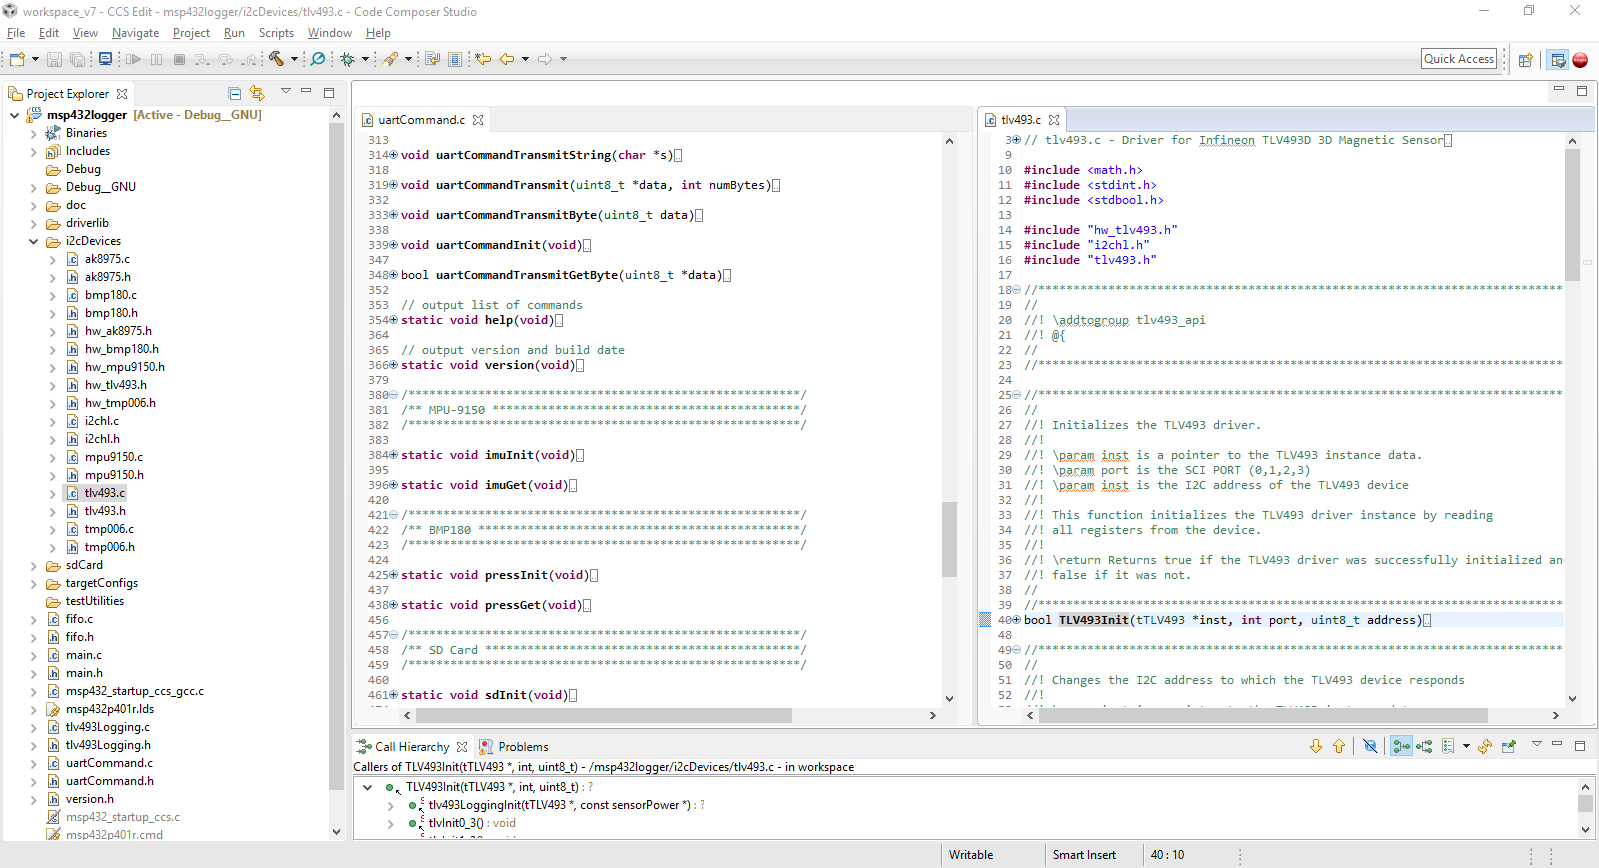
CCS typically displays files in tabs using the same editor window. To split the editor window and view content from two (or more ) files side-by-side (or top-and-bottom), simply drag the desired tab to the side (or top or bottom) of the editor window.

For example, drag an editor tab to the right margin,

which results in the file appearing in a new editor window to the right.

Split Edit Window (same file)

The method above (moving an editor tab to a new editor) doesn’t work to view different parts of the same file in separate windows. Instead, use

  • Ctrl Shift [
  • Ctrl Shift –

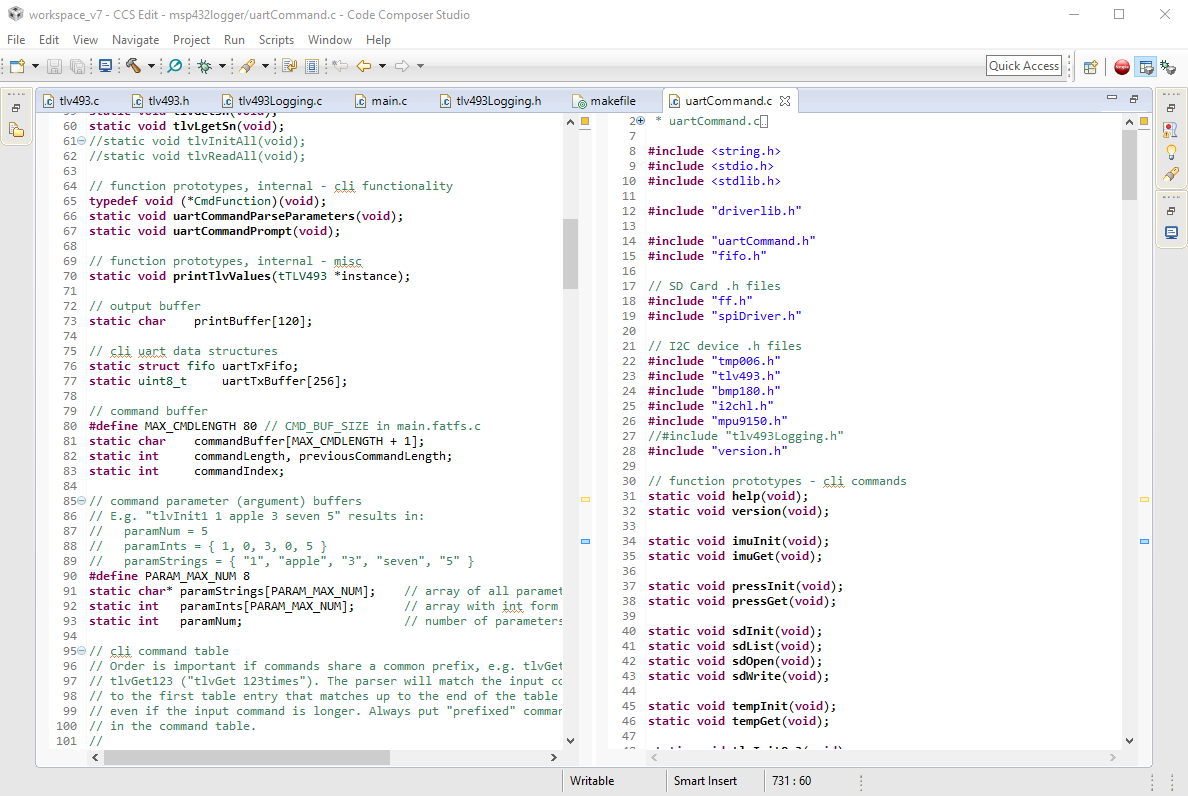
to split the edit window either vertically or horizontally (or to un-split).

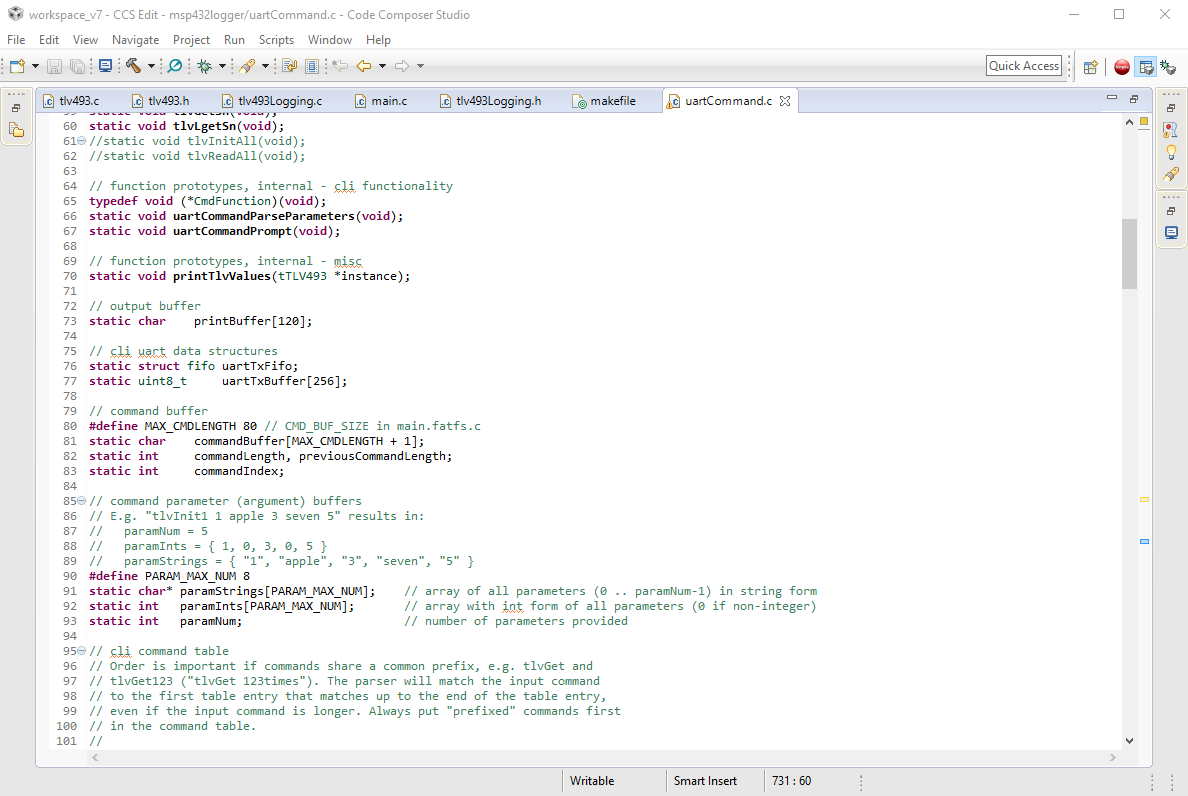
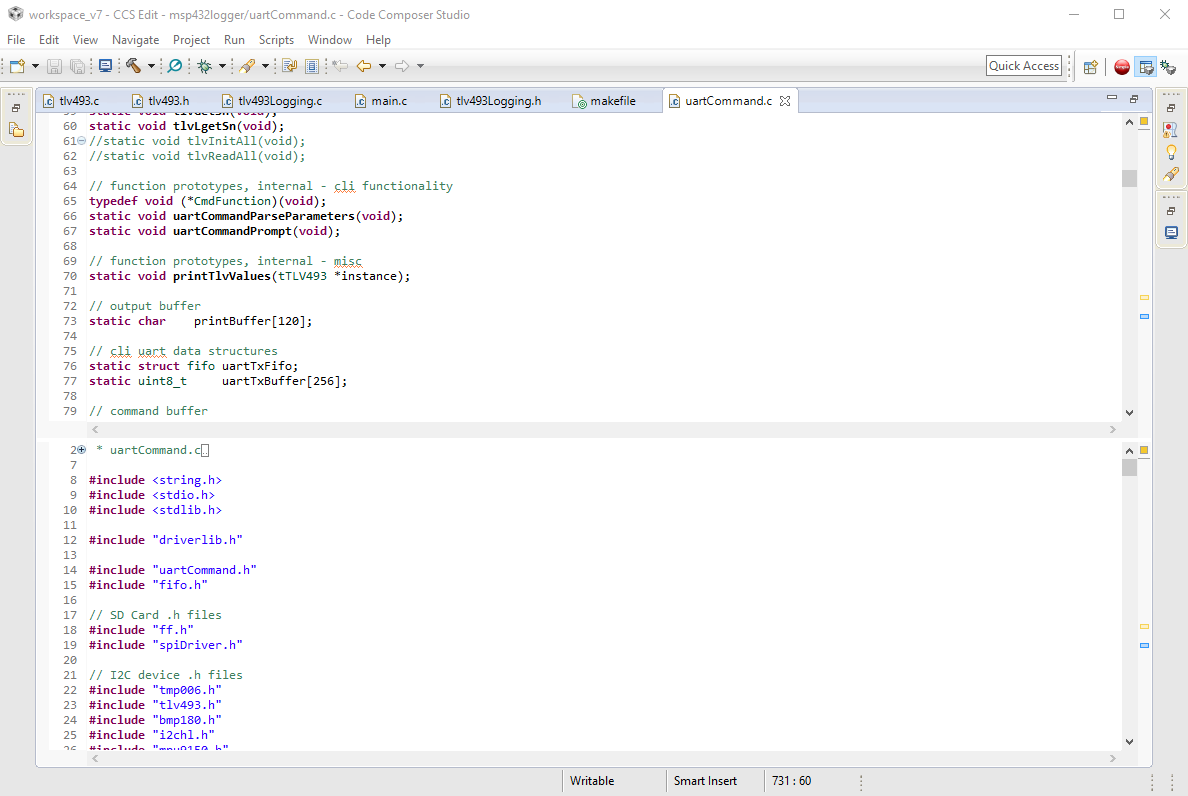
So from a single tab,

press ‘Ctrl Shift [‘ to see uartCommand.c in side-by-side panes, 

or ‘Ctrl Shift -‘ to see uartCommand.c in top-and-bottom panes.


View Call Hierarchy

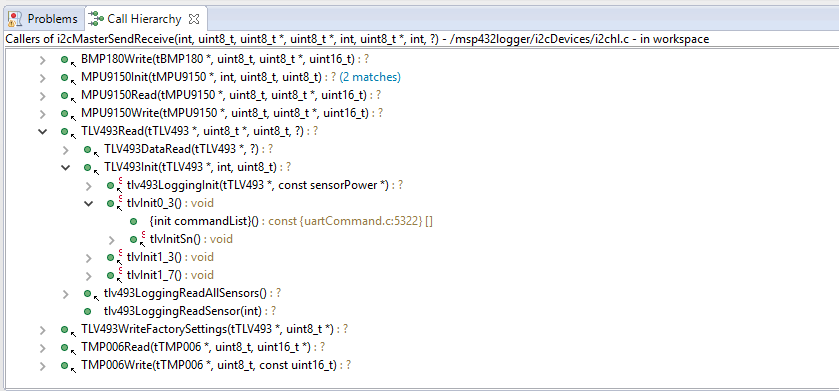
CCS show the call hierarchy for a function (i.e. a list of callers of the function). From the CCS Edit perspective, you can right-click on a function and select Open Call Hierarchy from the context menu. 

The screenshot below shows how the i2cMasterSendReceive() is called from the tlvInitSn cli command.

Missing Debugger Buttons in Simple Perspective

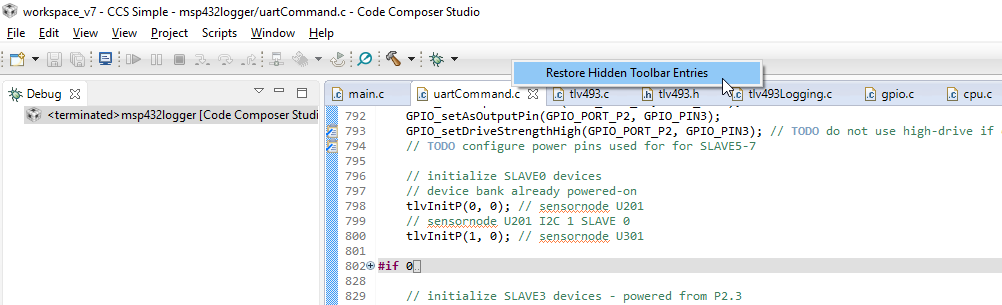
The Simple perspective in CCS should show debugger buttons in the toolbar (Run,  Step Into, Step Over, Pause, Stop, etc.) when a debugging session is active, but I have lost the buttons several times now. While switching to the Debug perspective is an option (which should be present in a debugging session) to use the buttons there, I have been able to restore the buttons in the Simple perspective by right-clicking on the menu bar and selecting Restore Hidden Toolbar Entries, then switching perspectives to something else and then back to Simple.


Branching in Subversion using TortoiseSVN

It is generally considered good practise with Subversion to keep trunk for stable useable code, and create a development branch from trunk for new development. The new development may be used, for example, to code a new feature, to perform release stabilization, or to experiment with refactoring, and will be merged back into the main branch when the work is complete.

Working on the msp432logger project, I wanted to refactor the code to create a distinct logging application, separate from the driver level, and created a new branch for the work called TRY-loggerapp

Create a development branch

I’m following Subversion best practices for my project directory structure, using trunk, tags and branches sub-directories.

Foresight

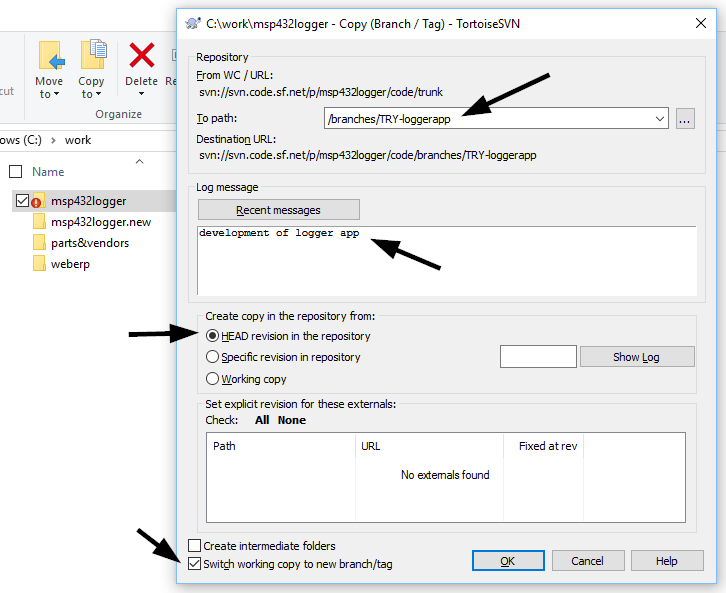
Right-click on the local repository workspace folder in Windows Explorer and pick TortoiseSVN -> Branch/tag… from the Context menu. Select the path for the branch, a log message, and the base for the branch. You can select HEAD or a specific version to base the branch on. If there are no edited files in the working copy, the Copy dialog will default to using the most recent version as the base for the branch.

tortoisesvn-07-create-branch-from-head-ok-comments

Hindsight

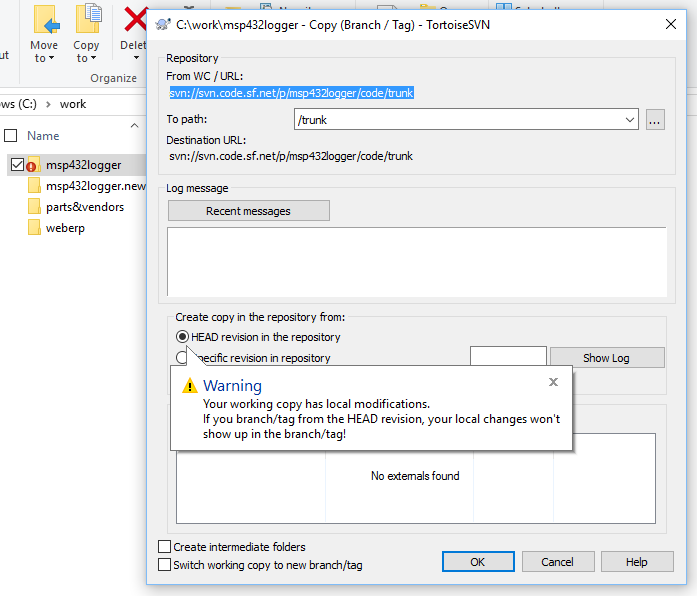
If you are creating the branch in hindsight and have already made file edits, TortoiseSVN will warn you that basing the branch on HEAD will result in loss of those edits.

tortoisesvn-01-create-branch

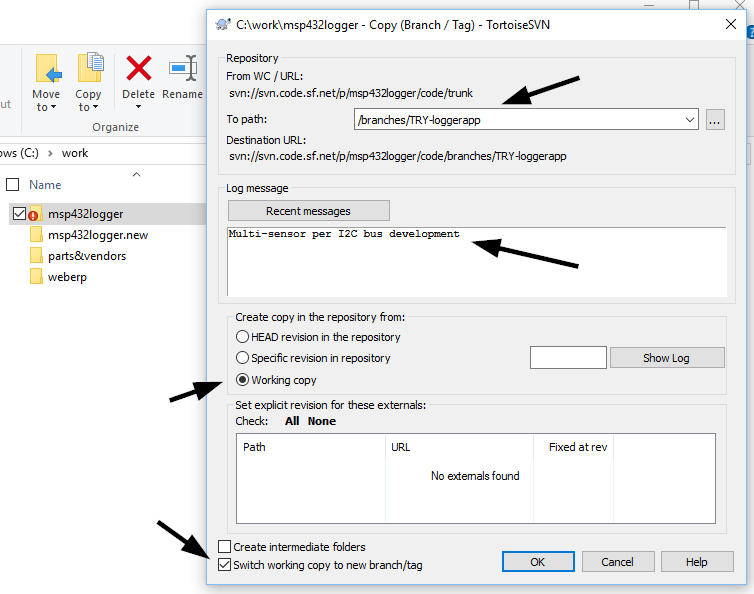
In this case, you will likely want your edits (and any new files) to become the first commit in the new branch. In this case, close the warning and select Create copy in the repository from: Working copy.

tortoisesvn-05-create-branch-ok-comments

Work in the dev branch

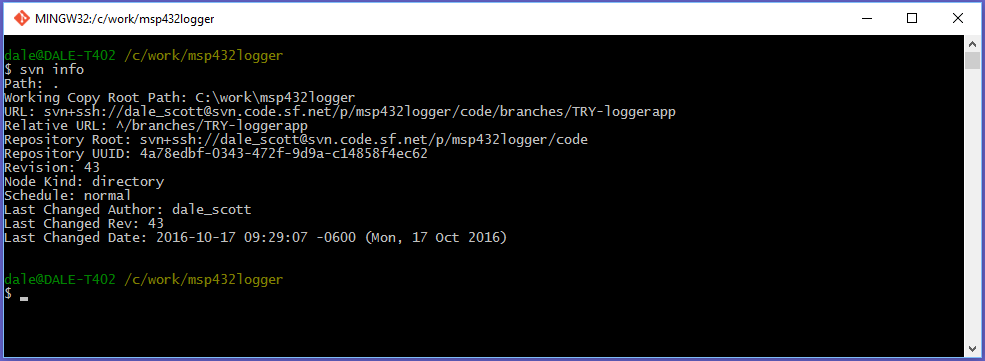
I selected Switch working copy to new branch/tag in the Copy dialogue when I created the branch. The current branch in the working copy can be verified using the svn info cli command.

tortoisesvn-09-svn-info

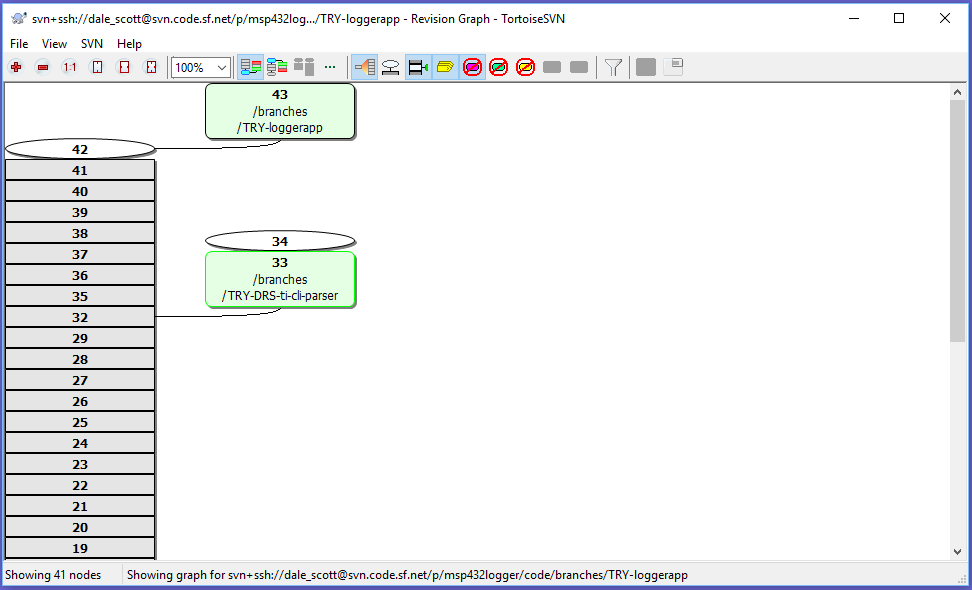
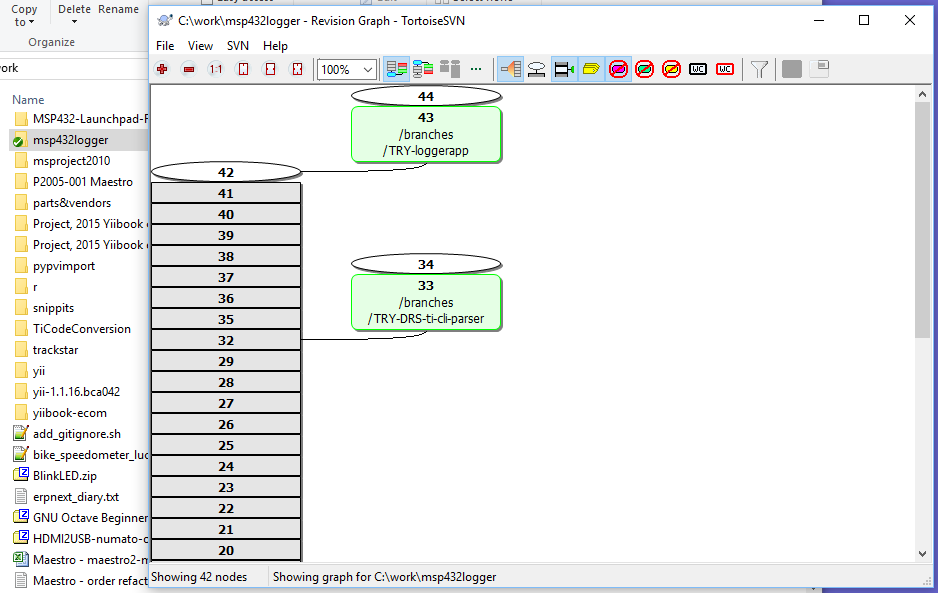
You can also see the new branch in TortoiseSVN’s Revision Graph.

tortoisesvn-10-svn-revision-graph

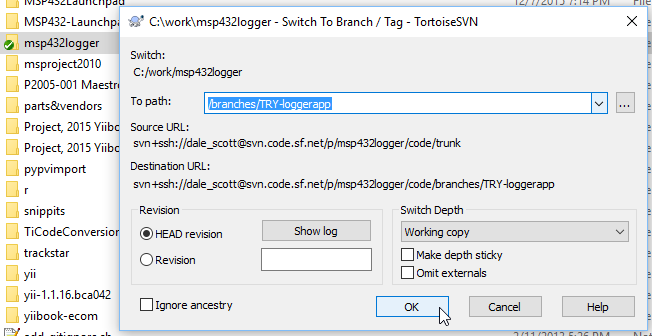
If I hadn’t checked Create copy in the repository from: Working copy when I created the branch, I would have had to Switch to the branch in a separate step.

Right-click on the local repository workspace folder in Windows Explorer and pick TortoiseSVN -> Switch… from the Context menu, and select the path for the branch to switch to.

tortoisesvn-10-switch-to-branch

You can confirm your working copy has switched to the desired branch using the Subversion cli command “svn info” as previously described before continuing development in the new branch.

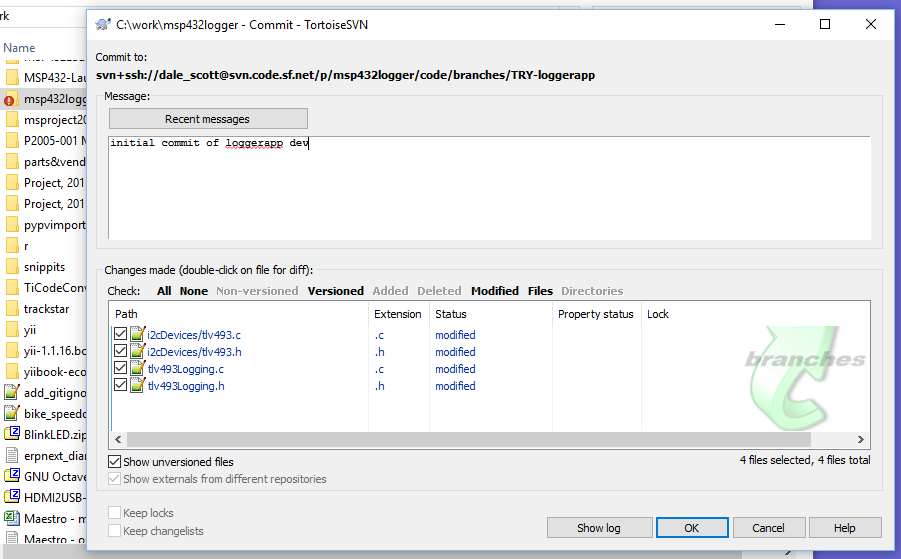
Checking in code is as before, but first check the Commit to: line at the top of the Commit dialogue to confirm the code will be checked into the correct branch.

tortoisesvn-11-first-commit

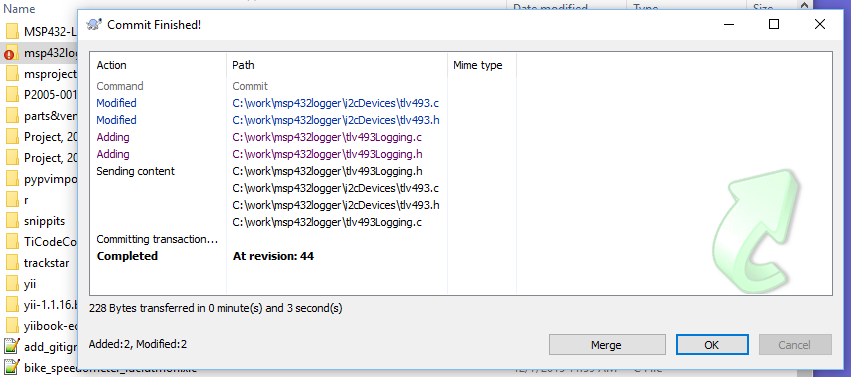
After clicking OK, you should see that the check-in completed successfully.

tortoisesvn-12-first-commit-finished

and the Revision Graph now includes the check-in.

tortoisesvn-12-new-revision-graph

Merge dev branch back into trunk

Eventually you want to merge the development branch back into trunk. The preferred method is to start with a clean working copy, check out the branch to merge into (i.e. check out trunk), then use the TortoiseSVN Merge Wizard to merge the desired branch into trunk.

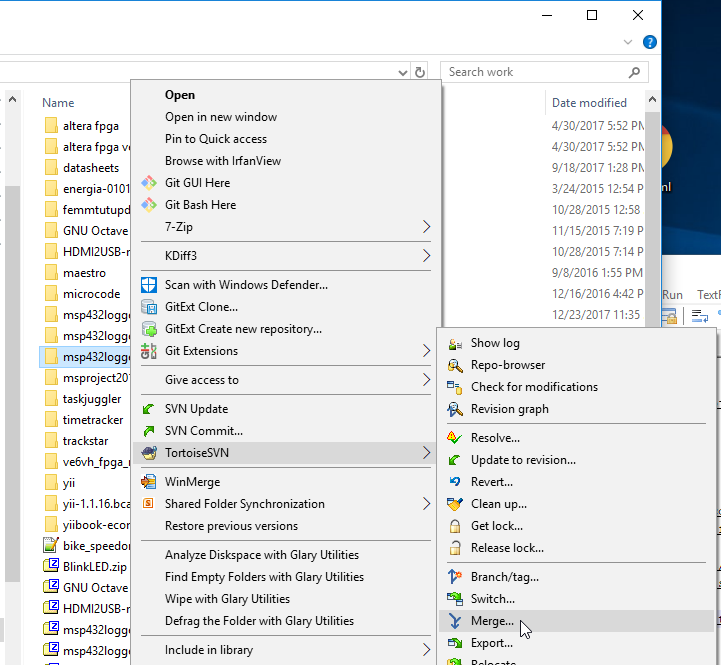
 Start the Merge Wizard.


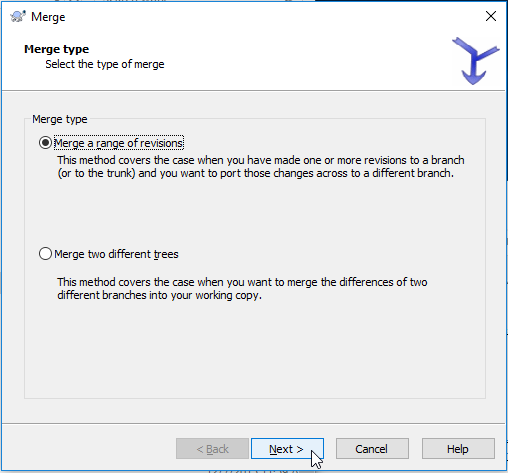
Select Merge Range of Revisions.

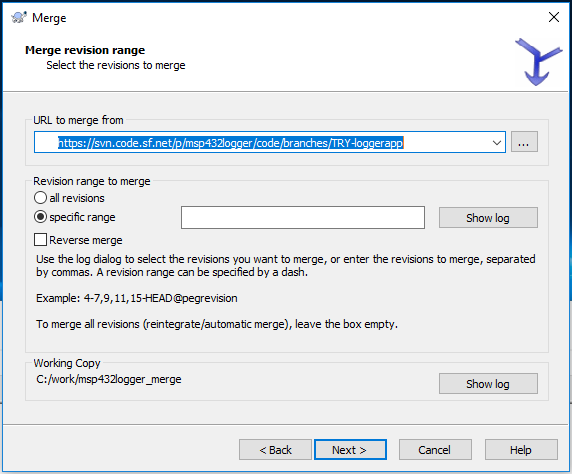
Select the branch to merge into the current branch.

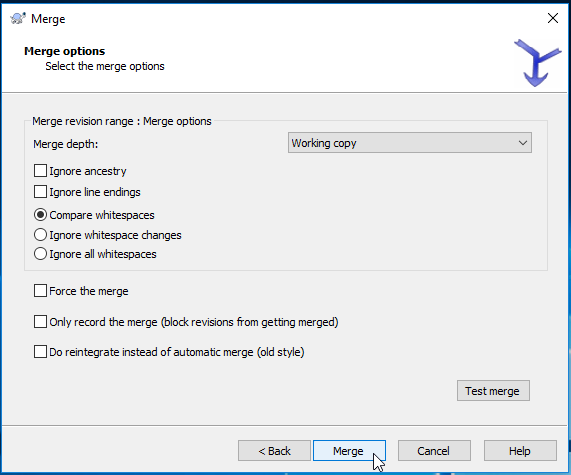
Options will not be necessary for basic operation.

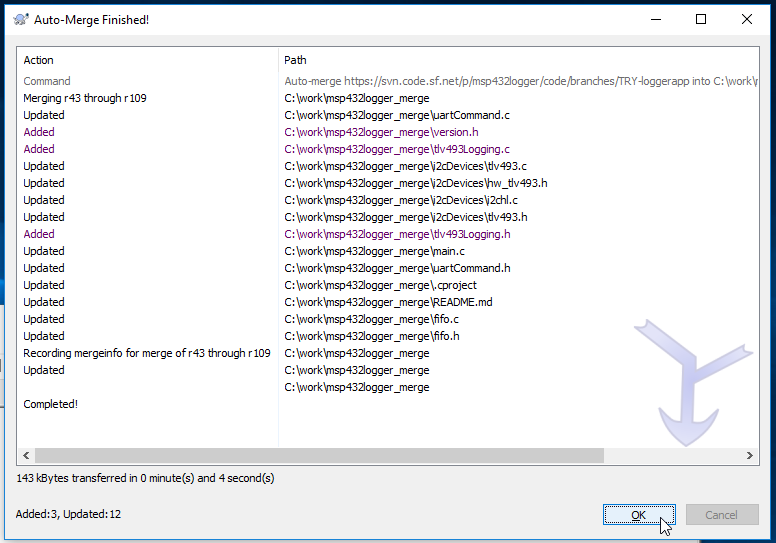
The results of the auto-merge will be shown.

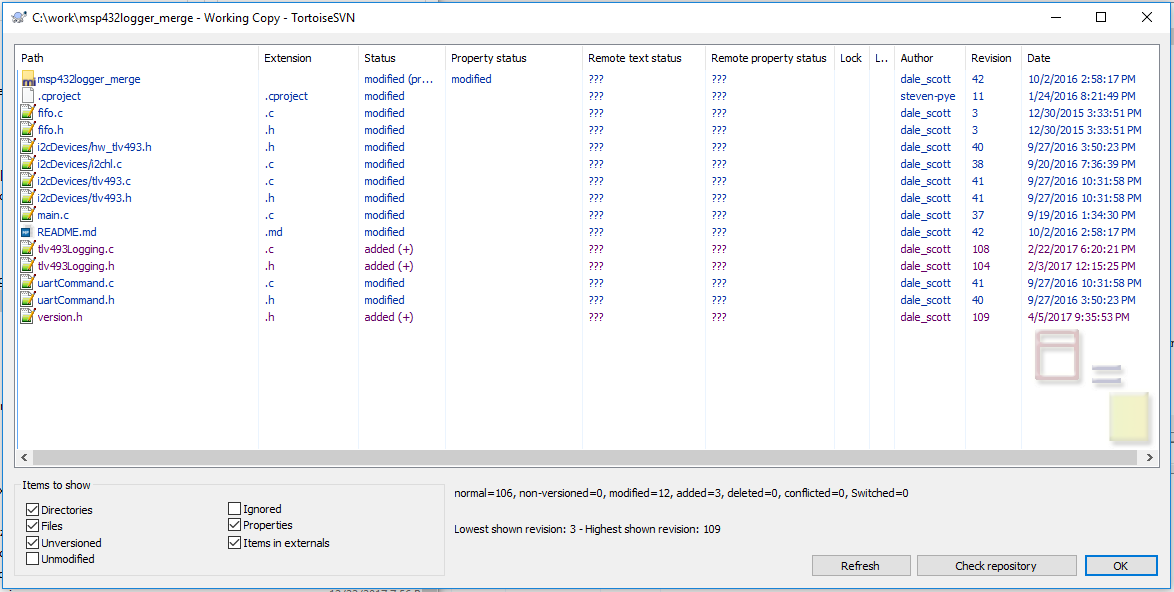
The working copy is now modified with the results of the merge.

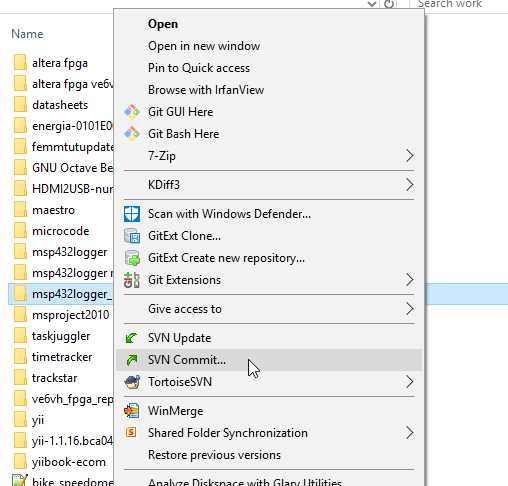
Test the modified working copy as needed, then commit the modified trunk branch back to the project.

Easy  Peasy!

Cheers,
Dale

FreeBSD Patch Accepted!

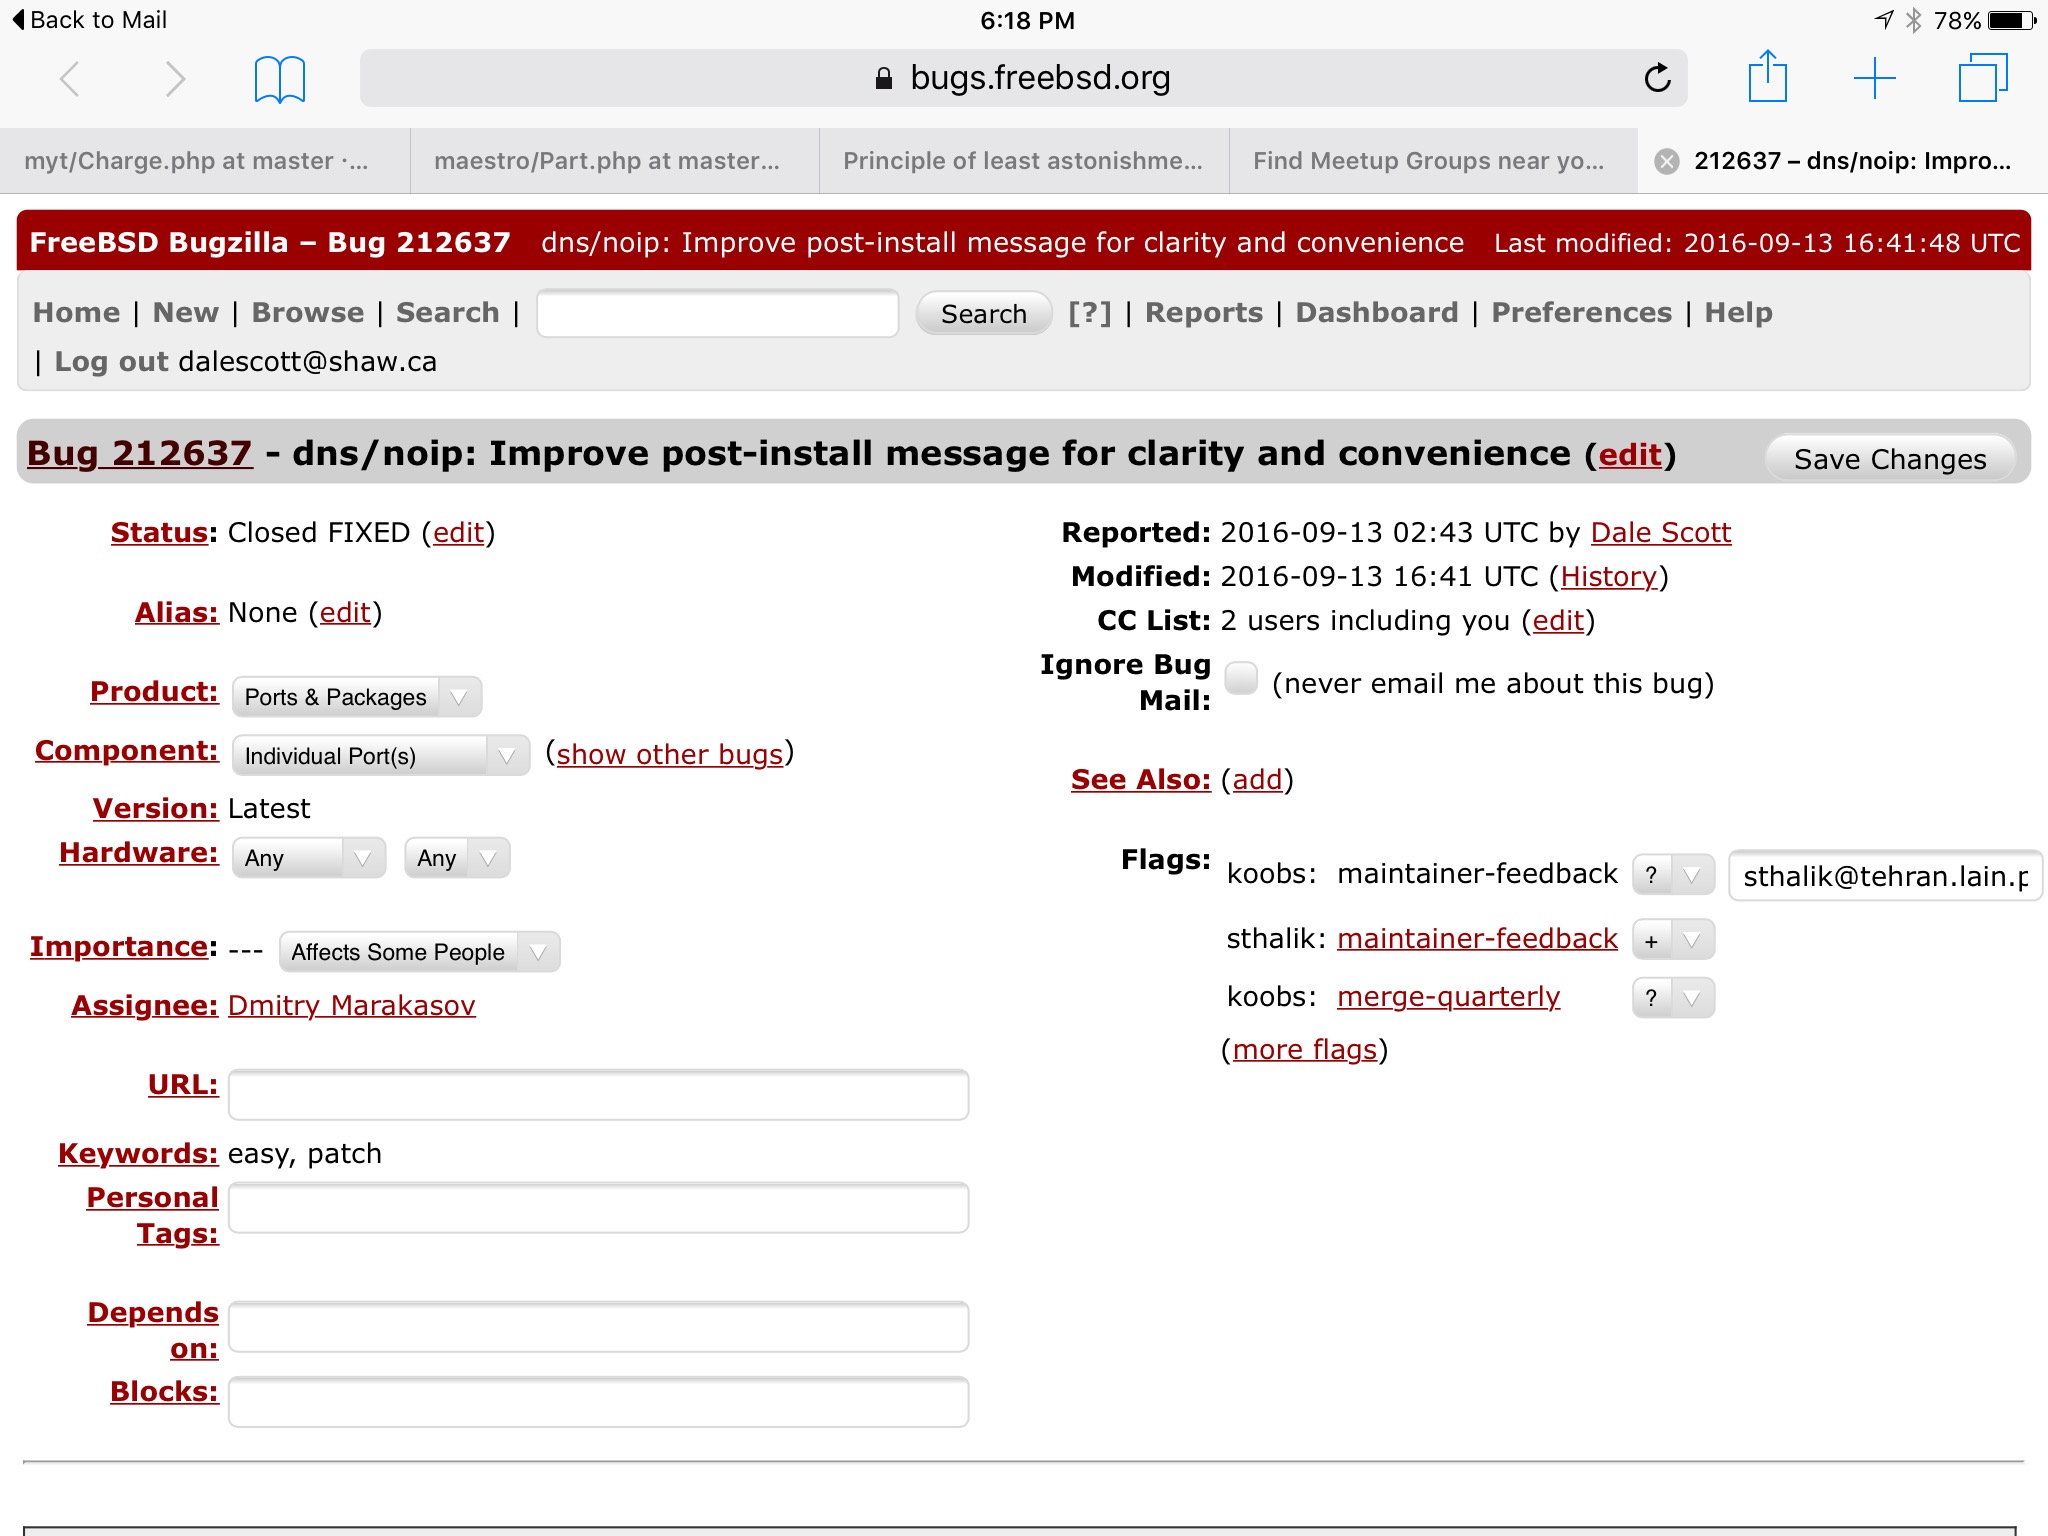
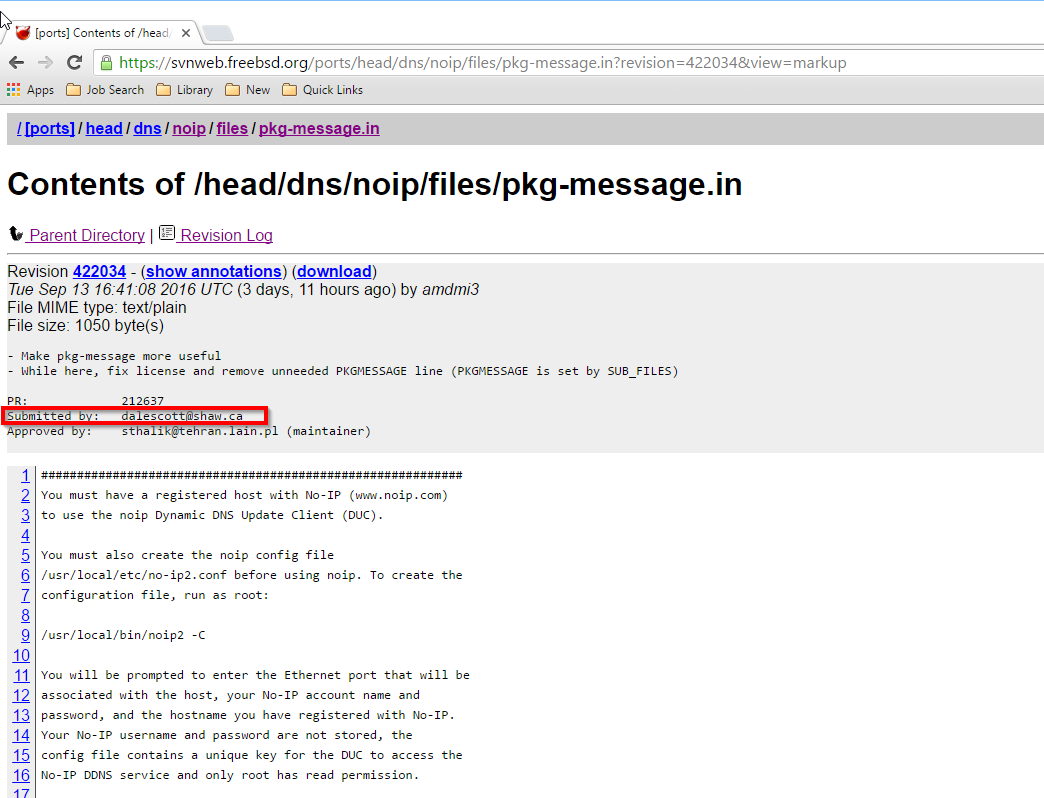
It was an emotional moment last week when I had a patch (code change) accepted by the FreeBSD operating system. It was a relatively simple change to the dns/noip port’s post-install message to clarify the port’s configuration and use (a port is the scaffolding code that integrates a third-party application into FreeBSD, and provided as part of FreeBSD).

FreeBSD is a free Unix-like operating system, most commonly found on servers in backrooms and data centers. It is similar to Linux, except that FreeBSD is a direct open source derivative of the original AT&T Research UNIX® (Linux is a re-implementation or clone). FreeBSD is more enterprise friendly than either Microsoft Windows or Linux, because of its permissive license allowing use and rework without cost or legal restrictions (Linux imposes the restrictive copy-left GNU Public License, or GPL, limiting a business’s ability to profit from its own innovations), and because FreeBSD has a well-defined release engineering process that is visible, accessible, and emphasizes stability and trust.

The motivation for the patch came when I was re-building several systems in which the dns/noip port was used – the client for No-IP’s DDNS service. Each time I searched which files had been installed by noip to find the README file with configuration details. The problem would have been avoided entirely if the missing information had only been included in noip‘s post-install message.

I informally discussed my proposed patch with Stanislaw Halik, the dns/noip port maintainer on record, who indicated his approval. I then submitted an official PR (problem report) to the FreeBSD project, and included a patch file giving the specific changes I was proposing.

The PR was reviewed by the FreeBSD maintenance team, Stanislaw gave his official approval, and my provided patch file had been merged into the FreeBSD codebase in less than 24 hours – visible, traceable and trustable!

2016-09-16-noip-pr-212637-dalescottshaw-ca

How cool was that! Although I submitted the patch to scratch my own itch, it was accepted based on its benefit to others.

Dale
Transparency with Trust

P.S. Stanislaw also introduced me to POLA, or the Principle of Least Astonishment. POLA applies to user interface and software design, and can be taken to mean that software should behave in a way that users will anticipate. Since the dns/noip port can now be installed as a binary package (not only compiling from source as has been traditional), users installing the binary package will expect instructions to be meaningful to their situation.