
The procedure described here is based on A successful Git branching model by Vincent Driessen (also known as Gitflow), adapted for use with GitHub’s Fork & Pull Model and showing both the developer and project maintainer workflows.
I would like to thank Vincent for his permission to plagiarize his article so such shamelessly.
This article was never completed and instead you may want to read Atlassian’s excellent Gitflow summary.
Why a Workflow Reference?
I have previously written about the ATK Framework and Achievo resource management projects moving to community governance. Along with a change in governance, the project repositories are moving to GitHub. Git and GitHub are not new to the ATK/Achievo community, but a well-managed project needs a documented workflow reference for consistent and efficient development.
The examples show the Achievo project, using Git-Bash for development on Windows and tcsh for production on FreeBSD, and using the ssh:// transfer protocol with configured ssh keys ~/.ssh/id_rsa on the development workstation and ~/.ssh/authorized_keys on the production server (https:// may be used to access GitHub through an enterprise firewall that blocks ssh, although in my case both ssh:// and https:// to GitHub are blocked).
Why Git and GitHub?
Simply put, a distributed version control system (DVCS) is a practical necessity for distributed development. Git is the de facto DVCS for distributed open-source development, and GitHub is the de facto hosting site for open source projects.
Why Gitflow?
A tool can be so versatile that it becomes difficult to use because of its versatility. Git and GitHub are like that. They impose no workflow, meaning users get to (or rather, have to) develop their own workflows. Gitflow brought order to the Git world by presenting a versatile workflow in easy to understand language, clear diagrams and example commands.
The only problem is that Gitflow follows the Shared Project Repository Model, where developers push changes directly to a shared canonical project repository, while the ATK Framework and Achievo projects (and many others) follow the Fork & Pull Model, where development is done in project forks and Pull Requests are used to have changes pulled into the canonical project repository. However, Gitflow can easily be adapted to the Fork & Pull Model.
Distributed but Centralized
Even though project development may be distributed, project teams usually designate one specific repository as the canonical project repository (where the “official” code is). The canonical repositories for the ATK Framework and Achievo projects are in the atkphpframework group on GitHub.
To develop in an open source project hosted on GitHub, a developer forks the canonical project repository to their own GitHub account, then clones the fork to their local system for development and testing. According to common Git convention, the fork is called “origin” (because it is the origin of your local development repo), and the canonical project repository is called “upstream” (because it is upstream from “origin”).
After completing a set of changes, a developer pushes their changes to origin (so their origin repo now includes their changes), then sends a Pull Request to the project maintainers to pull their changes upstream. A project maintainer reviews the changes in the Pull Request, pulls accepted changes into their own local clone of the canonical project repository, and finally pushes the result back to the canonical repository (yes, I said the changes are finally pushed to the canonical repository but the process from the developer’s perspective ended with the pull).
Sometimes a group of developers will collaborate on a new feature, pulling changes from each others origin repos, before sending a Pull Request for their collective result. This prevents premature work from being committed to the canonical repository. Pulling from other developers is simplified by defining a “remote” in your local repository for each of the origin repositories of the other developers working with you.
The following diagram shows the typical repository interactions for developers (the diagram does not show a) pulling between developers or b) responding to a Pull Request).

Fork a Project
First, fork a project to develop in. Forking a project means to take a copy of a project’s source code for independent development. On GitHub, it means to click the Fork button on a project page. GitHub then creates a clone of the project in your own GitHub account. You can fork one of your own repositories, a public GitHub repository, or a private GitHub repository that has been explicitly shared with you.
The first step is to login to GitHub and fork a project. I’m going to be developing in the Achievo project, so I access the Achievo canonical project repository and click the Fork button at the top of the page (just below my login name). GitHub then creates a public clone of the canonical project for me in my personal GitHub account.
Clone your Fork
After forking a project, you need to clone it to your local development system. How exactly you do this will depend on the protocol you want to use, specified by the source URL format used in the clone command. The Git protocol uses SSH keys instead of passwords, but uses a non-standard port that is generally blocked by corporate firewalls. The HTTPS protocol generally works behind corporate firewalls, but requires your GitHub login name and password for each commit (although they can be cached temporarily).
I’ll clone my Achievo fork to my local system using the Read-Write SSH URL (shown at the top of the GitHub project page for my fork).
$ dale@DALE-T61 /c/xampp/htdocs
$ git clone --recurse-submodules "git@github.com:dalers/achievo.git" "achievo"
Achievo is built on top of the ATK Framework and uses a Git submodule (atk/) to reference the ATK project repo on GitHub, instead of using a copy of the ATK code. The “–recurse-submodules” option to the clone command causes submodules to be pulled as part of the clone – without it the atk/ directory would be empty after cloning and you would have to manually update any submodules:
dale@DALE-T61 /c/xampp/htdocs/achievo (master)
$ git submodule update --init --recursive
Next, create an “upstream” remote in your local clone that references the canonical project repository. Use the GitHub read-only URL for the canonical project repository because you won’t be pushing any changes upstream (you’ll be using Pull Requests, remember?).
dale@DALE-T61 /c/xampp/htdocs/achievo (master)
$ git remote add upstream git://github.com/atkphpframework/achievo.git
dale@DALE-T61 /c/xampp/htdocs/achievo (master)
$ git remote -v
origin  git@github.com:dalers/achievo.git (fetch)
origin  git@github.com:dalers/achievo.git (push)
upstream        git://github.com/atkphpframework/achievo.git (fetch)
upstream        git://github.com/atkphpframework/achievo.git (push)
Finally, fetch from upstream to bring in the branches that are in the canonical repo. You will be using at least the upstream/develop branch so you can keep your local develop branch up to date with changes in the project repo.
dale@DALE-T61 /c/xampp/htdocs/achievo (master)
$ git fetch upstream
From git://github.com/atkphpframework/achievo
* [new branch]      develop    -> upstream/develop
* [new branch]      master     -> upstream/master
...
Branches and Merging
Branches are created in your local development repo for doing development. A branch is generally named according to the development being done, but Gitflow naming rules and project conventions might apply if the branch is going to eventually be pushed upstream.
Gitflow defines standard branches with rules for how they can be created and merged. When following Gitflow, a canonical repository always contains at least two branches:
- master
- develop
master and develop are long-running branches, starting essentially at the creation of a project and lasting for as long as the project does. The master branch contains the most recent production release, and the develop branch contains the latest changes intended for the next production release.
Gitflow also defines several types of topic branches. Topic branches aid parallel development, ease tracking of features, prepare for production releases and assist in quickly fixing live production problems. Unlike the master and develop branches, topic branches have a limited life time and will eventually be merged into the develop branch (and possibly also the master branch) and then removed. There are three types of topic branches:
- Feature branches
- Release branches
- Hotfix branches
Each type of topic branch has a specific purpose with strict rules for how a branch of that type can be created, named and merged.
These types of branches will be presented in more detail shortly, but note for now that they are standard Git branches and not special in any way from a technical perspective. It is only the rules defined by Gitflow that make them special.

Merging
Merging is when changes on one branch are applied to a different branch. The –no-ff flag results in a merge always creating a new commit object – even if it could be performed with a fast-forward. This avoids losing information about the historical existence of the feature branch. Compare the following two merge examples:
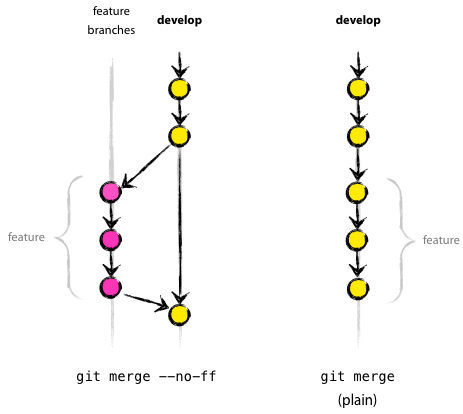
In the case of the –no-ff merge, the commits from the feature branch are clearly visible. In the case of the plain merge (without the –no-ff option), the feature branch commits cannot be distinguished from the other commits (you could read through the log messages, but even that might not make it clear). Reverting a feature can be extremely difficult with a plain merge, but is easy when the –no-ff flag is used.
You can make the –no-ff option Git’s default merge behavior by adding it to your global git config (you could add it to the repo config, but it’s best left to each developer’s discretion).
$ git config --global merge.ff false
master and develop Branches
As previously described, a canonical repository (“upstream”) always has at least two branches, master and develop.

Gitflow defines the upstream/master branch to contain the current production release, and the upstream/develop branch to contain code intended for the next production release (some may call this the “integration branch”, it is also the code that automatic QA regression testing is performed on).
When the code in the develop branch is deemed to be stable and appropriate for production release, it is merged into master and tagged with a release number.
By definition, the act of merging the develop branch into the master branch is a production release.
Feature Branches

- Branch from: develop
- Merge into: develop
- Named: anything except master, develop, release-* or hotfix-*
Feature branches are used to develop new features for the upcoming release or a distant future release. When starting development of a feature, the target release in which this feature will be incorporated may well be unknown at the time. The essence of a feature branch is that it exists as long as the feature is in development, but will eventually be merged back into develop (to definitely add the new feature to the upcoming release) or discarded (in case of a disappointing experiment).
Depending on the feature, the feature branch may exist only in the developer’s local repo (in other words, it is not pushed to either the developer’s GitHub fork or to the canonical project repo). This is especially the case for smaller solo developments. However, a significant feature branch is typically pushed upstream so that everyone can access it (for review, testing, and development).
Create a feature branch
First, check the local branches in your repo and what branch you are currently on.
dale@DALE-T61 /c/xampp/htdocs/achievo (master)
$ git branch
* master
Checkout a new branch (appropriately named ‘myfeature’) from the origin/develop branch.
dale@DALE-T61 /c/xampp/htdocs/achievo (master)
$ git checkout -b myfeature origin/develop
Branch myfeature set up to track remote branch develop from origin.
Switched to a new branch 'myfeature'
Now it’s time to code, commit some changes, do some testing, code some more, commit some more, test some more …
dale@DALE-T61 /c/xampp/htdocs/achievo (master)
$ git commit -a
Finally, update your local master branch, then create a local develop branch from origin/develop and update it from upstream as well (you’ll want upstream up-to-date for branching it to a new feature branch – more on this later).
dale@DALE-T61 /c/xampp/htdocs/achievo (master)
$ git merge upstream/master
Already up-to-date.
dale@DALE-T61 /c/xampp/htdocs/achievo (master)
$ git checkout -b develop origin/develop
Branch develop set up to track remote branch develop from origin.
Switched to a new branch 'develop'
dale@DALE-T61 /c/xampp/htdocs/achievo (develop)
$ git merge upstream/develop
Already up-to-date.
dale@DALE-T61 /c/xampp/htdocs/achievo (develop)
$ git checkout -b achievocore develop
Switched to a new branch 'achievocore'
Merge the feature branch into develop
Finished features are merged into the develop branch, to be included in the next production release.
$ git checkout develop
Switched to branch 'develop'
$ git merge --no-ff myfeature
Updating ea1b82a..05e9557
...
$ git branch -d myfeature
Deleted branch myfeature (was 05e9557).
$ git push origin develop
Push the develop branch to origin
TODO
Issue a Pull Request
TODO
Process the Pull Request
TODO
Release Branches
- Branch from: develop
- Merge into: develop and master
- Named: release-x.x.x
A release branch is where the code for a new production release is stabilized, including fixing minor bugs found during release testing and preparing meta-data for the release (updating version numbers, updating CHANGES and AUTHORS files, etc.). By doing the stabilization work on a release branch, the develop branch is cleared to receive changes for the following release.
A release branch should be created when develop (almost) reflects the desired state of the new release. At the very least, all features targeted for the release must have been merged into develop. Merging features targeted for a subsequent release into develop must wait until after the release branch is branched from the develop branch.
It is only when the release branch is branched that the intended release designation is decided – not sooner. Before the release branch is created, it is only known that the develop branch reflects changes intended for the “next release”. Deciding what to officially call the “next release” is made on the start of the release branch according to the project’s rules for version number bumping (e.g. if the current release is 0.2, whether the next release will be 0.2.1, 0.3, or 1.0.0).
Release branches are created from the develop branch. For example, say version 1.1.5 is the current production release and we have a big release coming up. The state of develop is ready for the “next release” and we have decided that this will become version 1.2 (rather than 1.1.6 or 2.0). So we branch off and give the release branch a name reflecting the new version number:
$ git checkout -b release-1.2 develop
Switched to a new branch "release-1.2"
$ ./bump-version.sh 1.2
Files modified successfully, version bumped to 1.2.
$ git commit -a -m "Bumped version number to 1.2"
[release-1.2 74d9424] Bumped version number to 1.2
1 files changed, 1 insertions(+), 1 deletions(-)
After creating a new branch and switching to it, we bump the version number. Here, bump-version.sh is a fictional shell script that changes some files in the working copy to reflect the new version (this of course can be done manually, the point is that at least the version identifier in the code is changed). Then the bumped version number is committed.
This new release branch will exist until the release is actually made. During this time, the code is stabilized and bug fixes are committed to the release branch (although if significant may also be merged back into develop). Adding new features into a release branch is strictly prohibited. If a release will be delayed to incorporate a new feature, the release branch should be abandoned, the new feature completed, and then the release process started over, otherwise continue developing the new feature in a feature branch and include it in the next release.
Push the release branch to origin
Finished features are merged into the develop branch, where they will then be included in the next production release.
Issue a Pull Request
TODO
Process the pull request (make the release)
When the release branch has been stabilized and ready to be released, the release branch is first merged into master (since every commit on master is a new release by definition, remember). Second, the commit on master is tagged for easy future reference. Finally, the release branch is merged into develop, so that develop includes the stabilization and bug fixes done in the release branch (and will be included in the next production release).
$ git checkout master
Switched to branch 'master'
$ git merge --no-ff release-1.2
Merge made by recursive.
...
$ git tag -a 1.2
The release is now done, and tagged for future reference. It is increasingly common for the project maintainer to sign the tag (using the -s, or -u <key>, option to the tag command), but this varies from project to project.
To keep the merge the changes from the release branch into develop:
$ git checkout develop
Switched to branch 'develop'
$ git merge --no-ff release-1.2
Merge made by recursive.
...
This step likely results in a merge conflict (because the version number has changed). If so, fix it and commit.
Now we are really done and the release branch may be removed, since we don’t need it anymore:
$ git branch -d release-1.2
Deleted branch release-1.2 (was ff452fe).
Create a release branch
TODO
Push the release branch to origin
TODO
Issue a Pull Request
TODO
Process the Pull Request
TODO
Hotfix Branches

- Branch from: master
- Merge into: develop and master
- Named: hotfix-x.x.x
Hotfix branches are very much like release branches, but follow an expedited workflow since they are created to release a single immediate fix to production. The normal release branch process cannot be followed because the develop branch will typically contain many changes since the last release, and would take too much time to stabilize and release. The purpose of a Hotfix branch is to correct a single, well-understood defect of limited-scope. If this isn’t the case, then the normal release process must be followed (and the previous release was premature, but that’s a different problem).
Create the hotfix branch
Hotfix branches are created from the production release in the master branch. For example, say version 1.2 is the current production release and a severe bug has been discovered. causing troubles due to a severe bug. We branch off a hotfix branch and start fixing the problem:
$ git checkout -b hotfix-1.2.1 master
Switched to a new branch "hotfix-1.2.1"
$ ./bump-version.sh 1.2.1
Files modified successfully, version bumped to 1.2.1.
$ git commit -a -m "Bumped version number to 1.2.1"
[hotfix-1.2.1 41e61bb] Bumped version number to 1.2.1
1 files changed, 1 insertions(+), 1 deletions(-)
It’s best practice to immediately bump the version number after branching of, then fix the bug and commit the changes in one or more commits.
$ git commit -m "Fixed severe production problem"
[hotfix-1.2.1 abbe5d6] Fixed severe production problem
5 files changed, 32 insertions(+), 17 deletions(-)
Push the hotfix branch to origin
Finished features are merged into the develop branch, where they will then be included in the next production release.
Issue a Pull Request
TODO
Process the pull request (make the release)
When finished, the hotfix branch is merged into master for release. It is also merged into develop so that the fix is included in the next release as well. This is the same as releasing from a release branch.
First, update master and tag the release.
$ git checkout master
Switched to branch 'master'
$ git merge --no-ff hotfix-1.2.1
Merge made by recursive.
(Summary of changes)
$ git tag -a 1.2.1
The hotfix is now released and tagged for future reference. Like any release, it is increasingly common for the project maintainer to sign the tag (using the -s, or -u <key>, option to the tag command), but this varies from project to project.
Next, merge the hotfix into the develop branch:
$ git checkout develop
Switched to branch 'develop'
$ git merge --no-ff hotfix-1.2.1
Merge made by recursive.
...
There is one situation requiring special attention. If an upcoming release is currently being stabilized in a release branch, you will need to ALSO need to merge the hotfix into that release branch. If the release is imminent, you may chose to ONLY merge the hotfix into the release branch (it will eventually be merged into develop when the release branch is finished). However, if the release is abandoned for any reason, the hotfix may be forgotten and never merged into the develop branch – and you will wonder why the bug has reappeared in the next release.
Finally, remove the temporary branch:
$ git branch -d hotfix-1.2.1
Deleted branch hotfix-1.2.1 (was abbe5d6).
Create a hotfix branch
TODO
Push the hotfix branch to origin
TODO
Issue a Pull Request
TODO
Process the Pull Request
TODO
Conclusion
As Vincent Driessen said in “A successful Git branching model“, there is nothing really new about this model. It’s just about communicating a concept so that it can be understood and accepted. Isn’t that what solving most problems is about?
Further Reading
I also found the following references helpful:
- Pro Git, by Scott Chacon (free) or commercial
- Git Branching and Merging (Git documentation)
- Git for Beginners, by Ryan Florence
- Git from the bottom up, by John Wiegley (PDF)
- GitHub Suggested Workflow (Apreche.net)
- Collaborative GitHub Workflow (eqqon.com)
- Pro Git, by Scott Chacon (free) or commercial
- Git Branching and Merging (Git documentation)
- Git for Beginners, by Ryan Florence
- Git from the bottom up, by John Wiegley (PDF)
- GitHub Suggested Workflow (Apreche.net)
- Collaborative GitHub Workflow (eqqon.com)
Hi Dale.
I’m traying to implement that, But I’m not sure, When Can developer does the pull request to canonical project repo?
A pull request isn’t part of Git per se. GitHub is a set of services built on top of Git, which includes the “pull request” workflow. Following the Gitflow model does not require GitHub.
What I think you are asking about is how a development team is organized, and the hierarchy within the team. The need to push a commit to the canonical repo escalates through the commit approval process the team is using until it reaches someone with the authority to push to the canonical repo. This may require multiple repos with strictly controlled push access, and a commit works its way up through the repo hierarchy. IIUC this is how the Linux kernel development is organized.
GitHub turns this around to work better with unstructured teams. A contributor doesn’t need to know the team structure, they simply send a pull request to the canonical repo (on GitHub), which goes to the owner of the repo who accepts the pull request and pushes the commit.
I hope that helps.
Cheers, Dale
hello, does the release branch created by upstream account and other developer’s account just pull it?
Hi Charles, this is the part I’m not as sure about, but I’m working this out now for the Maestro project and will be updating this more soon.
I think the upstream project will typically merge changes from a fork repo’s master branch into the upstream repo’s release branch if for release stabilization (leading to an x.0.0 x.y.0 or x.y.z release), or into the develop branch or a feature branch if the changes are still part of a work in process (intended for a later release), but only in response to a Pull Request from the fork repo.
Haha TODO because you are ripping this off from another site?
No, not ripping off, I simply haven’t had the time to finish the post, and Vincent gave his permission for the diagrams. I hope to get back to the post, because I haven’t found any other tutorials yet on managing a GitHub project from the perspective of a project maintainer.