I will be at the EPTECH electronics exhibition in Calgary on March 9 to present webERP as the ideal platform for engineering PLM and to manage parts and orders for engineering prototyping and small-volume production. Watch for me if you’re going to be there, I would love to hear about the challenges facing you, and what strategies you have found work best.
Engineering teams need to manage part numbers for off-the-shelf and custom parts, and bills of materials for assemblies, including keeping track of selected COTS OEM part numbers and vendor information for purchasing, and the current revision of a custom part (and why it’s the current version). Engineering teams must also control source documents for custom parts, such as mechanical drawings, schematics and PCB fabrication files, and also often manage prototype and small-volume purchasing and manufacturing.
webERP is the ideal platform for an engineering team to organize and manage this information with trust and transparency, providing controlled access to anyone in the organization who needs it. webERP is a fully-featured enterprise-grade ERP system, but it is equally suitable for use at an engineering department level.
EPTECH is Canada’s only series of coast-to-coast national electronics shows, targeting electronics designers, engineers, technicians, technologists, purchasers, technical managers and researchers. A broad spectrum of the electronics industry will be on display, including passive and semiconductor devices, electro-mechanical components, test equipment, contract test and manufacturing services…. EPTECH is also a place where the local community can cross paths on an annual basis, the significance of which is often under-estimated.
Implementing an Enterprise Resource Planning (ERP) system for purchasing in a small company offers significant advantages, primarily by centralizing and streamlining the procurement process. This centralization eliminates manual tasks and reduces errors, leading to improved accuracy in orders and inventory management. Furthermore, an ERP system enhances visibility into spending and supplier performance, enabling better negotiation power and cost savings. It also facilitates automation of routine tasks like purchase order generation and invoice processing, freeing up staff for more strategic activities. Ultimately, an ERP system empowers small companies to optimize their purchasing operations, reduce costs, and make more informed decisions.
A manufacturing enterprise purchases raw material, converts the raw material to finished goods and services, and sells the finished goods and services to customers. This tutorial will cover manually purchasing a short list of items in a Bill of Materials – commonly known simply as the “BOM” (pronounced “bomb”, which itself is interesting since “exploding a BOM” means to consider the items on the BOM individually).
Purchasing can also be done semi or fully automatically based on demand (sales order, manufacturing order or forecast), which will be the topic of a seperate tutorial.
Features of using webERP for purchasing include:
Efficiency. Items, Vendors, Purchase Orders, etc. are managed within one controlled system. Fix a problem once and it’s fixed everywhere.
Visibility. Purchases must be approved before printing and payment must be approved before being issued.
Scalable. Readily scales with users, items, vendors and orders, and adapts as your processes change over time.
The custom inductor in the Aircraft Wireless will be used as an example. Documentation will be stored in the webERP Knowledge Base (integration with WackoWiki CMS).
Goals
Issue purchase orders to a vendor.
Receive goods into inventory.
Create a vendor invoice and pay the vendor.
Purchasing Terms
A Vendor is a party who sells goods or services, other names often used are Supplier and Source.
A Purchase Order is a request to purchase an item sent from the intended purchaser to a vendor. If the vendor accepts the purchase order, it becomes a legally binding contract.
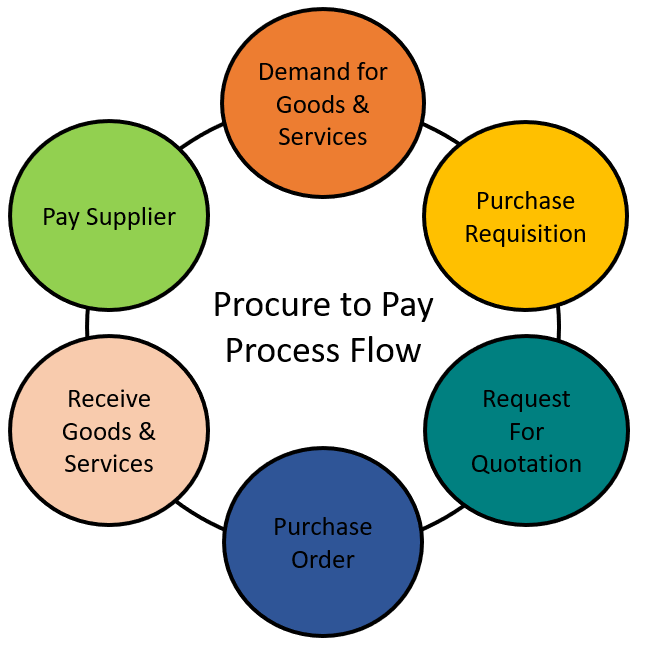
Procure to Pay (P2P) Process
The complete purchasing and payment process cycle is commonly called Procure to Pay, or P2P.
TODO re-generate image as original art with steps named per webERP convention and in style of O2C flowchart (see Sell with webERP)
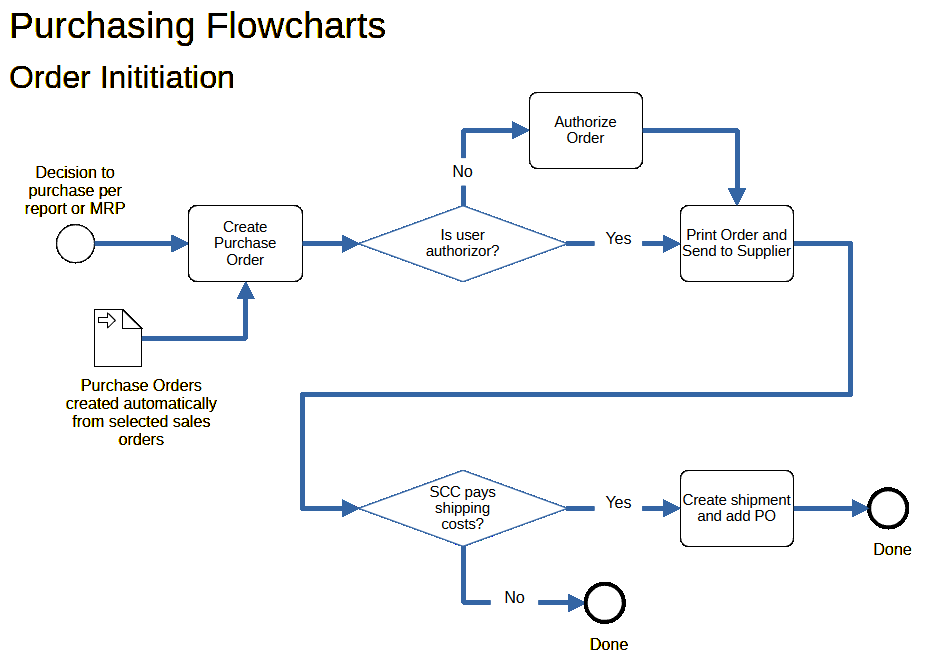
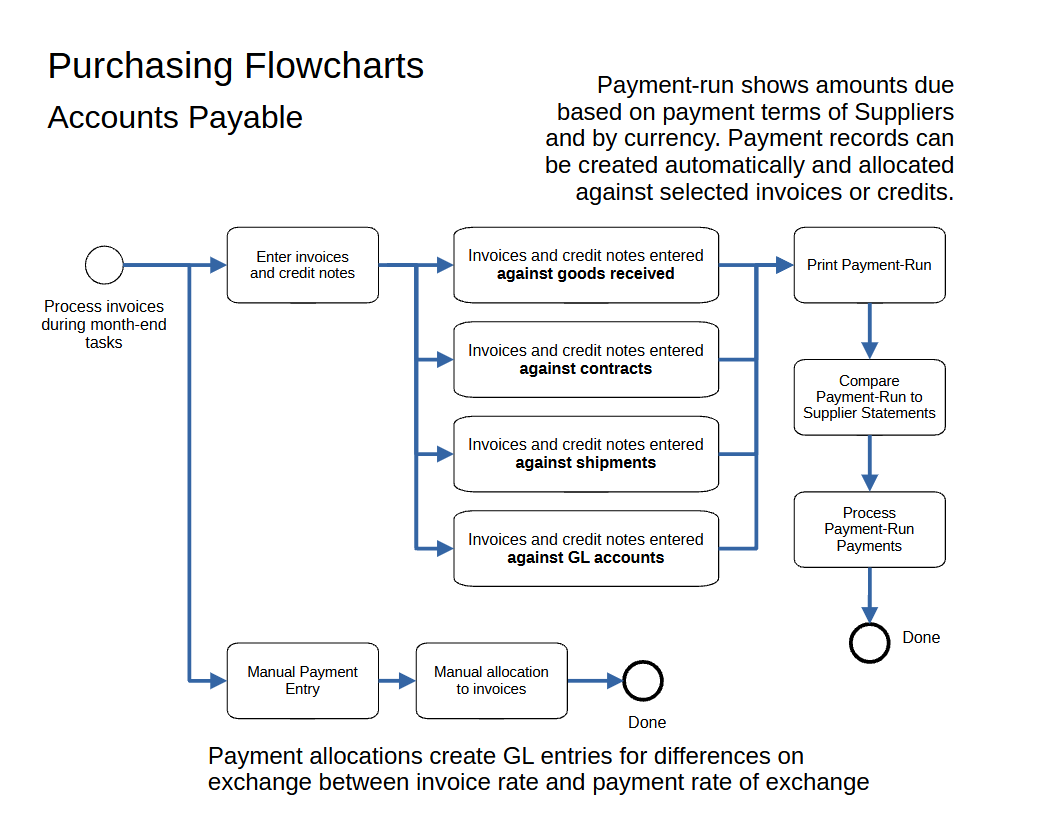
Purchasing Flowcharts
The general purchaing process in webERP is as follows:
Step 1. Create, print and send a purchase order to a vendor. The order will be approved and can be printed if the creator has authorization permission, otherwise it will be queued for authorization by someone who does have authorization. “Printing” is a euphemism for issuing the order to the vendor, and an order must be printed before stock can be received against it.
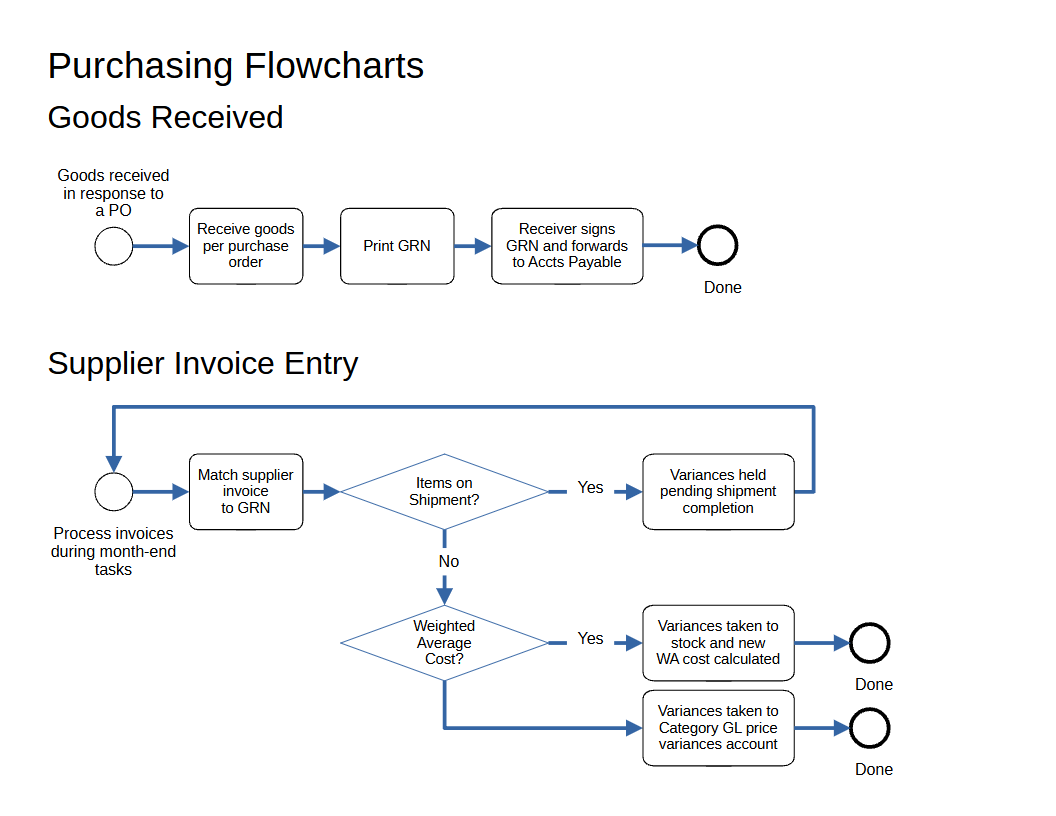
Step 2. Receive stock against purchase order.
Step 3. Print a Goods Received Note and submit to the Accounts Payable department for matching to the vendor invoice.
Step 4. Print and attach QA labels to the received goods.
Step 5. Pay Vendor. Payment is often made after goods are received according to the purchase terms (e.g. “30 day”) although other terms, such as prepayment and cash on delivery (COD), are also common. To pay a supplier, a supplier vendor invoice must be created and matched to the order and to the a goods receipt note (GNR).
TODO replace flow-charts with single swim-lane drawing
User Permissions
We will login as user “mnestor” (Mary Nestor), who is assigned the Administrator security role and has permission for almost all operations. If a user with a different security role is needed it will be noted.
In actual use each user should have their own login ID and configure a password that only they know. This enabled webWEP to correctly attribute transactions and other events for tracibility. While a single user ID with all security privileges could be used, it circumvents simple role-based user controls that prevent accidental errors. Also any business planning to scale rapidly based on standardized work flows, or that operates in a regulated industry, will require individual user login IDs.
The default (out-of-the-box) user permissions and security configuration will generally be sufficient to get you started. Eventually though you will want to create bespoke security roles and token assignments based on the structure, staff and relationships of your company.
Configuring user permissions is covered in more detail in the webERP User Permissions chapter.
Setup
Purchase Order Authorization
To simplify matters, we will follow the process as a user whose a security role allows purchase order creation but also to authorize them. While it is desirable to seperate these functions into different people for risk and security reasons, but this is not necessarily possible for a small company and approving an order would be an unnecessary and annoying second step.
Purchase order authorization was enabled via [Main Menu > Setup > System Parameters], each currency must be individually authorized via [Main Menu > Setup > Receivables/Payables Setup > Set Purchase Order Authorisation Levels]
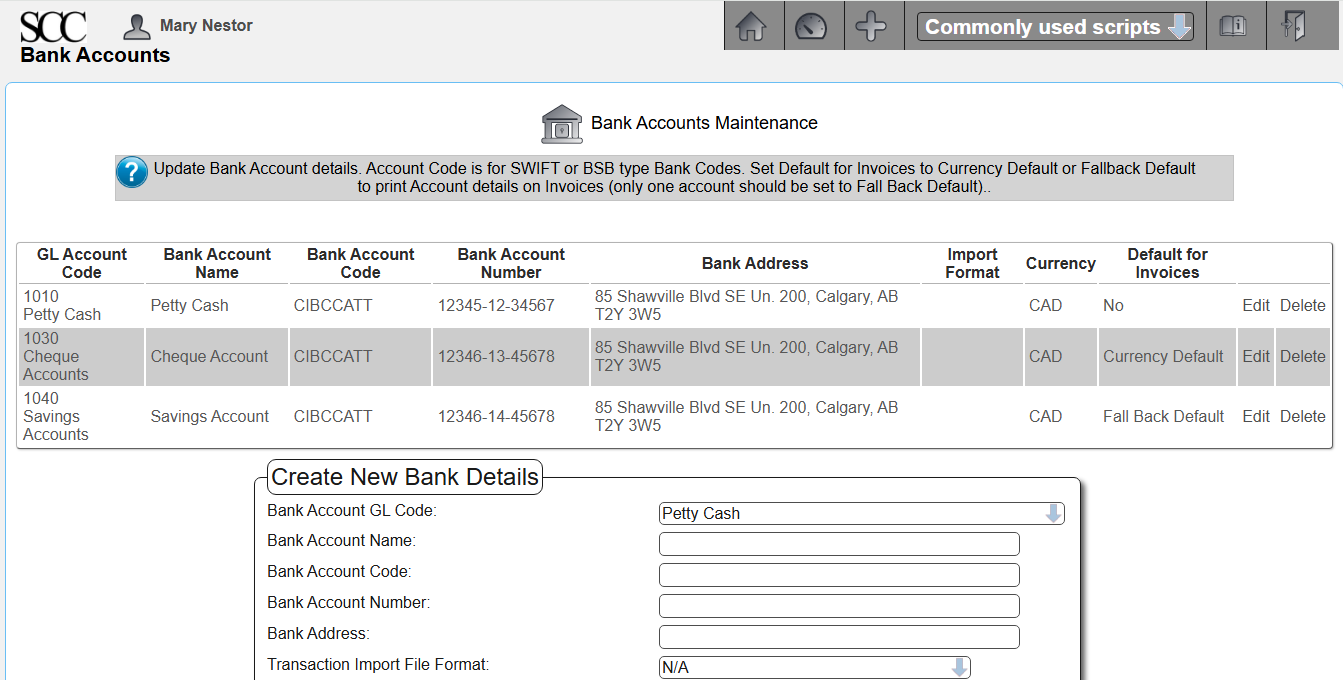
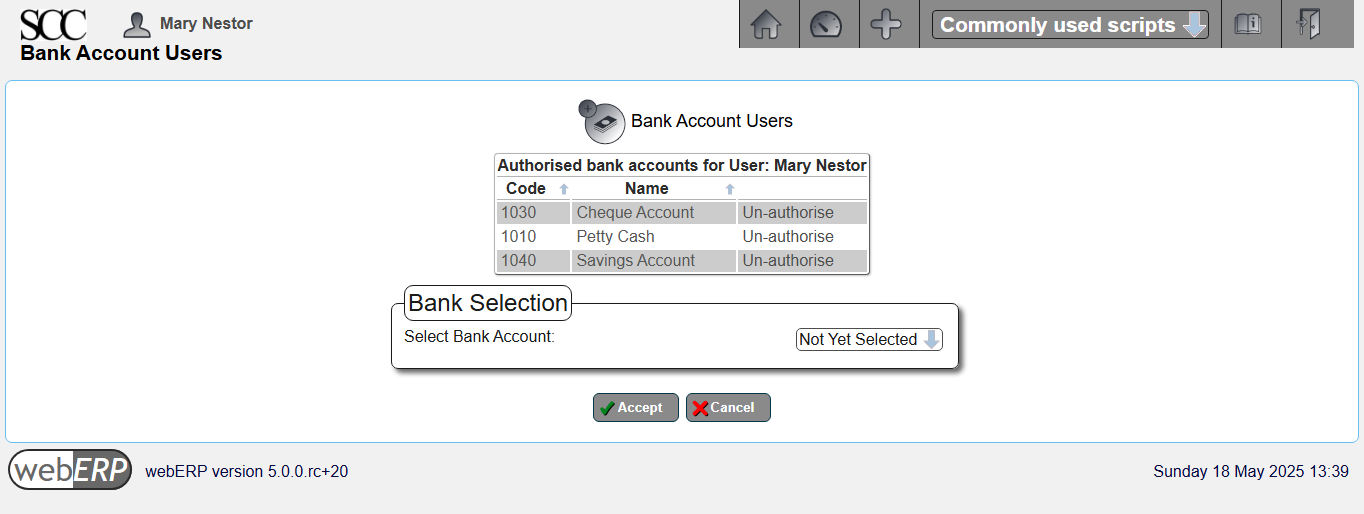
Bank Accounts
Bank accounts must be entered before recording payment to a vendor is possible.
[Main Menu > General Ledger > Maintenance > Bank Accounts]
In addition to entering the bank account information, the user must also have authorization to use the bank accounts.
Bank account authorization can be accessed either by user or bank account.
[Main Menu > General Ledger > Maintenance > User Authorized Bank Accounts]
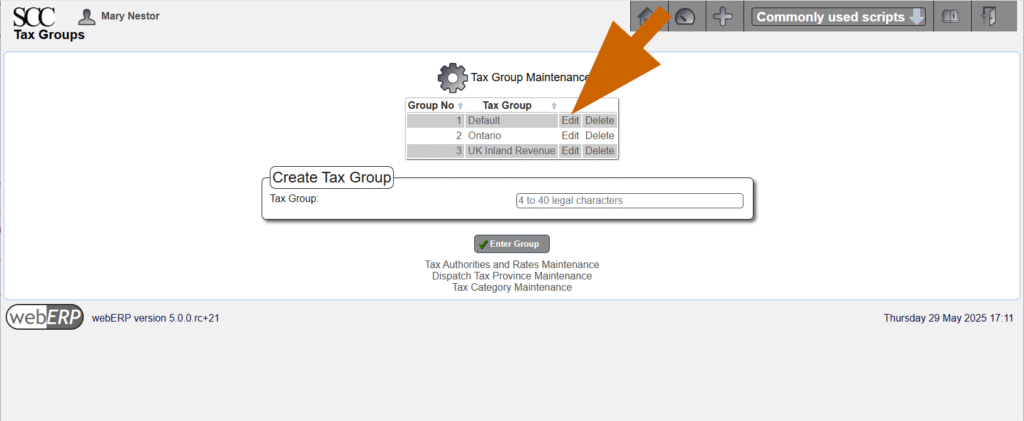
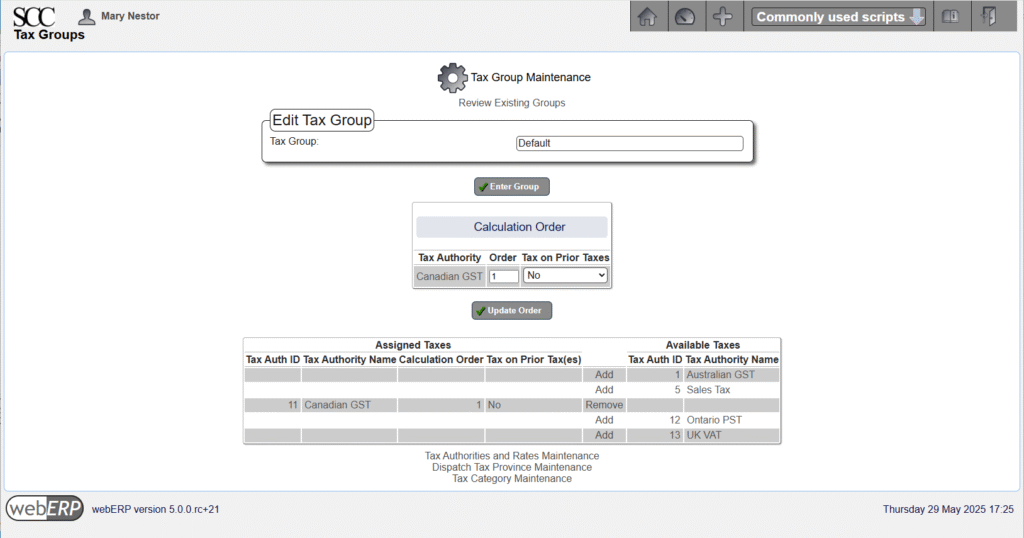
Tax Group
Although the Supplier is created when a bought-in Item is created in the PLM (Product Lifecycle Management) process, taxes are managed as a purchasing function.
The tax group determines the tax authorities to which the supplier reports and must collect taxes for. The tax group in conjunction with the inventory location record determines the rates of tax used in the automatic calculation of tax on suppliers invoices and credits. These rates can be over-ridden at invoice entry time.
Tax groups are created using the Tax Group Maintenance menu selection, we have created a “Default” tax group for purchases from Canadian suppliers received at the SCC’s main address in Alberta.
[Main Menu > Setup > General Setup > Tax Group Maintenance]
Edit the Tax Group to assign the appropriate Tax Authorities. You can see below that Canadian GST is the only tax authority assigned to the Default Tax Group.
Order Items
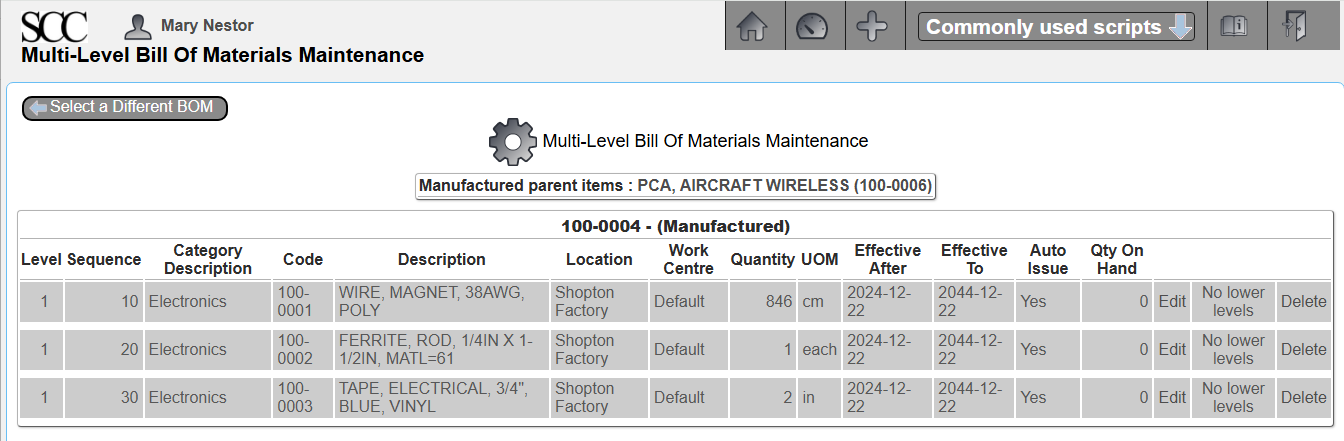
Before an inductor can be produced, the necessary raw material must be purchased.
For bought-in Items, it may be reasonable to insist supplier information must be entered when a new bought-in Item is created, which has already been done for the Items we will be ordering.
This is the Bill of Materials (BOM) for item 100-0004 “IND, 830UH, AIRCRAFT WIRELESS”:
The unit of measure (UOM) for item 100-0001 wire is centimeters (cm), which means the wire will be received, stocked (kept in inventory) and consumed measured in centimeters. As we will see though, the wire will be purchased by spools, which is the vendor unit of measure, and the manufacturer’s datasheet shows there are 19,300 feet of wire on a spool (for more detail see my post Mange Parts, Vendors and BOMs using webERP).
Issue Order
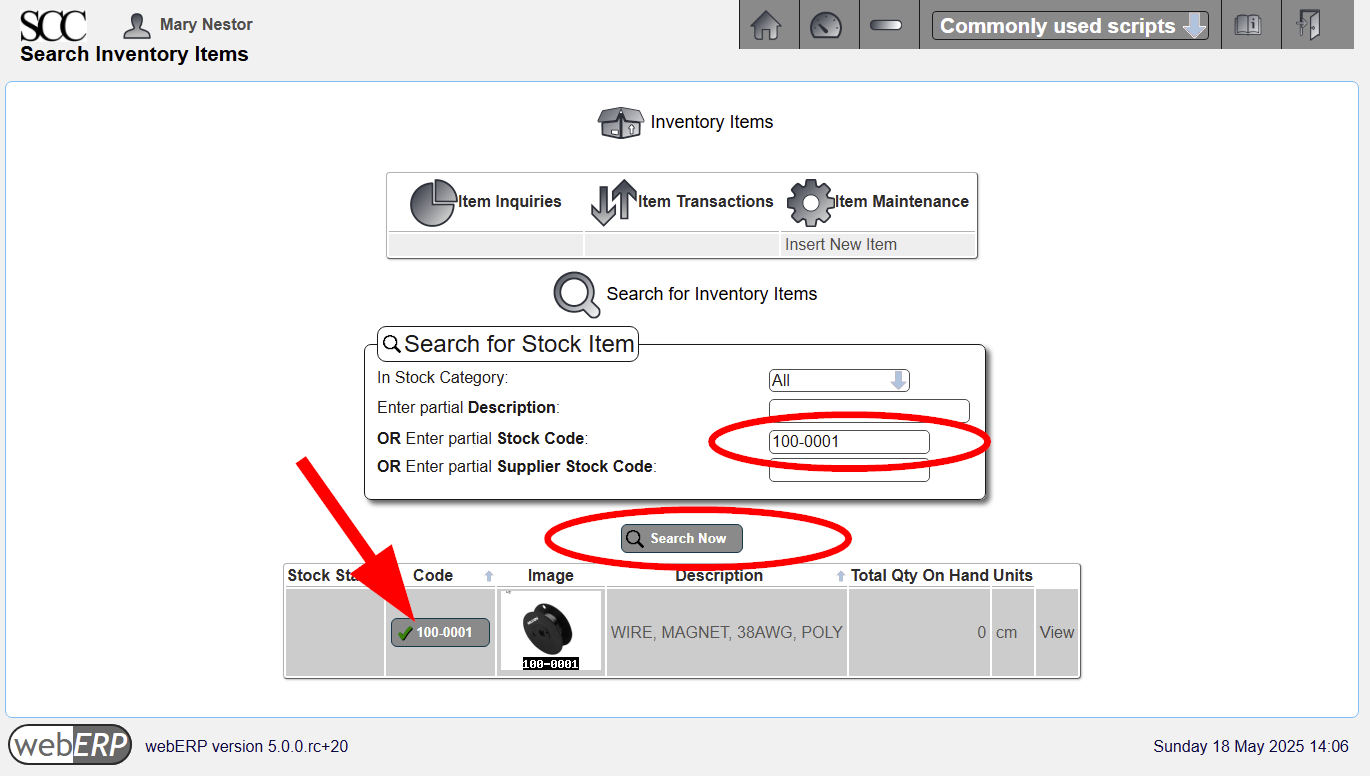
One method to start the order process is by selecting the item to purchase.
After selecting item 100-0001 an order can be initiated.
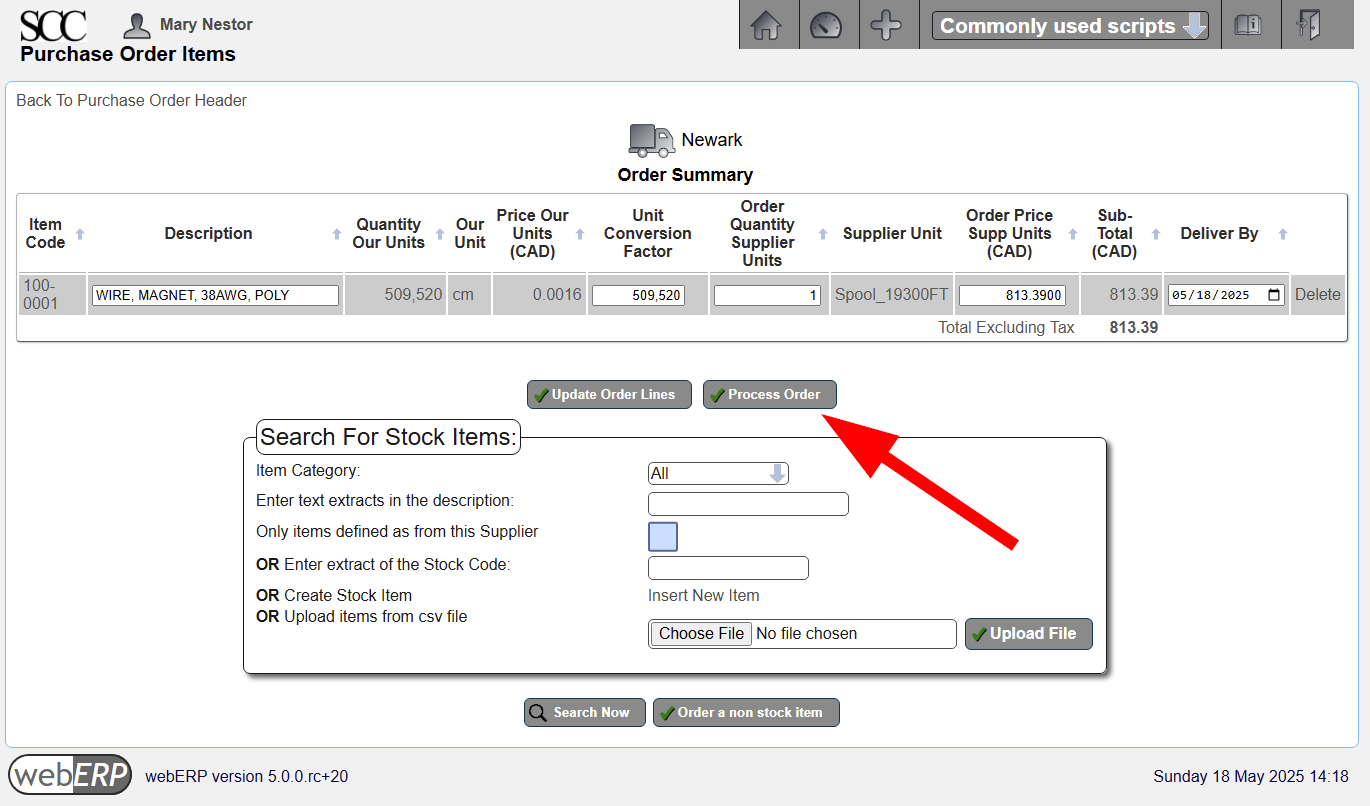
The order defaults to quantity 1 (spool), which in theory should be enough for 600 inductors. To place the order, click [Process Order].
If you change any values, you must click [Update Order Lines] before processing the order.
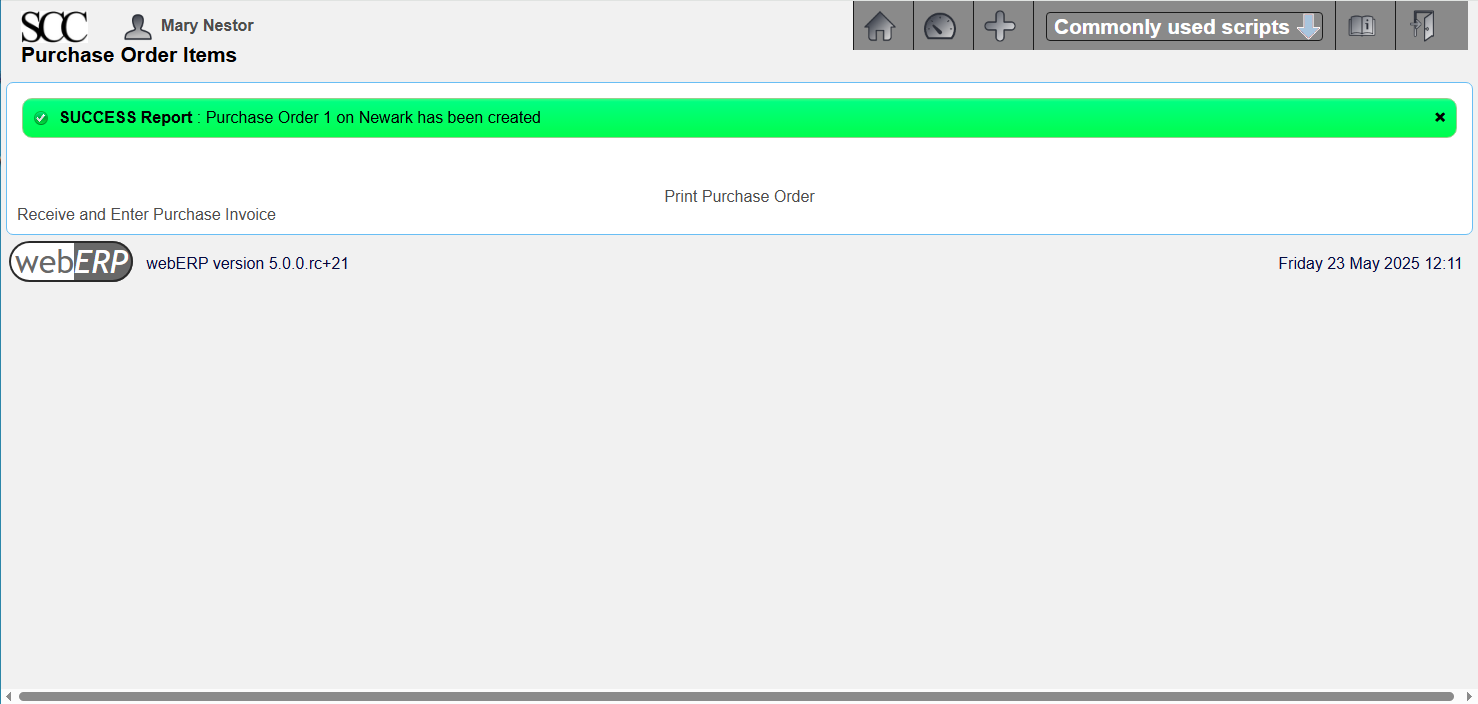
The order will be authorized automatically during processing because automatic authorization is enabled and the user Mary Nestor has purchase order authorization privileges. After processing, links are provided to Print Purchase Order or Receive and Enter Purchase Invoice.
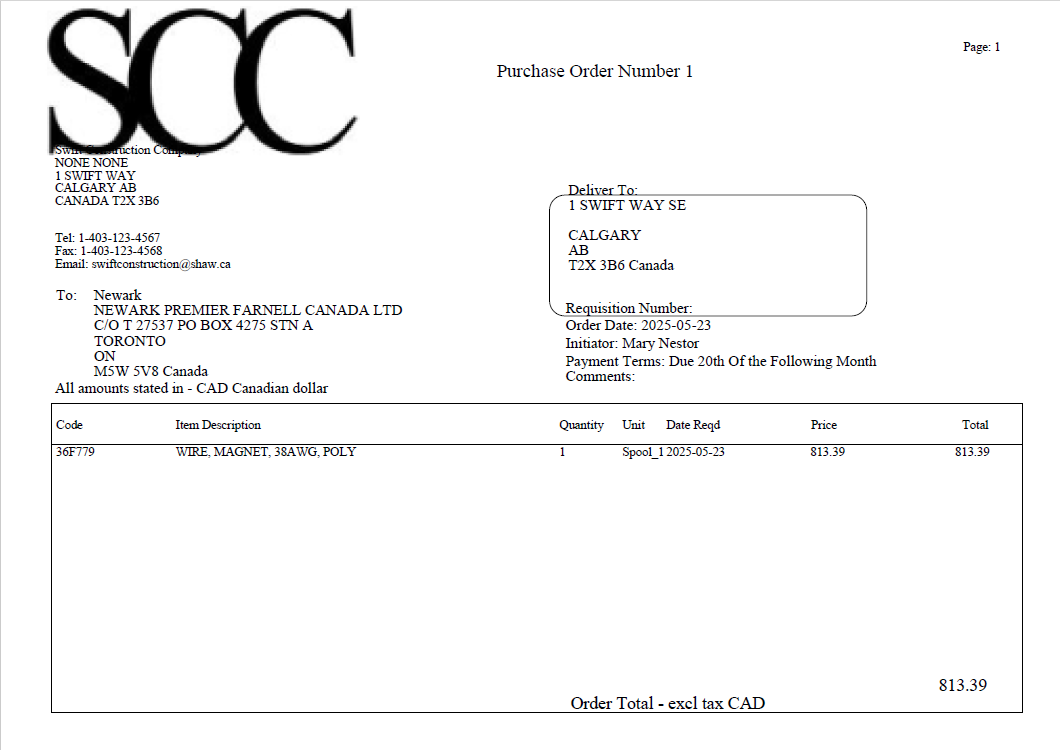
Printing the order creates a PDF document that can be saved or printed locally, or emailed to the vendor directly from webERP. More significantly, printing an order means to webERP that the order has been accepted by the vendor.
When a verbal order is given to a vendor, often the arrival of an invoice from the vendor is the trigger to create a purchase order. This is why a command to create a vendor invoice is provided. However, in this case, we will receive the order (i.e. recognise goods receipt) before creating a vendor invoice.
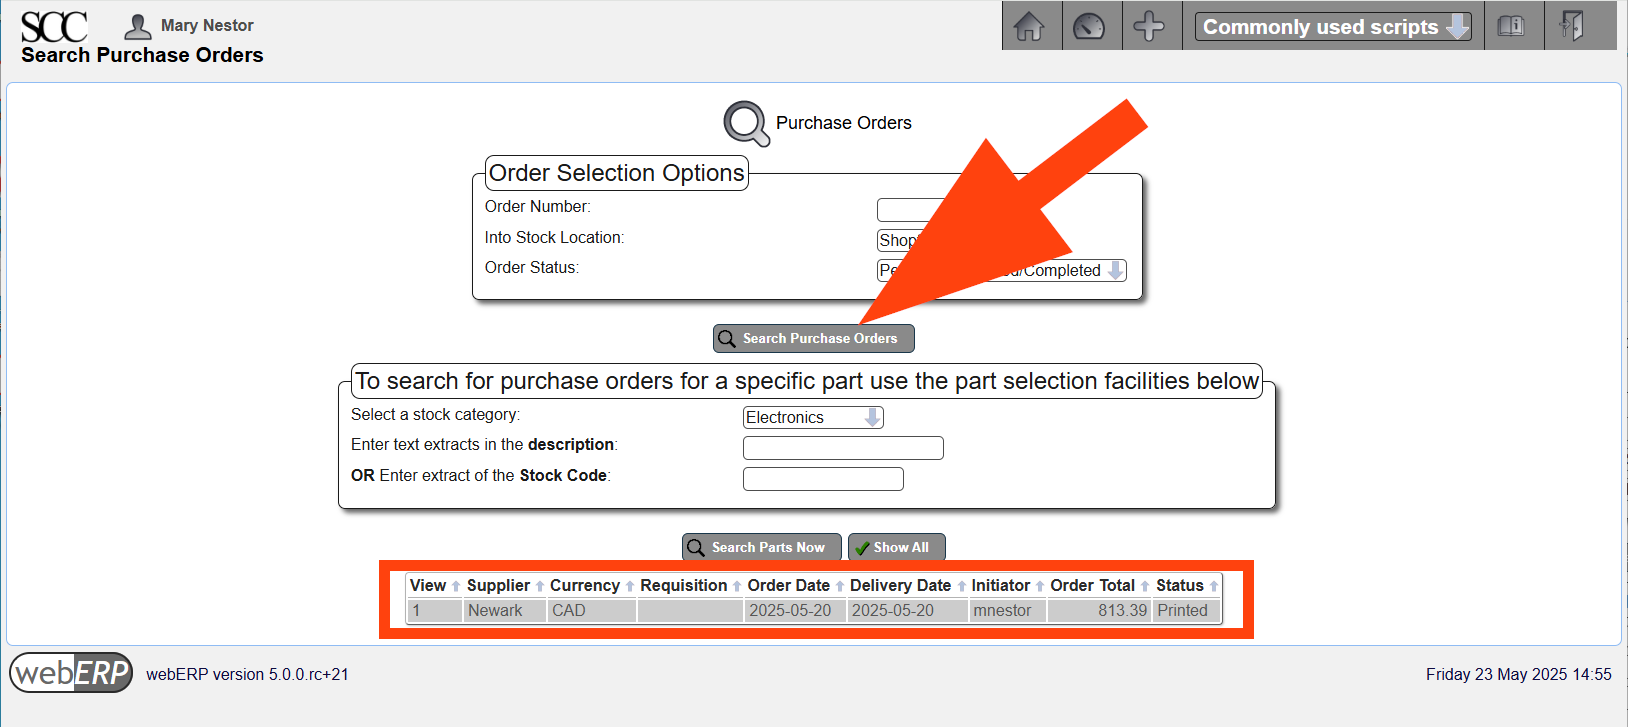
You can see that an order has been issued by searching for outstanding purchase orders.
[Main Menu > Purchases > Inquiries and Reports > Purchase Order Inquiry]
Receive Order
Orders are generally received after goods have been received or services have been performed. For physical goods, receiving can be considered to be when ownership of the goods transfers from vendor to company.
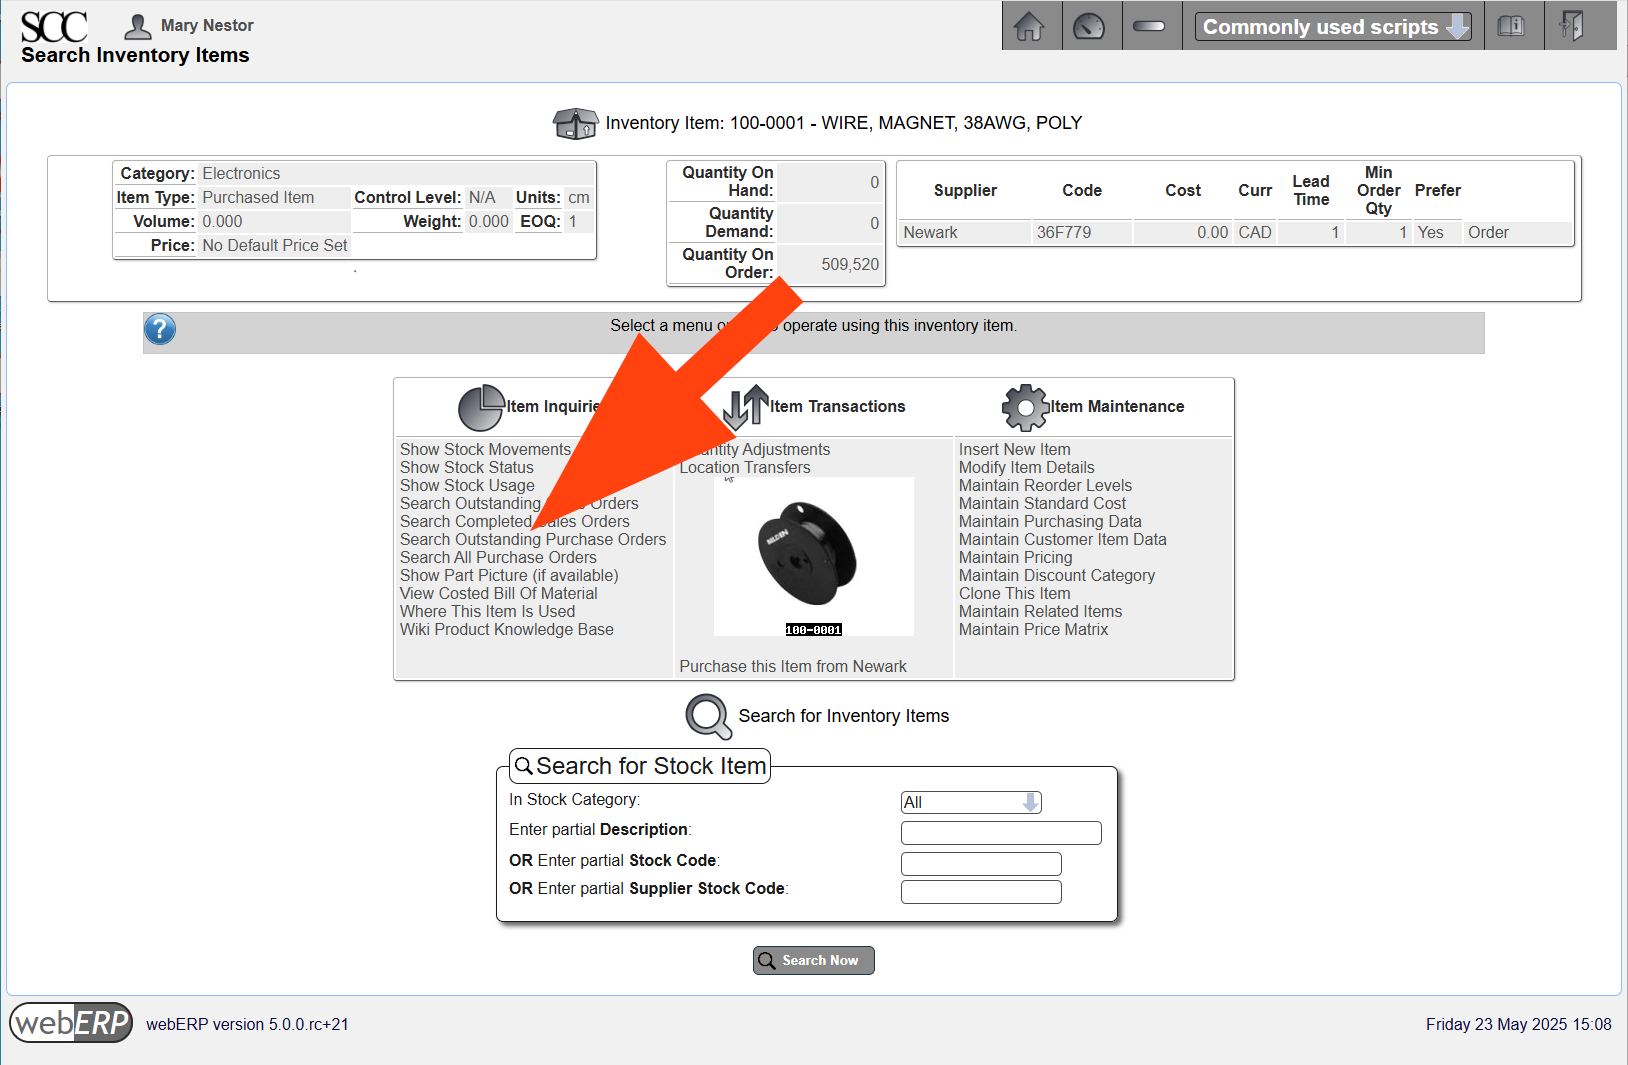
We will start the receiving process by searching for outstanding orders for item 100-0001.
After selecting the appropriate purchase order, the order can be received so long as it has been authorized and printed.
[Main Menu > Inventory > Select an Item > {select 100-0001} > Search Outstanding Purchase Orders > {select PO #} > Receive]
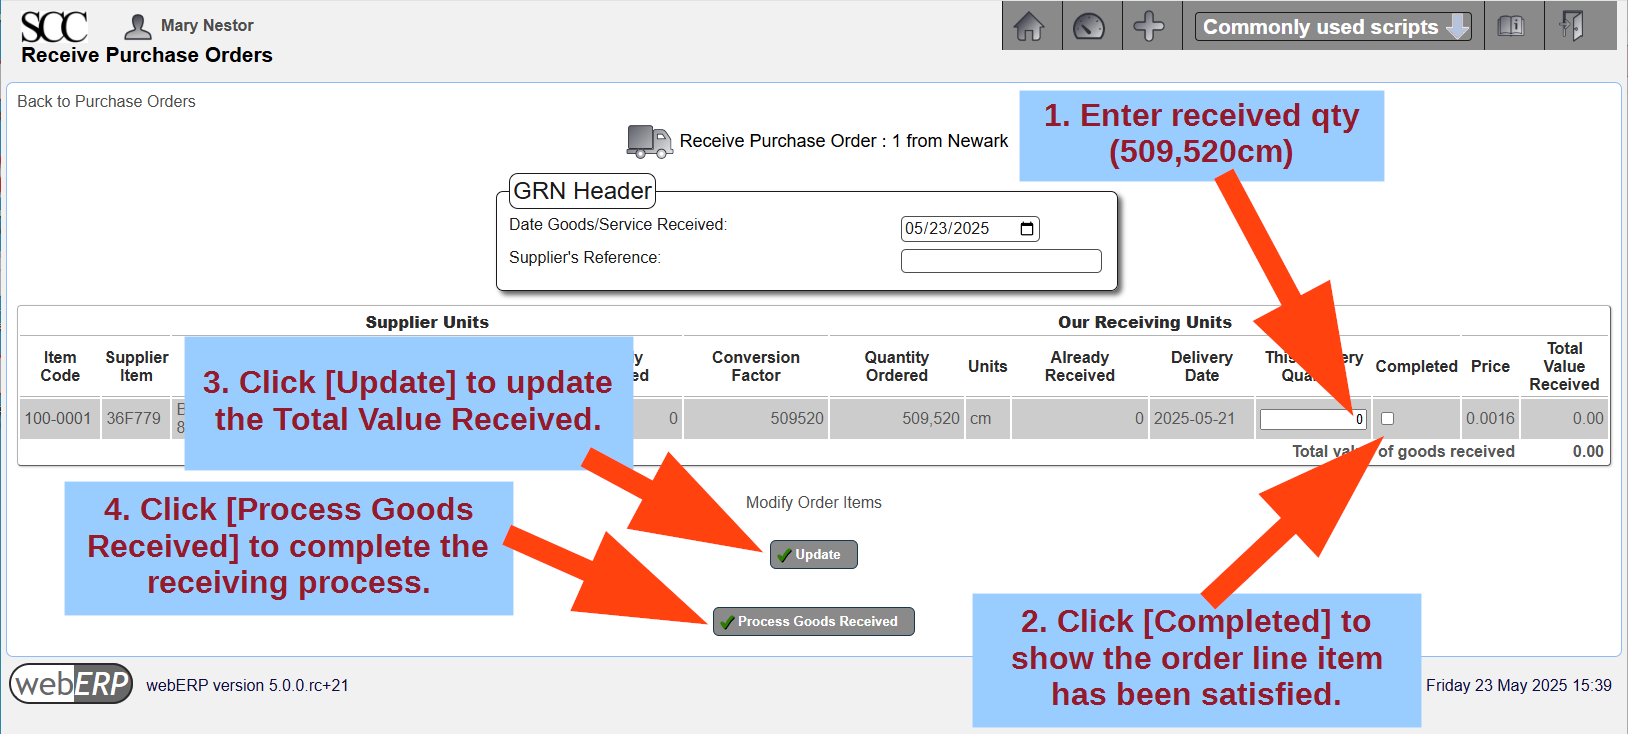
The Goods Received screen shows and allows the quantities received to be entered. The quantity in purchase units is shown together with the conversion factor from purchase units to the item’s unit of measure. Enter the receive quantity must be entered in the item’s unit of measure.
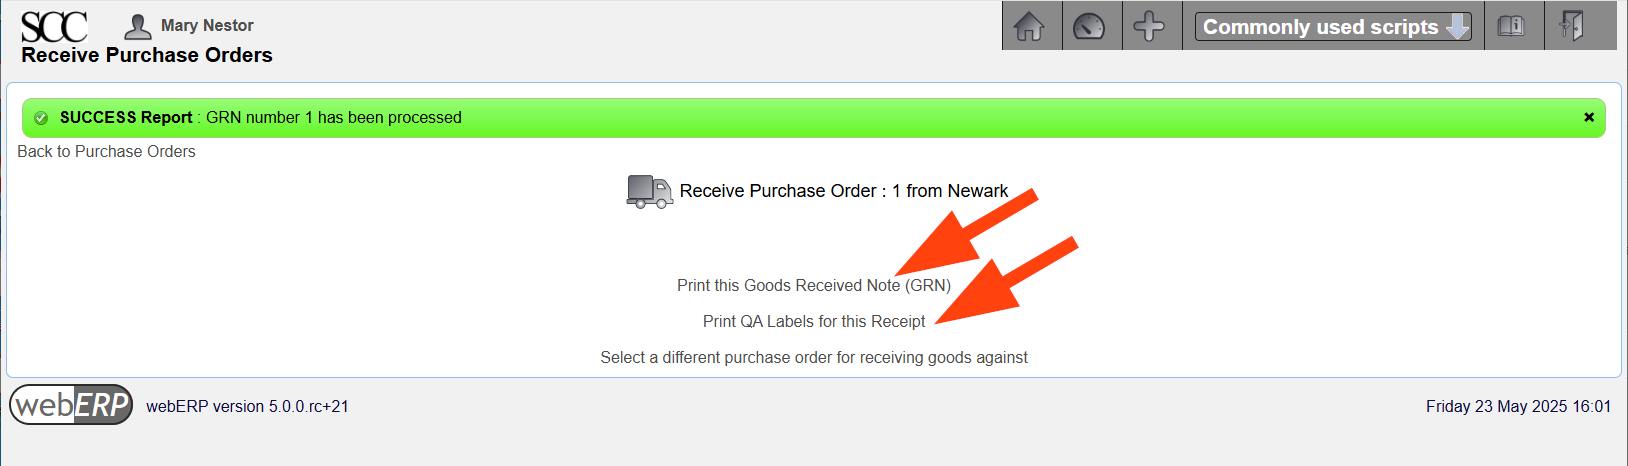
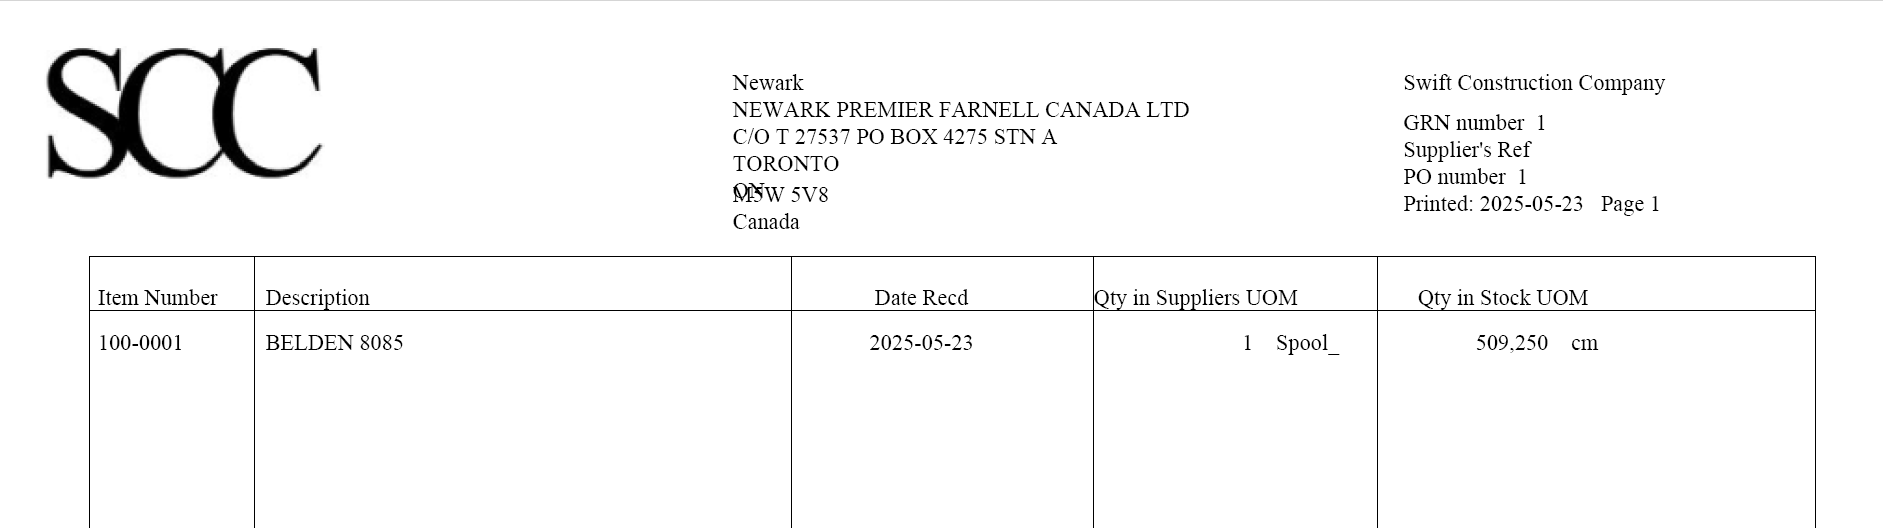
After processing, links are provided to print a Goods Received Note (GRN) and to print QA labels for sticking on the physical goods for identification.
Per SCC protocol, the receiver prints, signs and sends the GRN to the Accounts Payable department, where it will be matched with the vendor invoice before payment is made.
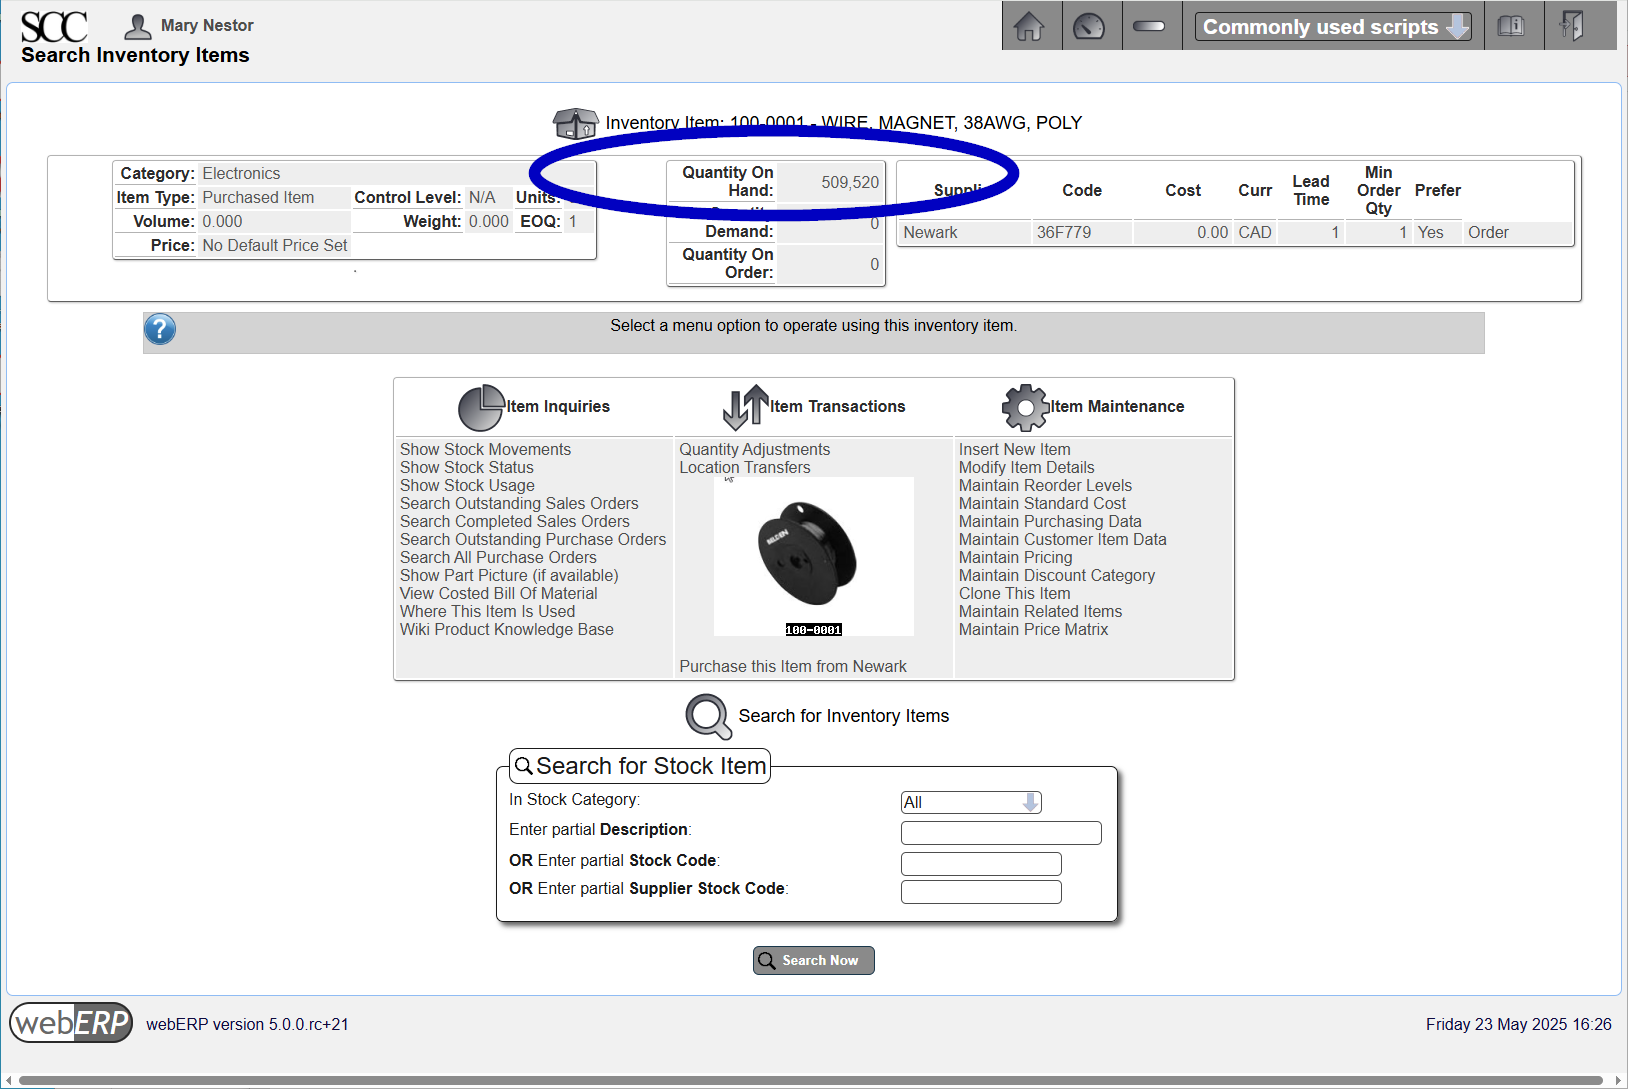
If you view Item 100-0001 again you will see the quantity on hand now reflects the received order.
Pay Supplier
Create Supplier Invoice
A supplier invoice is created to record an invoice received from a supplier for goods or services provided. A common industry process is to match the vendor invoice to 1) the purchase order and 2) a goods receipt notice (GRN), before issuing payment to the supplier.
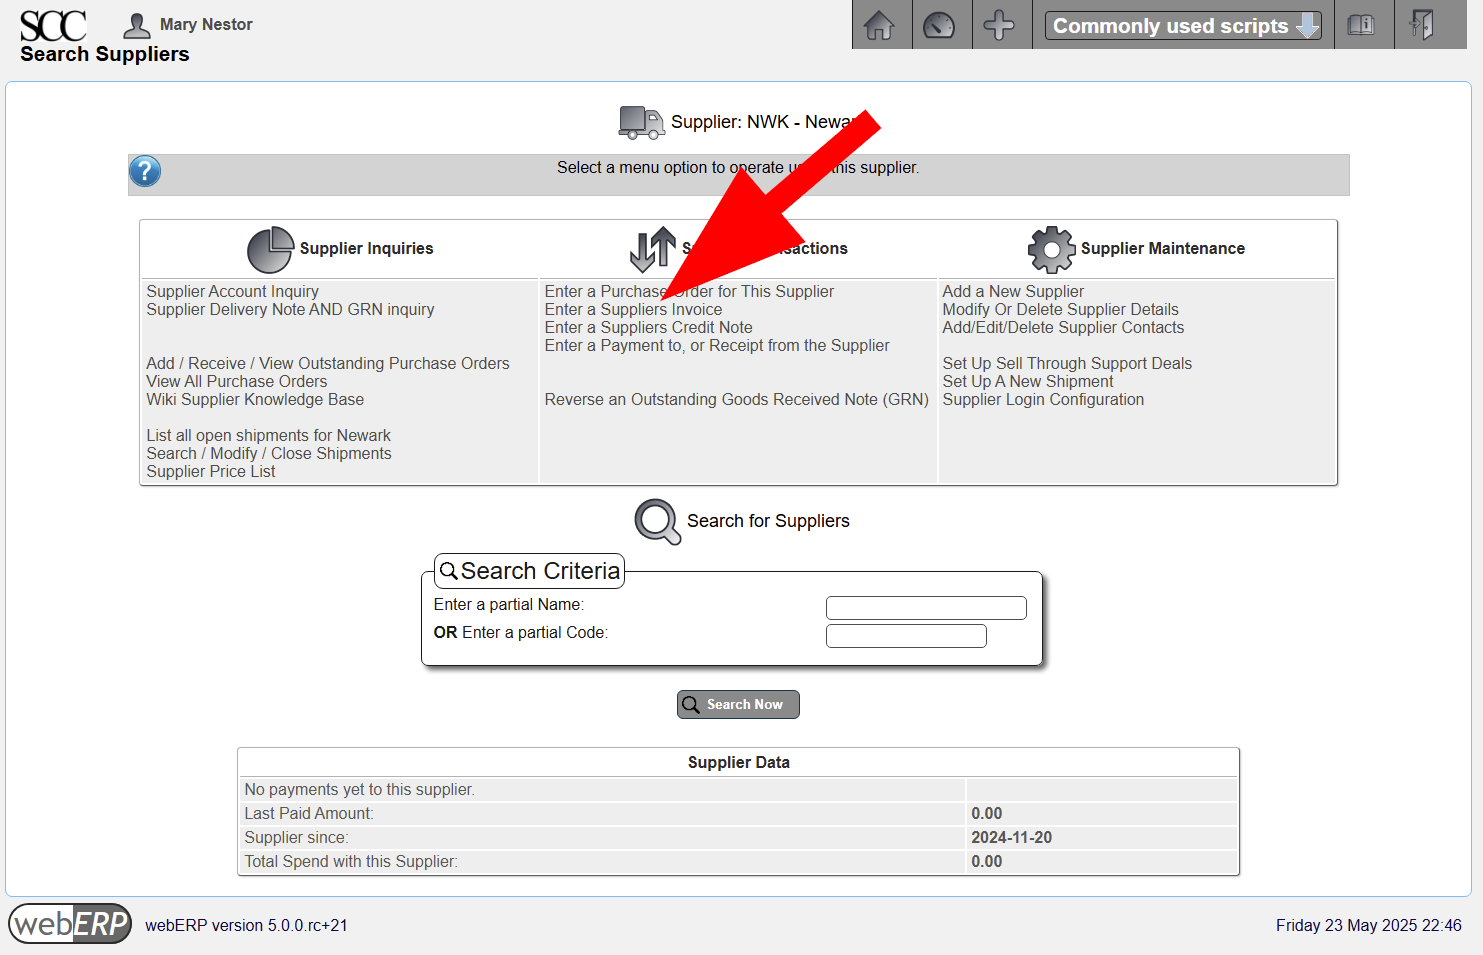
One way to start the supplier invoice process is to search for the supplier providing the invoice following [Main Menu > Payables > Select Supplier > Search > {select supplier}]
After selecting the supplier, click [Supplier Transactions > Enter a Supplier Invoice].
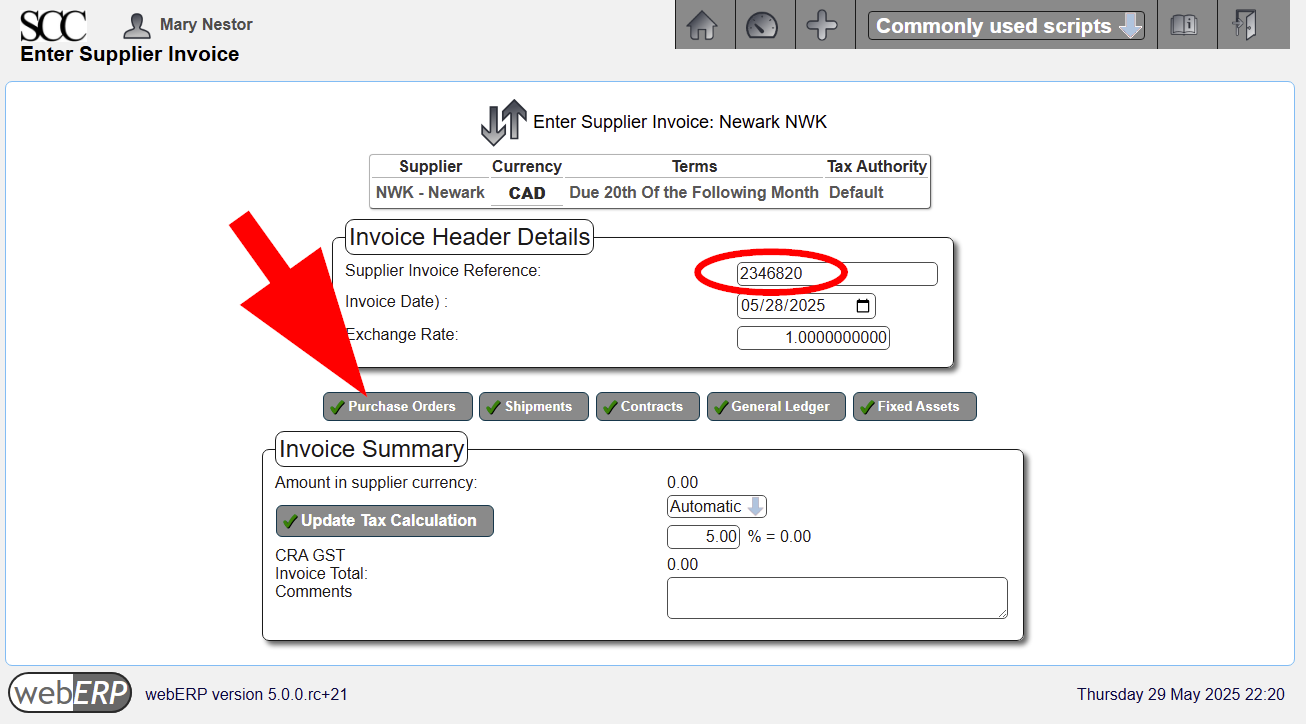
Enter a reference identifier for the supplier invoice if one is available.
Supplier invoice references must be unique for each supplier.
Next, click the [Purchase Order] button and match the vendor invoice to the purchase order.
[Main Menu > Vendors > Vendor Transactions > Enter a Vendor Invoice > Purchase Order]
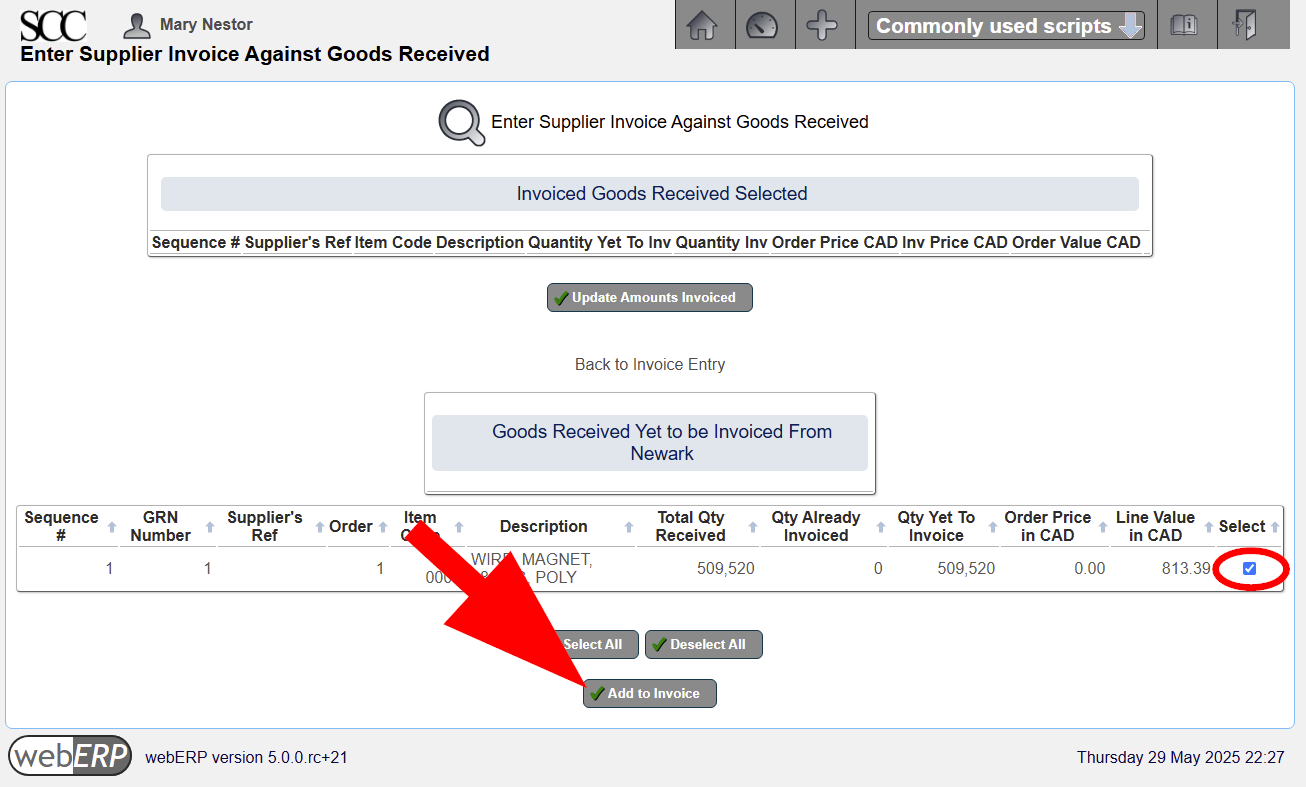
Select the purchase order line item that the vendor invoice pertains to and add to the invoice.
After adding the order reference to the vendor invoice, return to invoice entry.
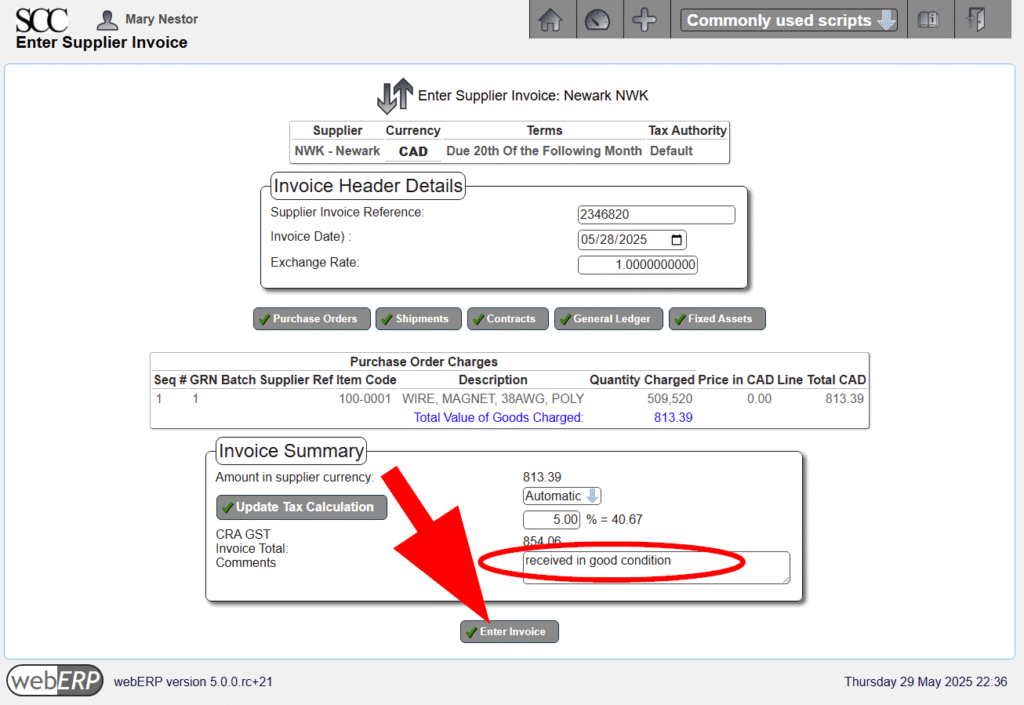
Add a comment and enter the invoice.
The vendor invoice has now been created.
You could next record payment of the invoice using the Enter Payment function, but we will start from the beginning to reinforce the procedure.
Issue Supplier Payment
FOLLOWING CONTENT HAS NOT BEEN UPDATED TO webERP v5 (images and text refer to v4)
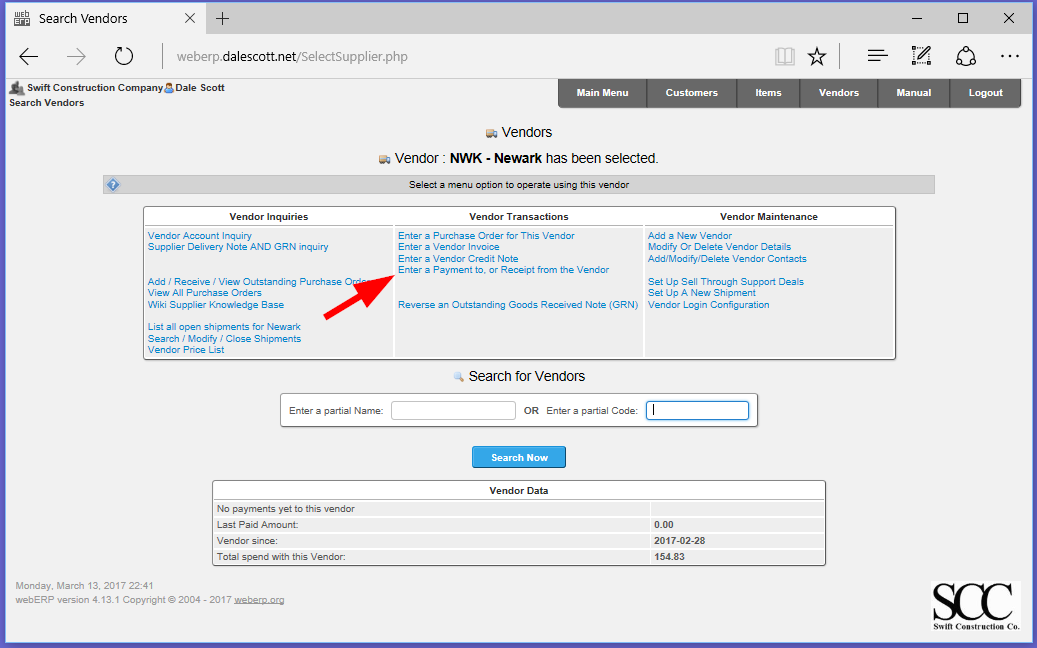
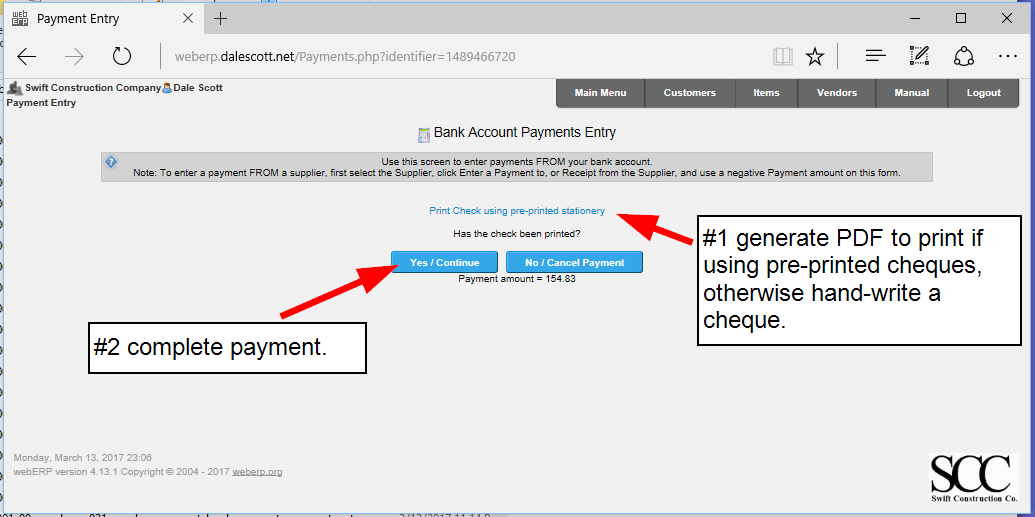
The vendor can be paid as soon after a purchase order has been printed, a goods receipt notice has been created, and a vendor invoice been created. However vendors will typically be paid based on operational procedures and vendor payment terms. One way to start the vendor payment process is to select the vendor again.
[Main Menu > Vendors > Select Newark]
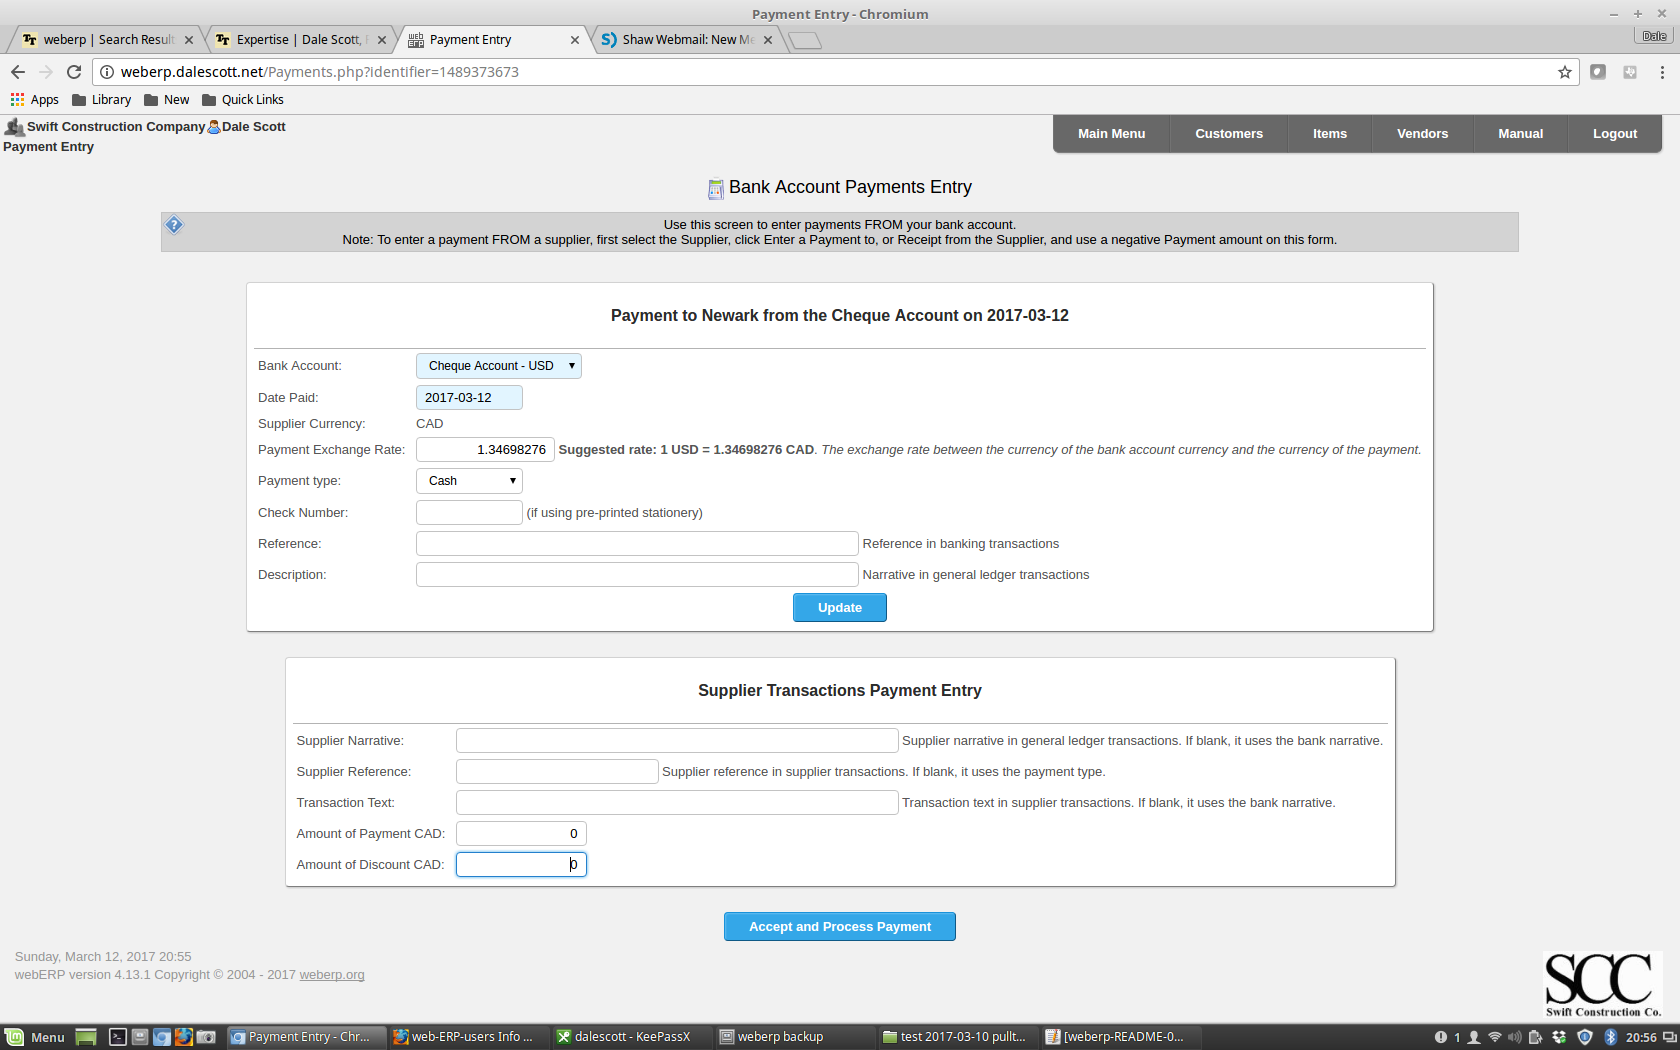
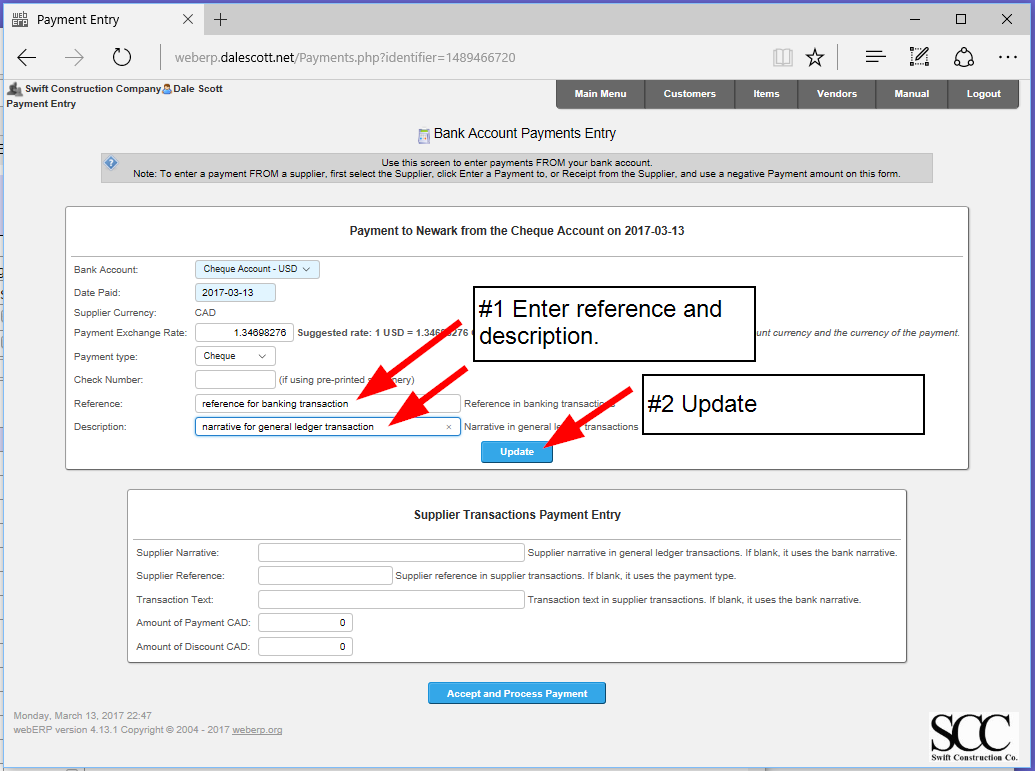
Use the Enter a Payment to, or Receipt from the Vendor command to access the Bank Account Payment Entry screen.
Enter the cheque reference and description.
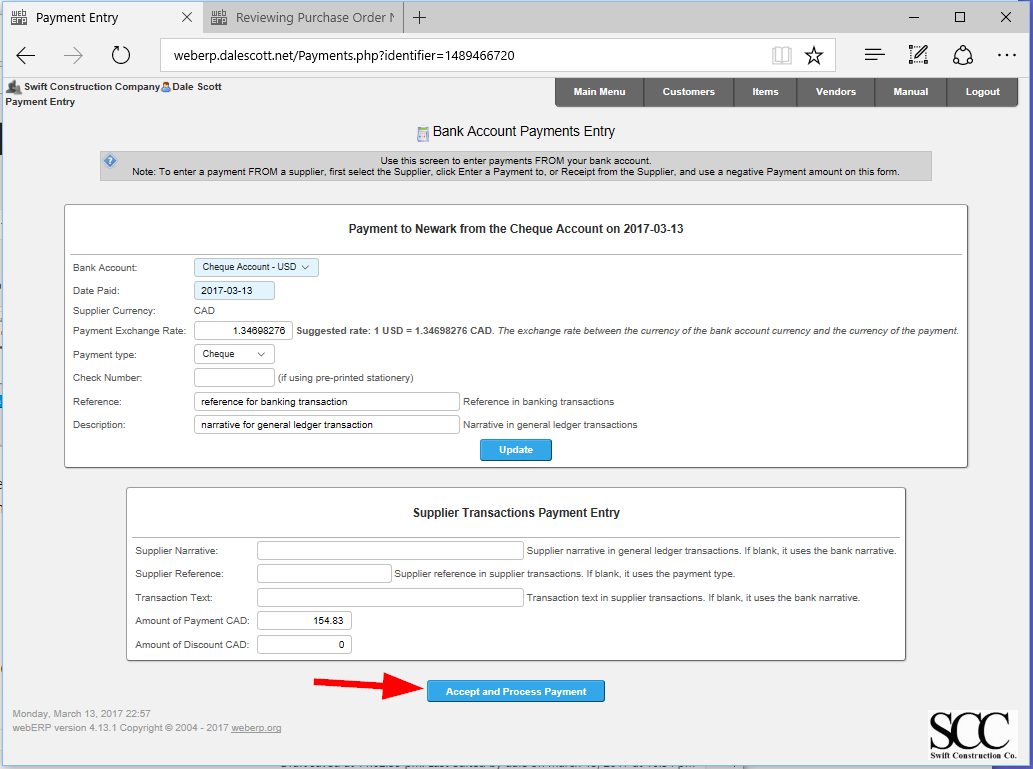
If desired, you can enter a Supplier Narrative, Reference and Transaction Text for the supplier transaction payment. I will leave them blank and they will populate as indicated. Finally process the payment.
Optionally print the cheque and complete the payment.
The payment can be allocated from the final screen, but this is the end of the purchasing cycle for this example.
Rinse and Repeat
Now that item 100-0001 has been dealt with, I will order sufficient quantities of items 100-0002 and 100-0003 to manufacture custom inductor item 100-0004 (manufacturing will be described in a seperate post).
Reports
A variety of reports are available related to the materials procurement process.
For example, to find a supplier for an item or to investigate an item:
Show all suppliers for a particular item.
Show Where-Used for an item (parent BOMs that include an item)
Show purchase orders for an item.
Further, a number of general reports list items that require ordering, or received orders waiting to be paid for.
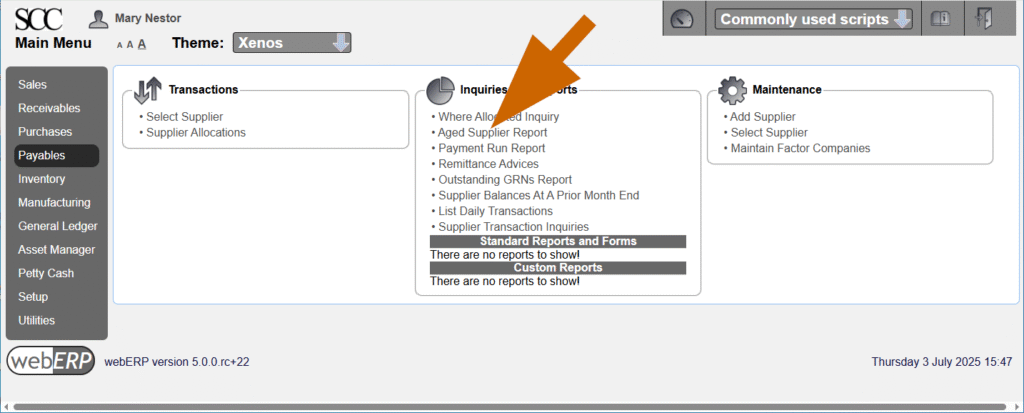
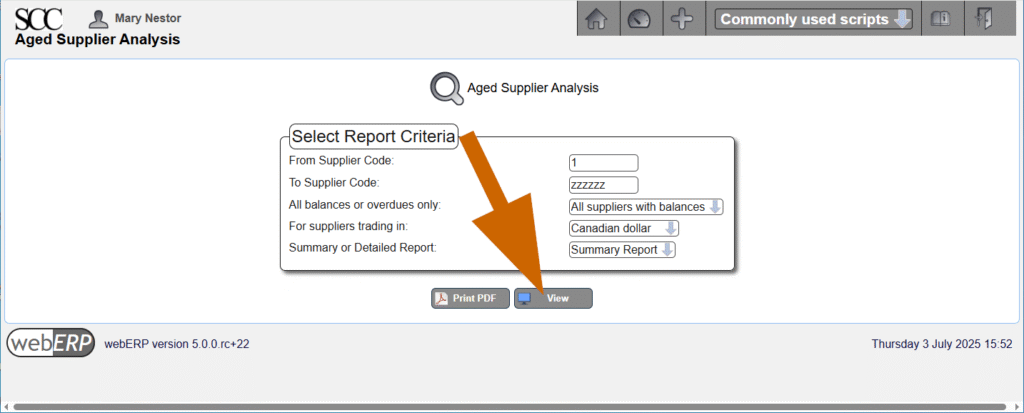
Aged Supplier Report
An Aged Supplier Report shows the amount owed to suppliers (Payables), and the amounts 30 days over due and 60 days over due.
For example, the wire ordered from Newark has been received and Newark’s invoice for $854.06 is due now.
[Main Menu > Payables > Inquiries and Reports > Aged Supplier Report]
Change Happens
When an custom item is revised, it may impact on items already purchased and waiting to be received, or items which are about to be ordered:
Cancel POs if possible for items no longer required
Modify POs to mitigate cost, possibly reducing quantities, extending delivery dates, stopping vendor work and paying only for work performed to date, and modifying vendor work to meet new requirements.
It can be helpful to proactively check for new part numbers, or new revisions of existing part numbers. Presumably they will need to be ordered eventually, and in the case of a revision may indicate changes coming for orders of current revisions.
Summary
This completes the overview of purchasing using webERP. A future tutorial will detail purchasing using a BOM (Bill of Materials) to save time. Instead of purchasing items individually, I will have webERP create purchase orders for all the items on a BOM.
This post was written for webERP v4.15.2. Refer to weberp.org and current software for v5 installation (v5 is still pre-release).
webERP is mature web-based open-source ERP (Enterprise Resource Planning) software that supports best practises and multi-user business administration, purchasing, sales, manufacturing and standard double-entry accounting.
webERP can also be used with a wiki CMS (Content Management System) to provide an integrated Knowledge Base. I will be using WackoWiki, one of the supported wiki engines.
Goals
Install webERP software.
Install MediaWiki software.
Configure webERP and MediaWiki for use.
Install Applications
I will install webERP and MediaWiki on FreeBSD, a Unix-like operating system (GNU/Linux is another popular Unix-type operating system). The server has already been configured with the Apache HTTP server and MariaDB database server.
webERP
Copy the webERP software files to the server and configure the Apache web server.
Extract distribution to /usr/local/www/
Rename extracted directory webERP/ to weberp-4.13.1
Create soft link “weberp” to weberp-x.y.z
Create Apache virtual server e.g. http://weberp.dalescott.net
Access http://weberp.dalescott.net with a web browser to run the installer.
Language: US
Db user and password: root (only for install, future access will be changed to a dedicated user after installation)
Company name: e.g. Swift Construction Company
Install demo data: YES
User “admin” email: e.g. dale@dalescott.net
admin user password: (keep this safe)
After the installer has completed, change the database access user to a new database user with privileges to webERP databases only.
Create a new database user “weberp” with all privileges to the weberp and weberpdemo databases.
Edit the webERP configuration file weberp/config.php and change the database access user and password to the new dedicated user.
MediaWiki
Copy the MediaWiki software files to the server and configure the Apache web server.
Extract the distribution to /usr/local/www/ (which will create mediawiki-x.y.z/)
Create a soft link “wiki” to mediawiki-x.y.z/
Create an Apache virtual server http://wiki.dalescott.net
Access http://wiki.dalescott.net/mw-config/index.php with a web browser to run the installer.
Name of wiki: webERP
User rights profile: Authorized editors only (public viewing is allowed)
Enable file uploads
Configure Applications
webERP
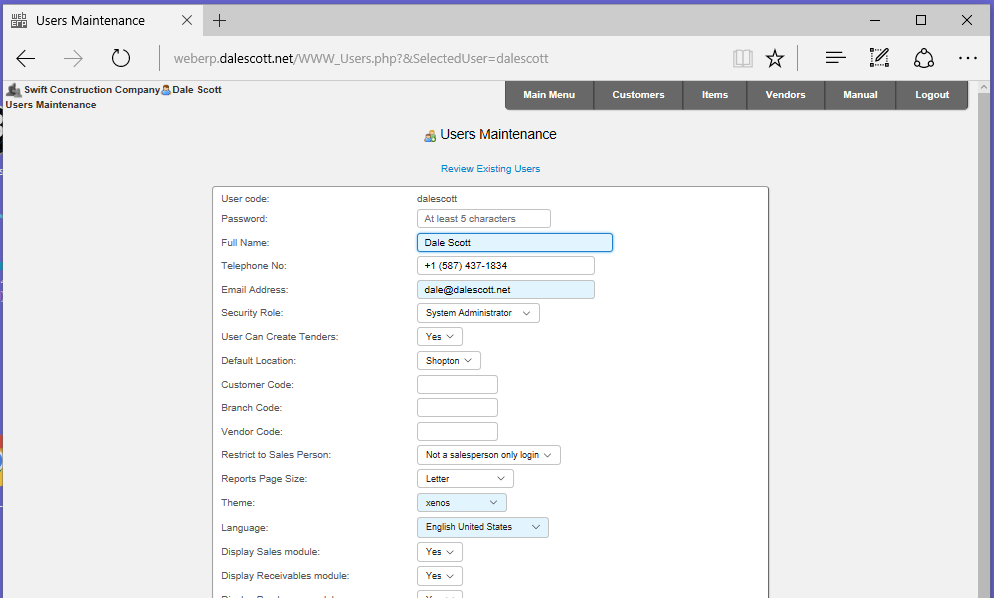
Log into webERP using the admin user credentials entered into the auto-installer and create new named user e.g. dalescott. The new user will be used for all subsequent work to identify the administration user specifically for audit purposes.
email: e.g. dale@dalescott
system administrator privileges
The original admin user (created by the auto-installer) cannot be deleted due to a now existing audit trail.
Location
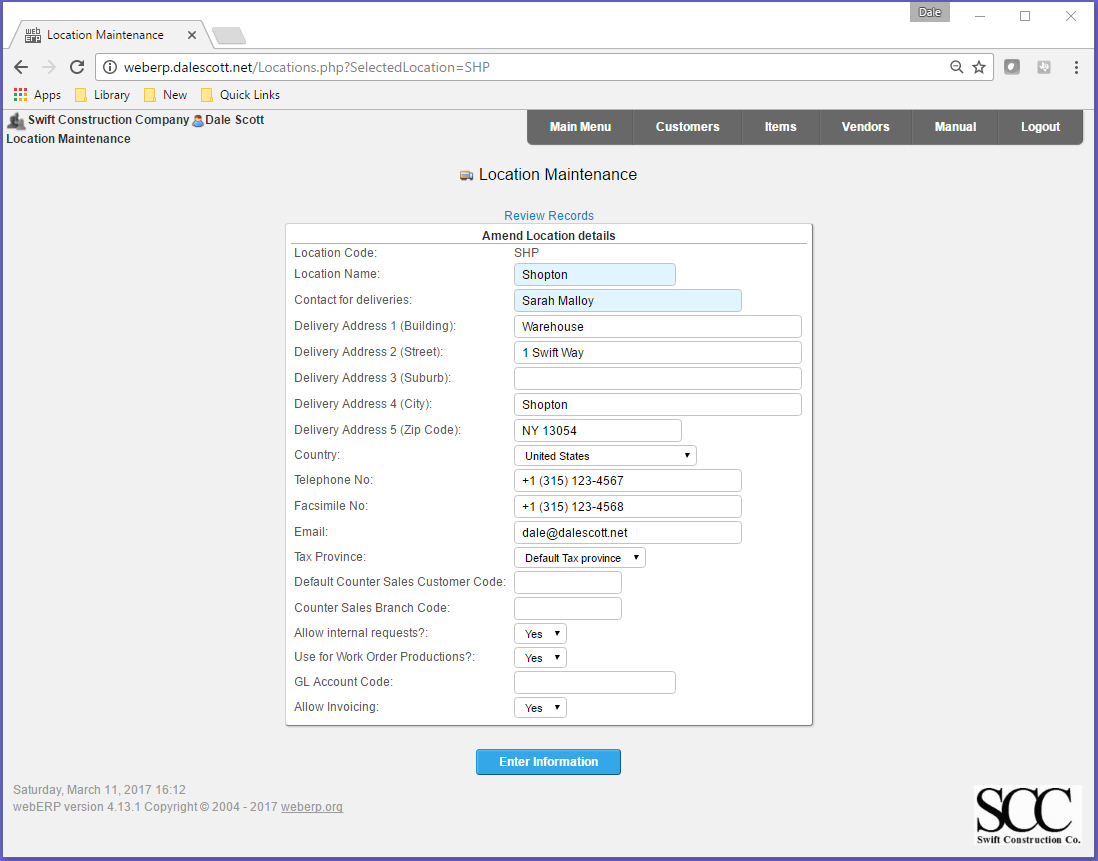
I will create a new location “Shopton” for the SCC headquarters.
Main > Setup > Inventory Setup > Inventory Locations Maintenance
Note: Delivery Address 1 must be given a value, otherwise a “missing delivery address” error will occur when later attempting to create a purchase order.
After creating the new location, change the location of the administration user to the new location (and of any other users).
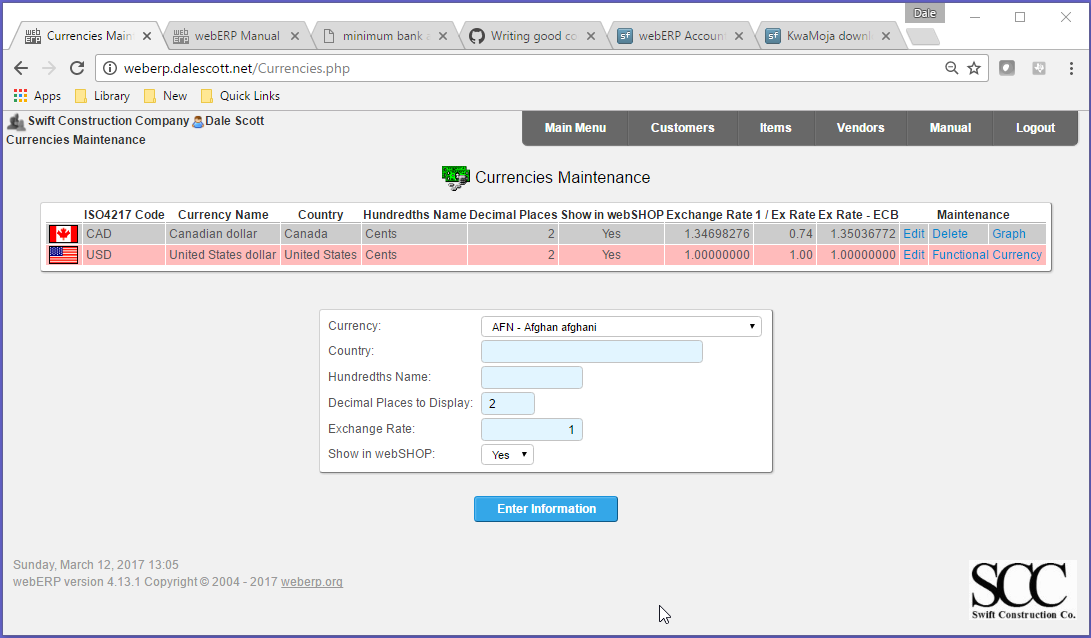
Currencies
I will create a new CAD currency as some items will need to be purchased in Canadian dollars. webERP will obtain currency exchange rates from either Google or the European Central Bank (Main > Setup > General > System Preferences).
Main > Setup > General Setup > Currencies Maintenance
“USD” is shown as the “Functional Currency” because United States is set as the SCC company currency in the Company Preferences.
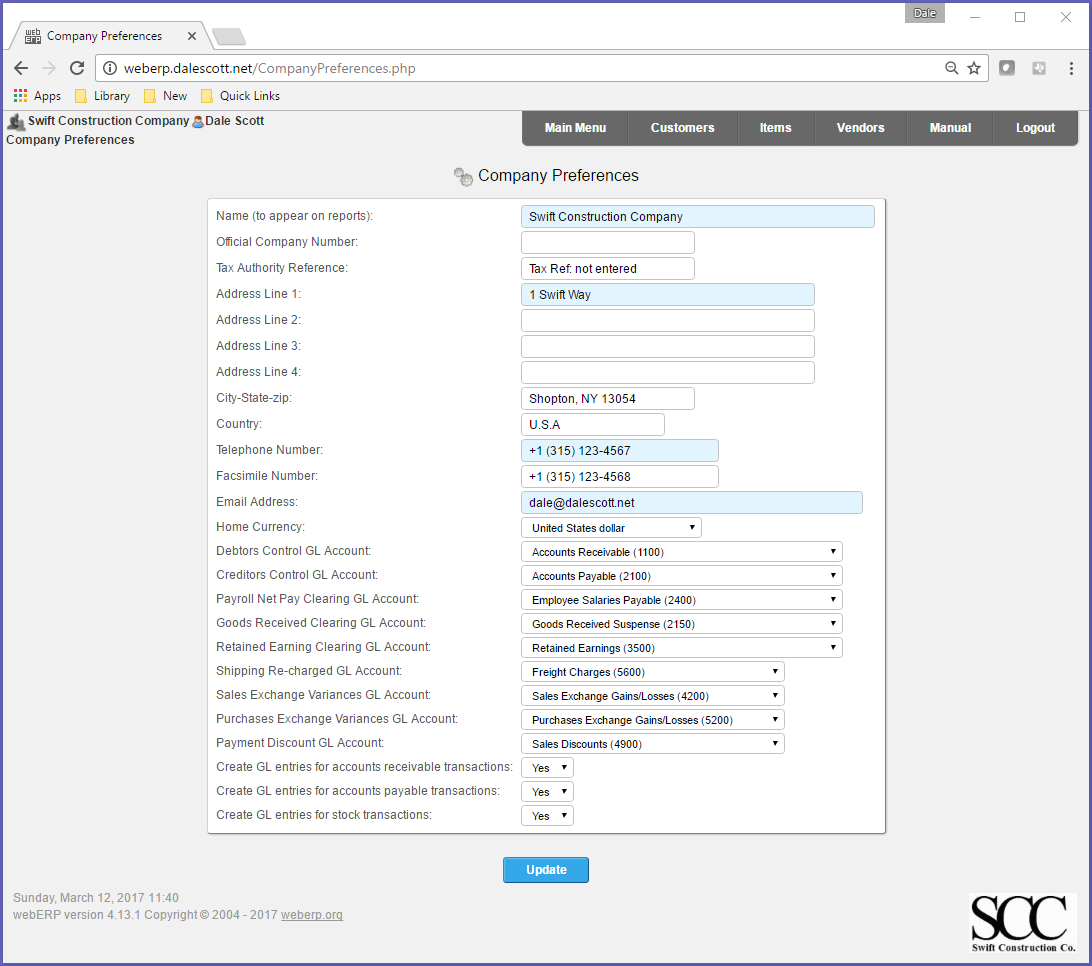
Company Preferences
Operating practices for a specific company are configured in the Company Preferences screen (webERP supports multiple companies and the desired company is selected at login).
Main > Setup > General > Company Preferences.
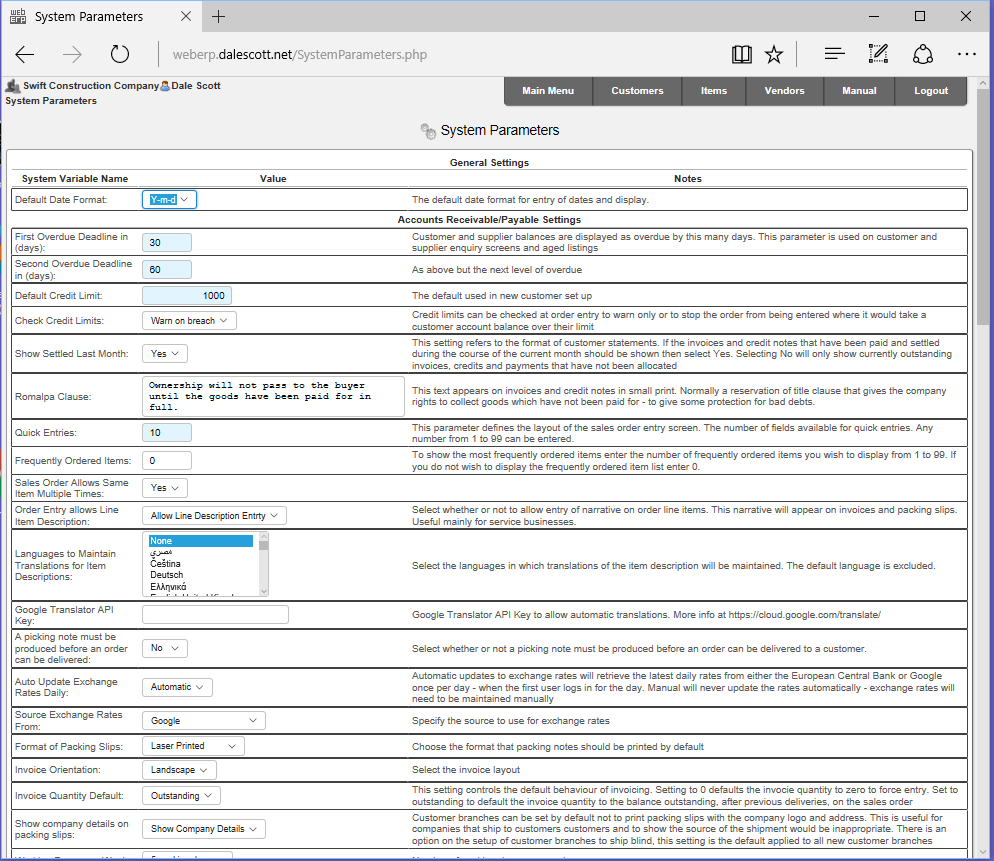
System Preferences
General system-wide behavior is configured in the System Preferences screen. I will quickly review some interesting parameters, and get into a bit more detail with a few specific parameters.
Date format: Y-m-d. I prefer ISO 8601 dates for clarity over familiarity (e.g. 2017-03-08 for March 8, 2017), which avoids the ambiguity of d/m/Y and m/d/Y.
Frequently Ordered Items: 0. I left this disabled but may experiment with it once the system has some orders entered.
Sales Order Allows Same Item Multiple Times: Yes. I will revisit this later, but at least initially I don’t want anything to block operation.
Languages to Maintain Translations for Item Descriptions: None. Don’t complicate things at least initially.
Picking note must be produced before an order can be delivered: No. I don’t want to complicate the process too soon.
Create Debtor Codes Automatically: No. I want to use my own mnemonic codes, but set to Yes if you don’t care and would prefer to let the system assign a sequential integer.
Create Supplier Codes Automatically: No. I prefer to use my own mnemonic codes.
Country of operation: United States (used when calculating shipping costs).
Purchase Order Allows Same Item Multiple Times: Yes. I will revisit this later, but at least initially I don’t want anything to block operation.
Automatically authorise purchase orders if user has authority: Yes. I will disable this later so I can follow the approval process.
Financial year ends on: December (if only to avoid having to answer of why not calendar years).
Maximum Size in KB of uploaded images: 300. I left this at its default value, although some images and screenshots will likely require re-sizing before uploading.
Directory to store images: part_pics (directory already exists)
Directory to store reports: reports (directory already exists)
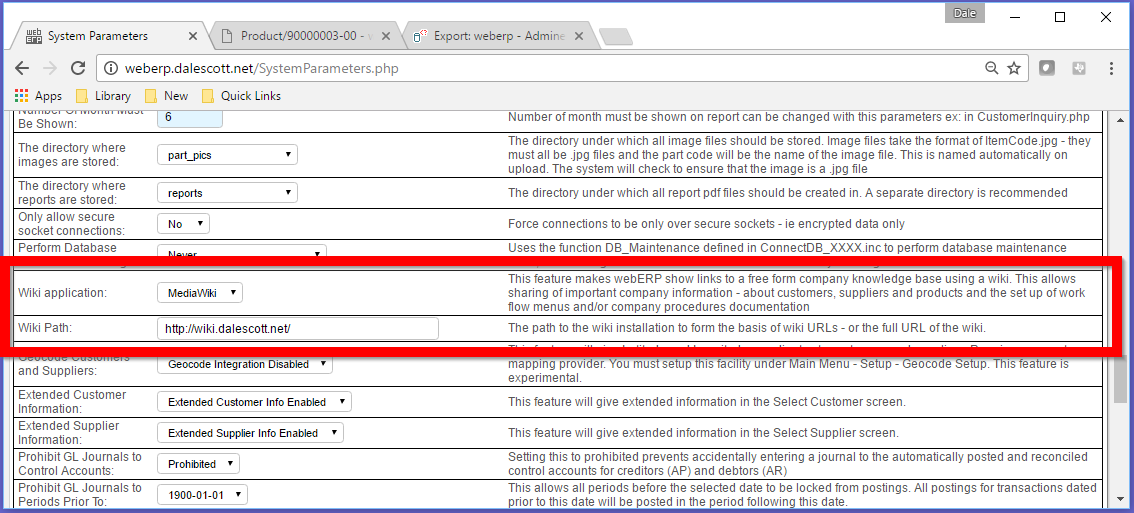
Wiki application: MediaWiki (I’m already familiar with MediaWiki), Wiki Path: http://wiki.dalescott.net/
Inventory Costing Method: Standard. webERP also supports weighted average, but Standard Costing behavior will be more obvious to start with.
Auto issue components: Yes. Automatically decrement items from stock according to the BOM for an Item when it is manufactured to reduce admin effort.
Prohibit Negative Stock: No. I’m pretty sure I will set this to Yes later, but prefer no blocking operations at least initially.
Log Severity Level: All, Path to log files: log. I want to see all possible log entries initially and can be reduced later (I also had to create the “log” directory and set ownership of the directory to the www:www, which is the Apache http server user on FreeBSD).
Controlled Items Defined At Work Order Entry: Yes. When set to yes, controlled items are defined at the time of the work order creation. Otherwise controlled items (serial numbers and batch/roll/lot references) are entered at the time the finished items are received against the work order
Auto Create Work Orders: Yes. Setting this parameter to Yes will ensure that when a sales order is placed if there is insufficient stock then a new work order is created at the default factory location
Default Factory Location: Shopton. This will be the default location for automatically created work orders.
Factory manager email: dale@dalescott.net, Purchasing manager email: dale@dalescott.net, Inventory manager email: dale@dalescott.net. I’m setting all email addresses to me for convenience so I see the traffic.
Using Smtp Mail: No. My server will route email from webERP out through my ISP’s mail server.
Main > Setup > System Preferences
Wiki Application
In particular, note the setting for “Wiki application”. When enabled by selecting a particular Wiki dialogue (MediaWiki, WackoWiki or DokuWiki), a link to the “Wiki Product Knowledge Base” will be shown in the Inquiries column of the main Items, Vendors and Customers screens (once an Item/Vendor/Customer has been selected).
You also need to set the root path to the wiki (that webERP will append to) in the system parameters screen. In my case, I needed a trailing “/” in the Wiki Path, but YMMV.
Database Maintenance
webERP can be configured to lock out users by setting Perform Database Maintenance at Logon to Allow SysAdmin Access Only. Only users with security profile “System Administrator” will be allowed to login or enter data when this is set, which is important when performing maintenance on the application code or database. A maintenance notice also appears on the login prompt when Allow SysAdmin Access Only is set.
Main > Setup > General > System Parameters
This parameter can also be used to periodically run the query “OPTIMIZE DATABASES” at set intervals. It is not clear how often this should be run, or even if there is a significant benefit. However, users will notice a slight delay during login when the it runs, it might have been a half-second with an almost empty Swift Construction Company database (on a older dual-core desktop PC with 4GB memory). If periodically running OPTIMIZE DATABASES is desired, you may consider creating an entry in the cron table to run the mysql command line interface, giving the query as a command argument.
MediaWiki
The webERP Knowledge Base, MediaWiki in my case, is a completely separate system from webERP, including separate users, user permissions, etc. webERP simply provides structured links into the Knowledge Base (with some variation depending on the wiki protocol selected in webERP Main > Setup > General > System Parameters > Wiki application).
I intentionally configured MediaWiki during install for public access, but required that a user be logged-in to create a new page, edit an existing page or upload a file. This allows anyone to see information, and in most cases get on with their job, without having to be concerned with logging into the Knowledge Base. For me, this is a nice balance of visibility and trust within a homogeneous organization. Users can also set their browsers to remember their login credentials and once set won’t be inconvenienced again (I wouldn’t necessarily recommend this when there are shared workstations, but then again many people use shared workstations and don’t control who the user is, it all depends….).
Upload File Types
I configured the permitted upload file types to include OpenOffice/LibreOffice files, dwg files and zip archives (see MediaWiki documentation).
I was asked recently to quote installing a 5-user open-source ERP system. Unfortunately, as with anything technical and complicated, “it depends”. Open-source software provides an incredible opportunity, but both client and vendor business models are still not familiar to most people outside the open-source community, who largely perceive open-source software as simply a less expensive alternative to traditional proprietary software.
Try asking yourself these questions:
Are you familiar with open-source software, its goals and philosophies, and licenses, business models, and support channels?
Is there a strategic benefit for using open-source software in your enterprise? Does using open-source software enhance your competitive position? Will you be “doing things” that are impossible otherwise, and will it be core to your business model?
Have you yourself installed the demo version, figured out the basics of how to use it, and have demonstrated it to anyone else?
Do you understand the technology involved? E.g. ERP, PLM, the internet, IoT, cloud hosting, change management, etc.
Do you understand the software development process? Change management? Agile? DevOps? Bug tracking? Workflow and data pipelines?
Is your finance person tech-savvy?
Do you have internal IT group, or do you already have a relationship with an IT services provider, or hosting provider?
Will you be configuring the software yourself?
You should have many more “yes” answers than “no” answers if open-source is right for you. More “no” than “yes” either means you have more boot-strapping to do, or you should buy a commercial product or service (which may possibly use open-source software behind the curtain).
To simply install open-source software on a server at a hosting provider generally costs practically nothing, typically at worst a couple hours for someone qualified. Add to that operating hosting costs, internal or external. The real costs are learning how to configure and use the software for your unique business, how to live with, work-around or develop the missing features (that you and least one other person insist are essential <wink>), customizing reports, etc.
As with any software, it’s important to uncover areas of friction as soon as possible. Finding out late that meeting a hard requirement will be extremely disruptive does no one any good. Prototype your basic business workflows and get quick validation by pretending you are various users performing their typical work tasks. However, it’s the confusing tasks, the ones “that depend”, or the ones that “we don’t need to deal with that now” that will likely determine in the end whether there’s a good fit or not, and also the implementation effort that will be needed. You may not need solutions for what you find, but you do need to know where you stand.
Fundamentally no one else can do this for you, because no one else understands your business like you do. The alternative is to have a proxy, which can turn the project into a 6-month to 18-month effort, with multiple people, requirements gathering, competitive product research, shortlist, deep-dive prototyping critical workflows with each shortlisted product, etc., which often is then beyond the ability of an SME to support.