Modbus Simulator Review

(updated January 2024)

Modbus is a communication protocol for industrial devices developed in 1979 by Modicon, now Schneider Electric.

A Modbus network consists of up to 247 Servers (originally Slave), and typically one Client (originally Master). A server is commonly a dedicated end-point device, such as a sensor or control device, and a client is commonly a Programmable Logic Controller (PLC) or gateway device in a SCADA network. A client reads or writes to the Coils and Registers in a server, whose purpose is unique to that server.

A Modbus communication starts when a client sends a message to a specific server, either requesting current coil states or register values, or sending states or values for the server to use. The server responds with either the requested data, or confirmation the sent data was accepted.

Modican designed the Modbus protocol for their PLC products, and freely provided the specification so that others could communicate with their PLCs. Modbus has since become a de facto industry standard for industrial devices, due at least in part to the specification being freely available to use. Modbus has evolved over time to remain current, starting with Modbus ASCII using serial RS-232 and RS-485 communications, then binary Modbus RTU for efficiency (also using RS-232 and RS-485), and more recently Modbus TCP for use with Ethernet networks.

The Modbus specification is now controlled by Modbus.org, a U.S. non-profit trade association, which continues to freely publish the Modbus protocol specifications and related technical resources.

Interest in Modbus has surged recently for use in the Industrial Internet of Things (IIoT). Modbus TCP enables data to be exchanged over a wide network, leveraging the advantages of Ethernet and the IwIP network stack for wireless end devices.

For testing and evaluation, general purpose Modbus software running on a desktop or laptop computer is often more convenient than using a purpose-designed Modbus device. A Modbus Client (Master) simulator can be used to query data from devices, and can be a valuable test tool when developing a Modbus Server (Slave) device. A Server (Slave) simulator can be useful as a digital twin for verification testing when developing a physical slave device, or as a device to interact with when developing a Modbus Client.

The following is a non-comprehensive list of available Modbus Server and Client software. If one of these doesn’t quite suite your needs, you consider adapting an existing open-source project or create your from-scratch solution using an open-source Modbus library.

Please post a comment to say if you have found any of these useful, or if you use software that is not listed.

Free Client (Master) Simulators

CAS Modbus Scanner

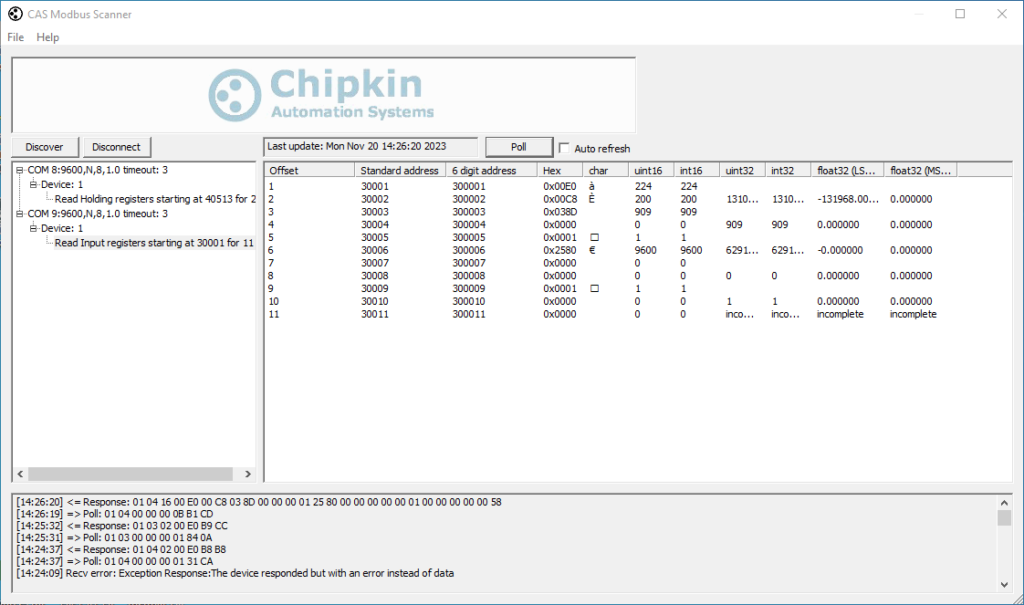
CAS Modbus Scanner is free Windows-only software from Chipkin Automation Systems recommended by Stephen. CAS Modbus Scanner can retrieve coils, inputs, holding registers, and input registers (displaying values in a variety of formats), and also discover Modbus devices on a network (testing every address, function, length, and offset to check for exceptions or responses). Source is not provided.

The scanner function came in handy recently when I used it as part of the verification test program for a new industrial controller.
ModbusScope

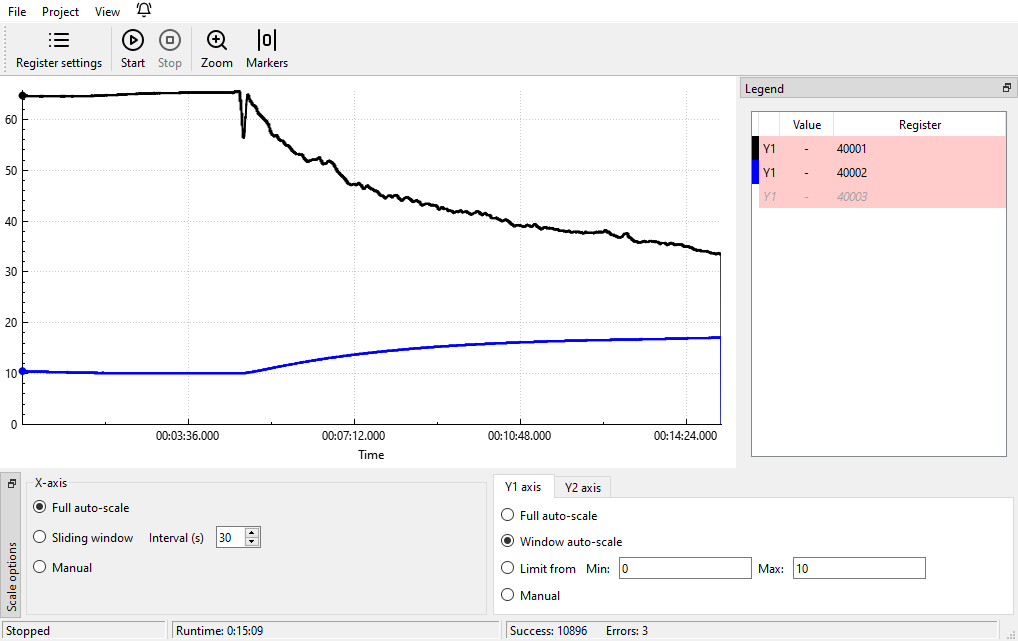
ModbusScope is a free open-source cross-platform app for capturing and graphing Modbus data. In the past, I would capture Modbus data using Modpoll and hammer the output into CSV with sed, or use ModScan to capture CSV directly, and plot using using either DatPlot or spreadsheet software. However, thanks to Ben’s comment, ModbusScope is now my go-to for data logging and capture when I’m looking at three or fewer registers from up to three devices.

ModbusScope is a Qt app and coded in C++, and uses muparser (“fast math parser library”) and QCustomplot (“easy to use plotting widget for Qt”), with icons from Lucide.
Modbus Tester

Modbus Tester from Schneider Electric is a free proprietary Windows GUI program for reading Modbus registers, and supports Modbus RTU and TCP. I found “Tester” did what it claimed, but it didn’t do anything better than I was already doing with other software.

modpoll

modpoll from proconX is a command-line program for Windows and Linux. It supports Modbus ASCII, RTU and TCP, and is a de facto standard based on the number of references it has on the web.

proconX provides modpoll as reference software for their commercial driver libraries. Source is provided, but compiling requires a paid license for the libraries.

mbpoll

mbpoll is an open source (GPL-3) cross-platform command-line utility based on libmodbus (see Libraries). It supports Modbus RTU and TCP and is available in many (most?) Linux distributions. mbpoll conveniently uses similar output syntax and command options as modpoll, I use mbpoll on a Linux Mint test computer and the two are essentially interchangeable. Unfortunately, although mbpoll claims to be multiplatform, I haven’t found a pre-built Windows binary and have found building from source on Windows to be problematic (if you are building mbpoll on Windows, please submit a comment explaining your procedure).

QModMaster

QModMaster is a free open-source Qt-based Modbus master based on libmodbus (see Libraries below). QModMaster is licensed using the LGPL and includes a bus monitor for examining traffic on the bus.

A binary executable is available for Windows, but using on Linux will require compiling the from source using Qt Creator (which I was unable to do successfully, so on Linux I use ModbusScope or Scanbus-BR when I prefer GUI software).

RMMS

Radzio! Modbus Master Simulator (RMMS) is a free proprietary Windows utility (GUI) and claims to replace commercial ModScan and Modbus Poll utilities. It supports Modbus RTU and TCP, and multiple Modbus slave devices. 

Scanbus-BR

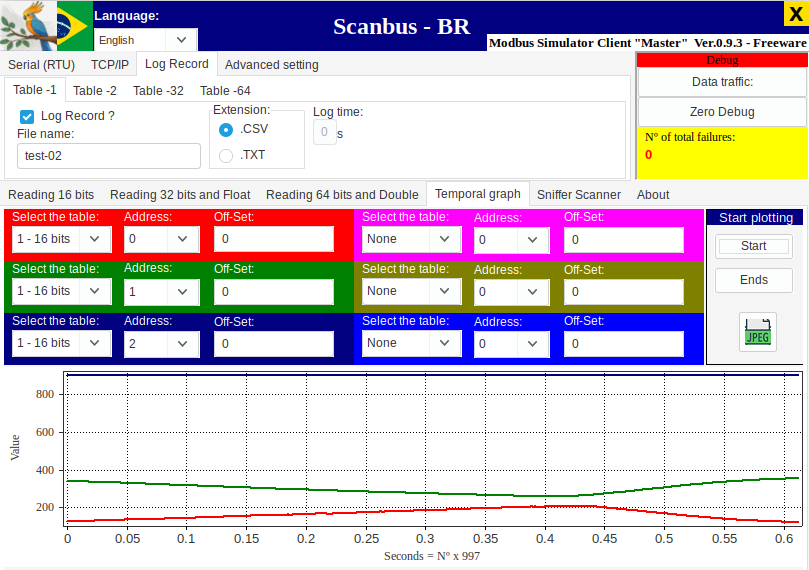
Scanbus-BR is is a free cross-platform multi-lingual Modbus RTU and TCP GUI client (Windows and Linux, and Portuguese, Spanish and English). Rodrigo Hernandes created Scanbus to scratch his own itch and released it publicly to help others and as a demo to support his project development work (he is also a Brazilian, which presumably is the reason for the “- BR” suffix). I found the charting capability very handy (plotting up to six registers vs time), and having register values shown in integer, hex and binary simultaneously saved time by not having to convert or switch display formats.
Paid Client (Master) Simulators

Modbus Poll

Modbus Poll from modbus tools was designed to help developers of Modbus slave devices and others to test and simulate the Modbus protocol. Using a multiple document interface, several Modbus slaves and/or data areas can be monitored at the same time. US$129 per developer. The modbus tools website also has a good intro to Modbus.

ModScan

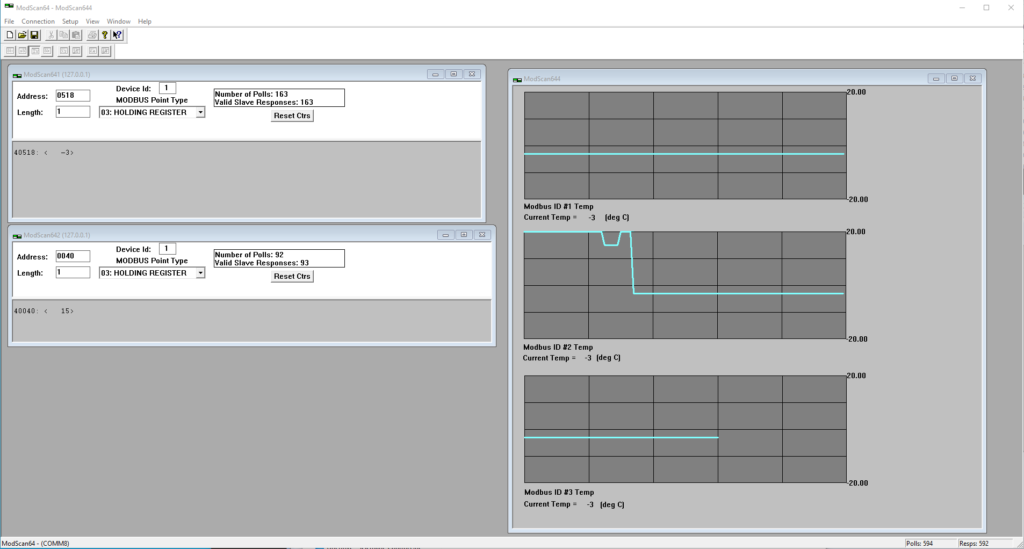
ModScan from WinTECH Software was developed to verify correct protocol operation in new or existing systems. ModScan supports an arbitrary number of queries, each with its own document window, and you can create your own custom windows and add content using the provided widgets (for example, using the trendline display shown below, which can plot up to four difference sources in one display). The data from each document window can be logged to its own data file.

Extensions provide third-party data acquisition using Control Automation routines or the MS Jet Database engine, and a debug mode displays raw serial data to and from a connected device. A single-user license cost US$65 when I last checked. 
Simply Modbus Master

Simply Modbus Master (RTU and ASCII ). The Free mode allows six request messages before the application must be re-started. C$60. A slave simulator and TCP client are also available. The website has a nice intro to Modbus and Modbus Enron.

Free Server (Slave) Simulators

ModRSsim2

ModRSsim2 was forked from MOD_RSSIM and includes compiling on Visual Studio 2010. ModRSsim2 supports RS-232 and TCP/IP connections, the full range of Modbus addresses for all four Modbus types (0xxxxx, 1xxxx, 3xxxx, & 4xxxx addresses), as well as diagnostics with complete traffic byte capture and logging capability. ModRSsim2 supports CSV loading and a scripting environment for testing as well as HTML custom displays. It is free and open-source, and licensed under the GPL.

MOD_RSSIM

MOD_RSSIM is a Windows-based Modbus PLC Simulator (and parent of ModRSsim2). It is free and open-source, and started as a test program for a SCADA/HMI with Modbus RTU and TCP/IP. Typical uses are to verify device configuration, support development of Modbus master and slave drivers for embedded and desktop platforms, and as an educational tool to learn Modbus protocols. 

pyModSlave

pyModSlave is a free and open-source Qt-based Python-code ModBus RTU and TCP slave from the developer of QModMaster. A Windows executable is provided and pyModSlave includes a bus monitor for examining all traffic on the bus. pyModSlave is licensed under the LGPL

UnSlave Modbus Slave Simulator

UnSlave Modbus Slave Simulator . UnSlave simulates any number of Modbus slaves. UnSlave is provided free from Unserver, possibly as a source of test data for Unserver’s Modbus REST API Server, which provides data from Modbus networks and devices to higher-level clients – and is monetized. The informative Complete Modbus Guide is also provided by Unserver.

Paid Server (Slave) Simulators

SimServe

SimServe by SCADAmatic can simulate Modbus ASCII, RTU, or TCP/IP. It provides a user interface for setting up a network topology of multiple devices simultaneously. The developer James brought it to my attention, and was kind enough to provide a guest key for evaluation. SimServe could be a valuable development aid if you are developing SCADA software and need simulated devices for testing, or if you are developing a device and could benefit from having a digital twin for comparison (assuming SimServe is capable of simulating your device).

WinModbus

WinModbus is a Modbus Slave Simulator for Windows. When I found it, the price was GBP62.50 which included lifetime support. A 14-day functional demo is available, and there is an attractive polished website.

Libraries

A number of Modbus libraries are available to leverage application development.

FreeMODBUS

FreeMODBUS is a free open-source implementation of the Modbus protocol with separate ASCII/RTU and TCP ports for a variety of embedded systems. I can recommend FreeMODBUS based on first-hand experience replacing a DIY protocol stack in an embedded industrial controller with an 8-bit MPU. FreeMODBUS is licensed using the BSD 3-clause license. 

libmodbus

libmodbus is a free open-source library for Linux, Mac OS X, FreeBSD, QNX and Win32. The library is written in C, supports RTU (serial) and TCP (Ethernet) communications, and is licensed using the BSD 3-clause license. QModMaster, pyModSlave and mbpoll (reviewed above) use libmodbus.

Other Resources

Peter Chipkin has a nice list of Modbus-related tools on the CHIPKIN website, including their own CAS Modbus Scanner, which is handy for investigating the functions, coils and registers supported by a device.

com0com is a free open-source kernel-mode virtual serial port driver for Windows. An unlimited number of virtual COM port pairs can be created, and any pair can be used to connect one COM port based application to another. The module is signed with a test certificate, and requires configuring Windows to load test-signed boot modules.
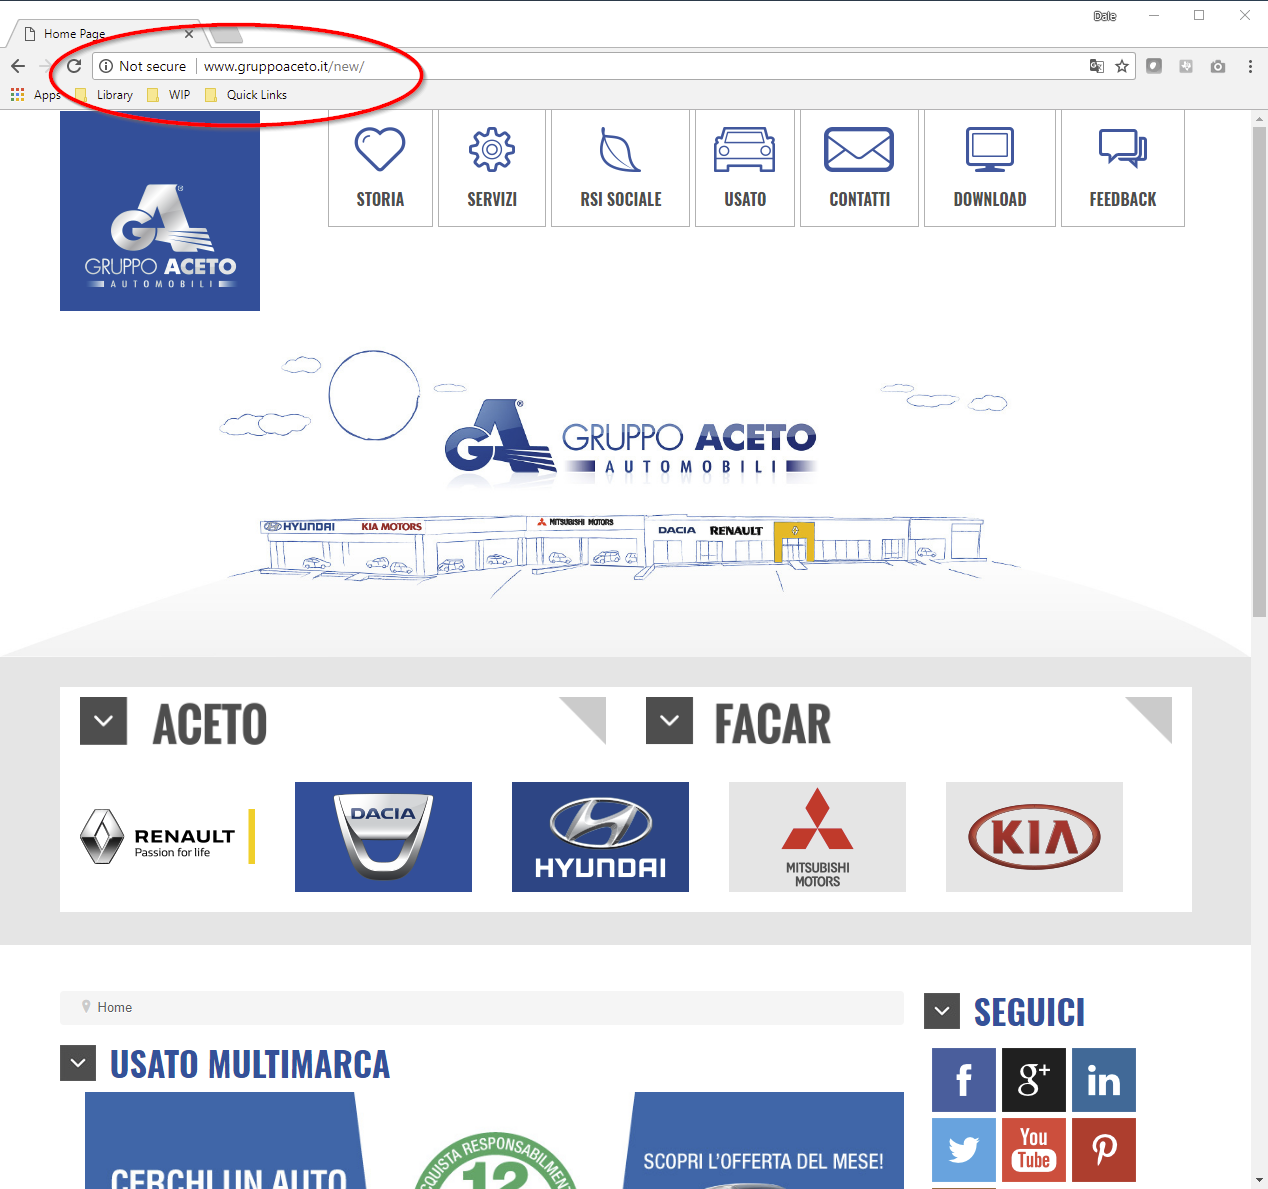
Has your server been owned?

Do you know what your server is doing when you’re not watching?

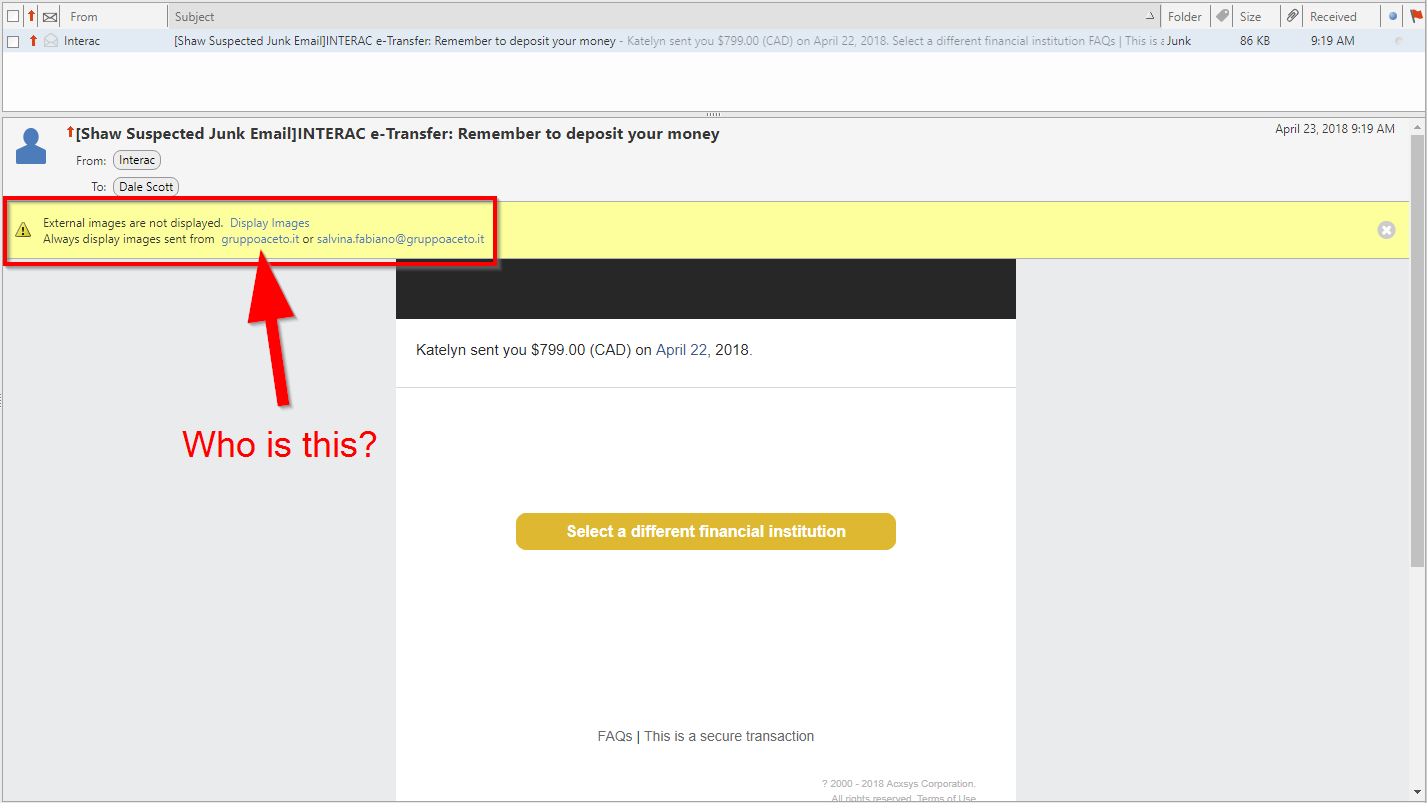
The morning mail delivered another phishing attempt. Someone apparently wants to send me money. I should be so lucky!

It was an obvious attempt since I don’t know any Katelyn’s, let alone one who would want to send me money. However, my browser was asking if I wanted to load the images, and that was curious.

Who was gruppoaceto.it I wondered? Were they an Italian anonymous file sharing site?

A little more typing and I learned “Gruppo Aceto” is an Italian automobile dealer.  Could Katelyn be working there?


Reports indicating what your servers are doing are probably already available, but is anyone reviewing them? Keep your systems maintained, but please, please, take a look at your log files every once in a while. 

Dale


Microchip PIC24F Development using MLA, EZBL, Git and Dropbox – Part 1

I recently started working with a client on the final stages of a new product development project. The hardware design is based on a Microchip PIC24FJ1024GB610 microcontroller and firmware is being developed on a Microchip Explorer 16/32 development system until prototype hardware is fully tested. I have been working almost exclusively recently with the TI MSP432, and it’s been great fun familiarizing myself with Microchip’s 16-bit development environment. 

Tutorials and demo applications are great sources of information, but are often from the perspective of a single developer, and brush over details such as source traceability and effective team development – often important within an enterprise to reduce risk and expedite time-to-market.

In this new series of blog posts, I will explore using the Microchip Library for Applications (MLA) as the basis of a new project, managing source files in a version control system (Git), sharing a source repository amongst a team using Dropbox, and finally integrating an application with the Microchip Easy Bootloader (EZBL). 

Development Environment Summary

  • Windows 10 development workstation
  • GitExtensions 2.50.02
  • MPLAB v4.05 (necessary at this time to use Easy Bootloader)
  • MLA v2017_03_06
  • Microchip Explorer 16/32 development board with PIC24FJ1024GB610 PIM
  • MikroElektronika microSD click (mikroBUS™ microSD Card module)

Create new MPLABX project

Microchip provides the MLA (Microchip Library for Applications) which includes demo applications which can be used as the basis of a new project. Two important components of the new instrument’s functionality is to present an internal SD Card to a USB host as a Mass Storage Device (MSD), and to support in-field firmware updating.

Based on this functionality, it was appropriate to start with the MLA msd_sd_card_reader demo app, and integrate EZBL after getting the demo code running on the Explorer 16/32 development system, .

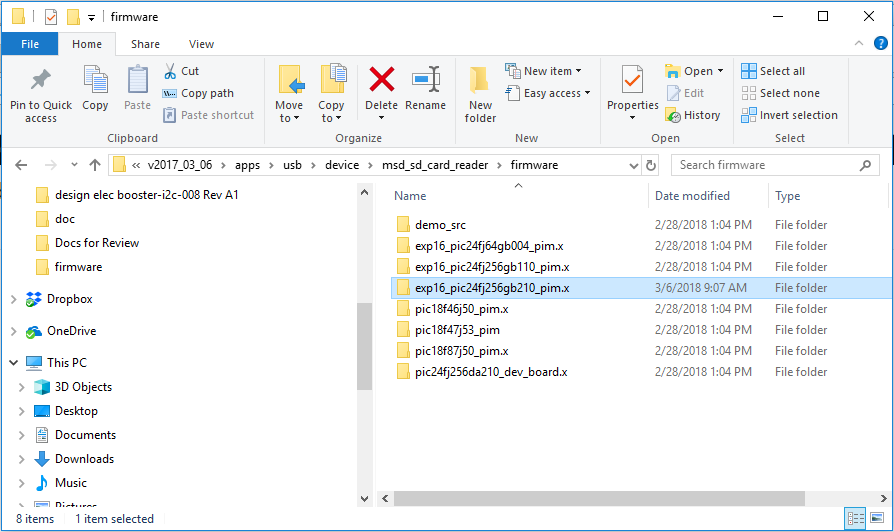
Unfortunately the MLA does not include a specific app for the Explorer 16/32 and PIC24FJ1024GB610, so I will have to adapt the Explorer 16 demo app for the PIC24FJ256GB210.

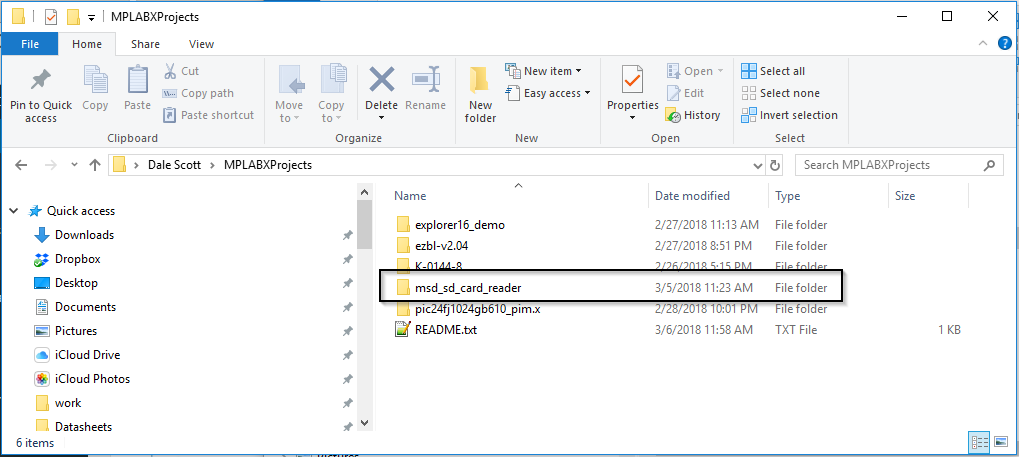
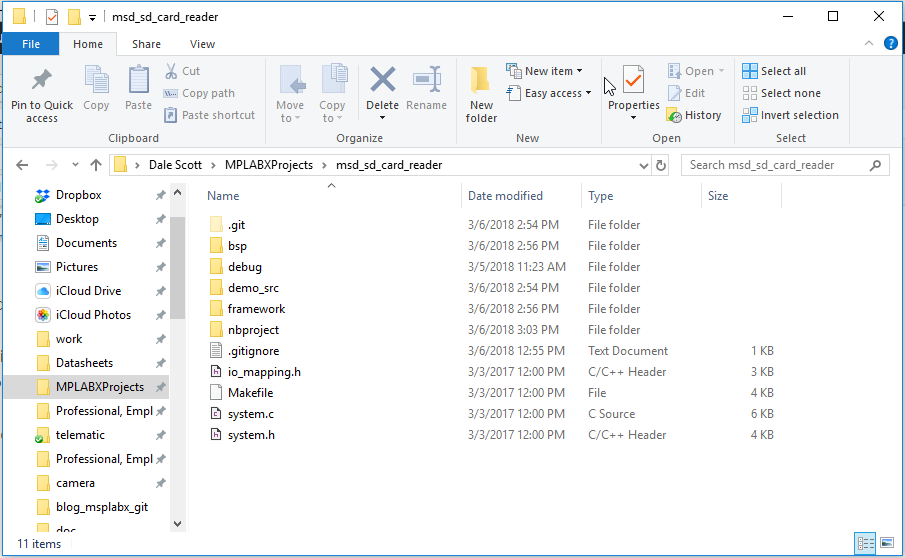
Copy the selected demo app to the ~\MPLABXProjects directory and rename it to something meaningful.

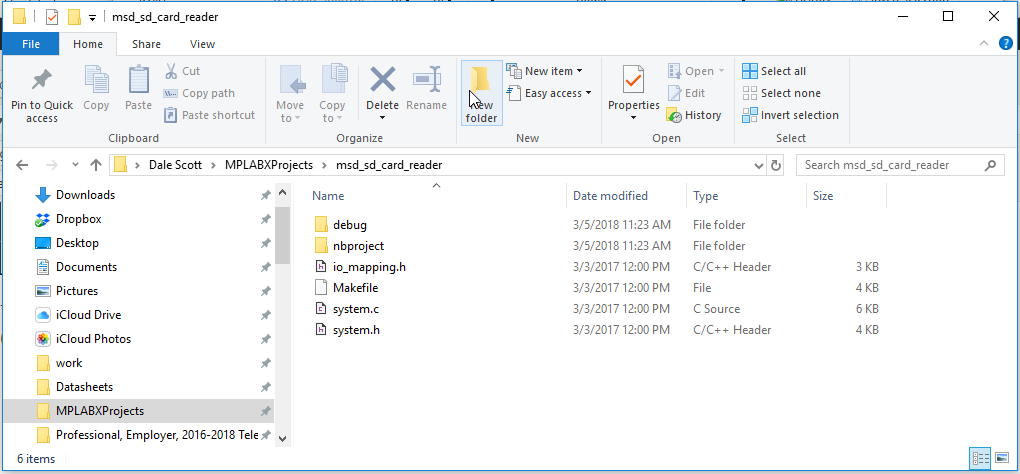
The project directory includes sources files and MPLABX project meta-data.

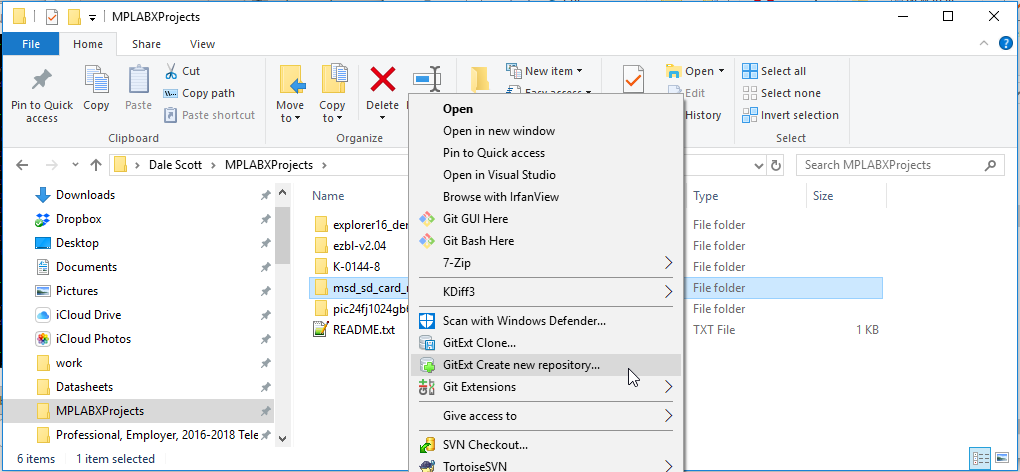
Now that there are files in the project it’s time to put it under version control. I will use Git for the project source file version control system (VCS), and have installed GitExtensions which integrates with Windows Explorer. MPLABX includes a built-in Git client which can be convenient but is less featured than GitExtensions. I’ll try to show the MPLABX Git client in a future post.

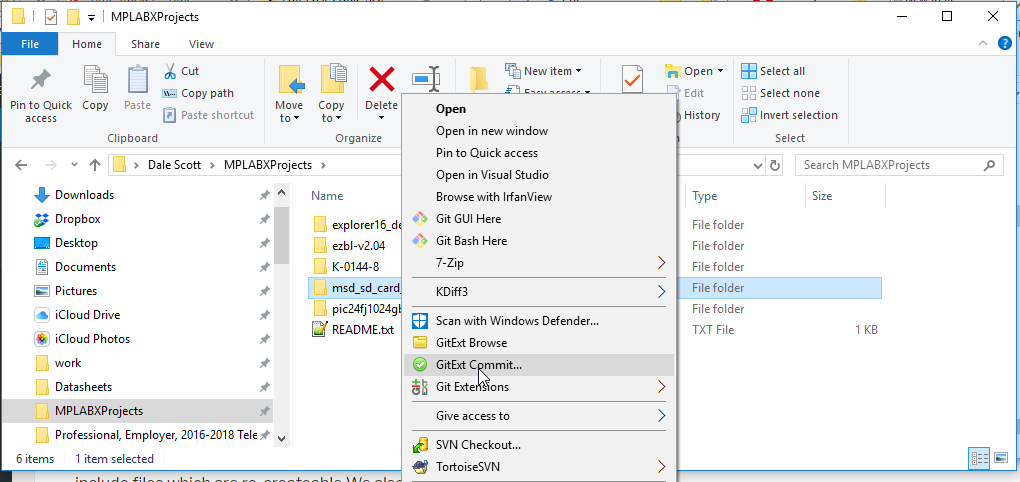
Start by using GitExtensions to create a working Git repo from the project directory.

Create a suitable .gitignore file so that Git will ignore files we don’t need to keep in the repo (generally the intermediate and debug compiler output). MPLABX  project meta-data will be kept in the repo though, as it includes specifying which files the compiler is to use, the include path settings, the target processor, etc. The new project files are then committed to the repo.

The project won’t build yet though because I haven’t copied the MLA support files into the project yet. I’m going to simply copy the MLA framework\ and bsp\ directories into the project. Even though I likely won’ t need all the files, it’s convenient to have a complete and consistent MLA in the project as it will simplify use and maintenance.

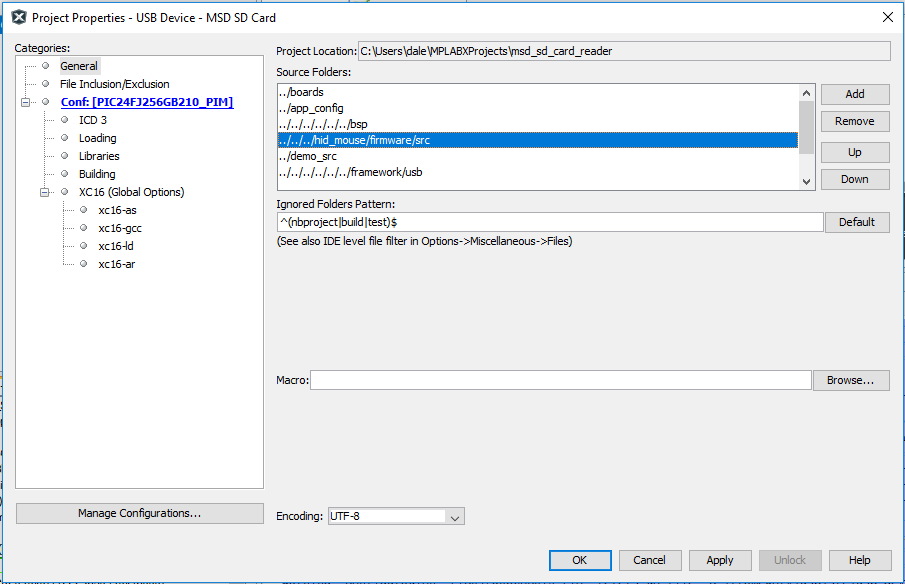
The source file directories in the project properties must be configured for the new MLA location within the project directory structure.

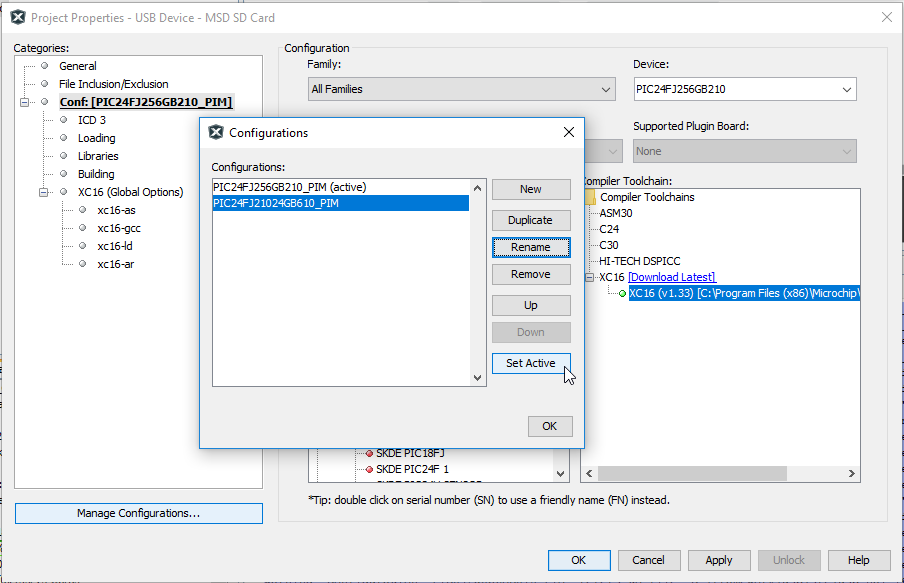
The build configuration must also be updated. I created a new configuration by copying the existing build configuration, and renaming it according my target processor and set the new configuration active.  

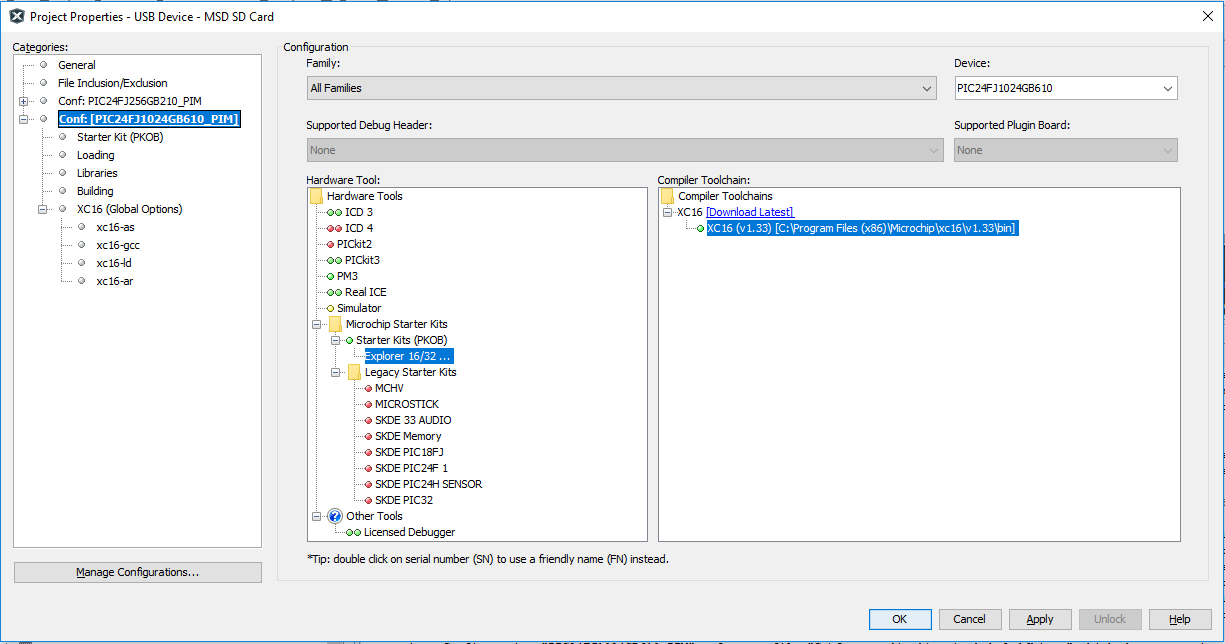
I also set the target Device to the PIC24FJ1024GB610, and picked the Explorer 16/32 development system in Hardware Tools.

I had hoped the project would build at this point, but at least not complain about missing files. This was not the case. Performing Clean and Build Project produced a torrent of missing files.

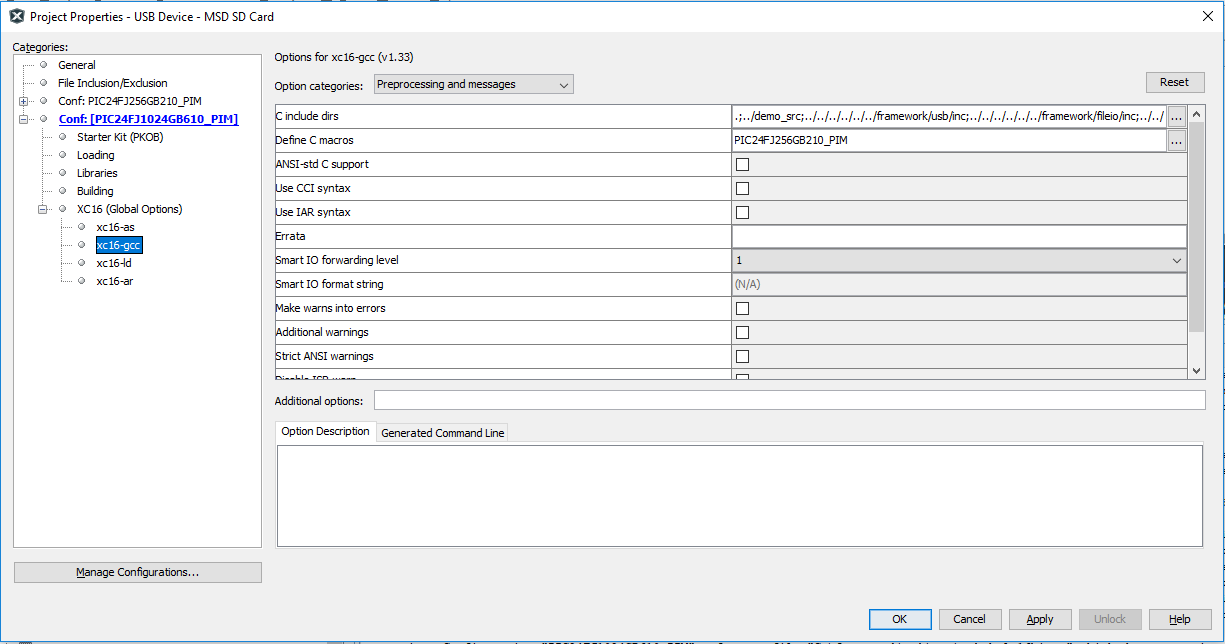
Investigating, I first found the build configuration includes specifying the “C include dirs” for the xc16-gcc compiler pre-processor, seemingly duplicating the project Source Directories. I made the preprocessing include directories the same as the Project Properties Source Folders set earlier.

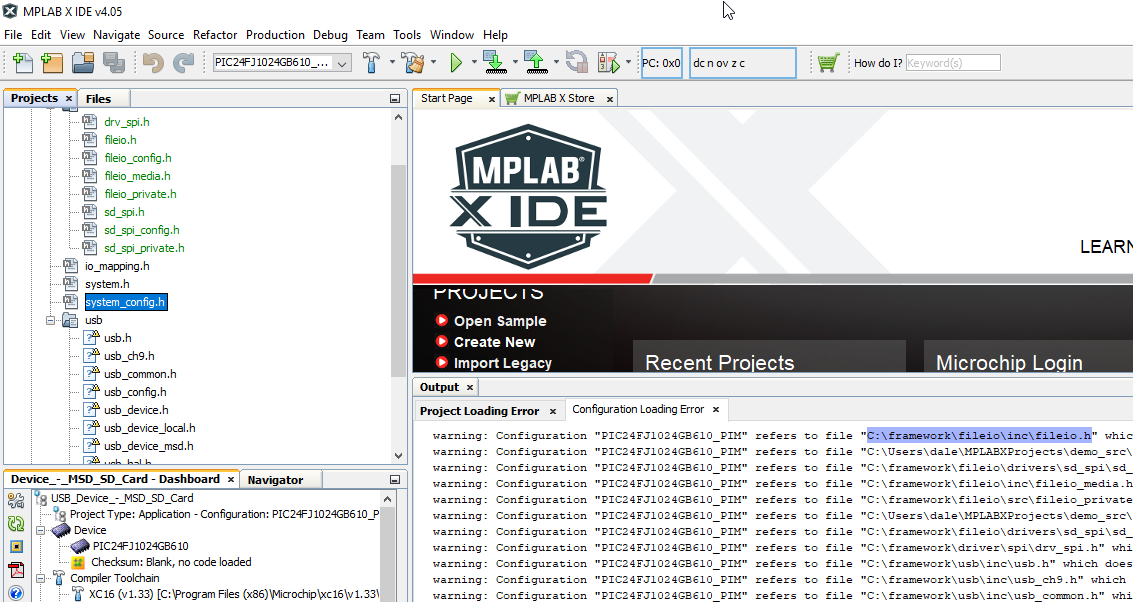
I then noticed that files reported missing in the build output were not shown with a “!” in the project navigator, and they also didn’t have the expected “H” or “C” in their file icon. 

I don’t understand why the files they weren’t found since I had corrected the include file settings. I had thought path settings were all relative to the project directory, but for some reason MPLABX expects the framework directory to be in the root of the drive, instead of the root of the project. Not sure what else to do, I individually removed each include and source file and then used “Add existing item” to re-add each file.

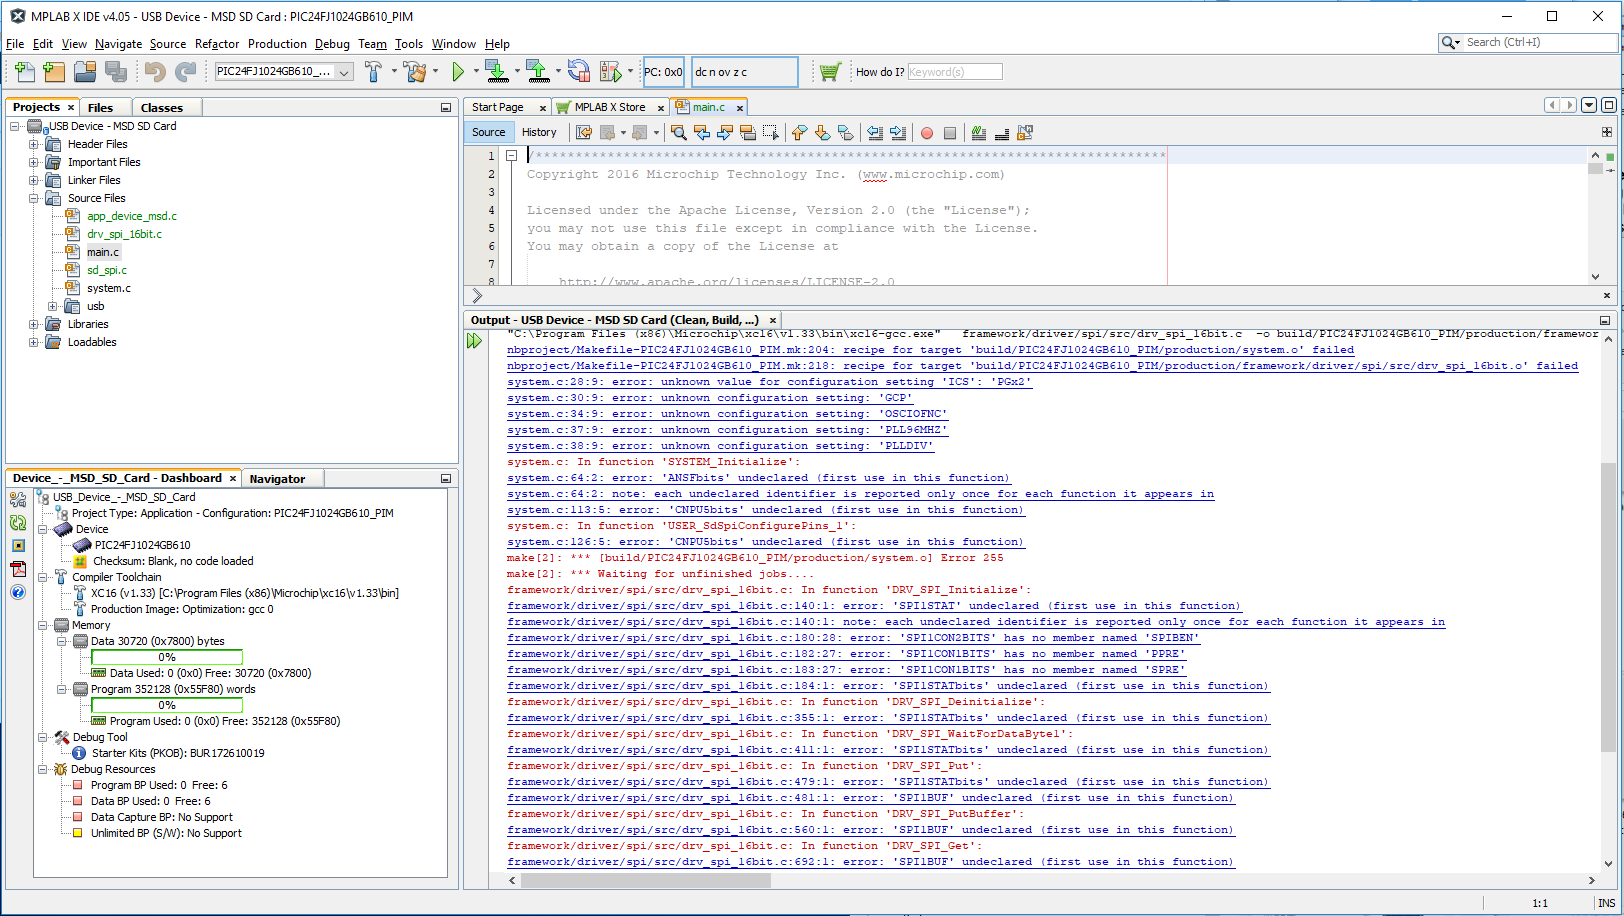
The project still doesn’t build, but now there are no errors due to missing files.

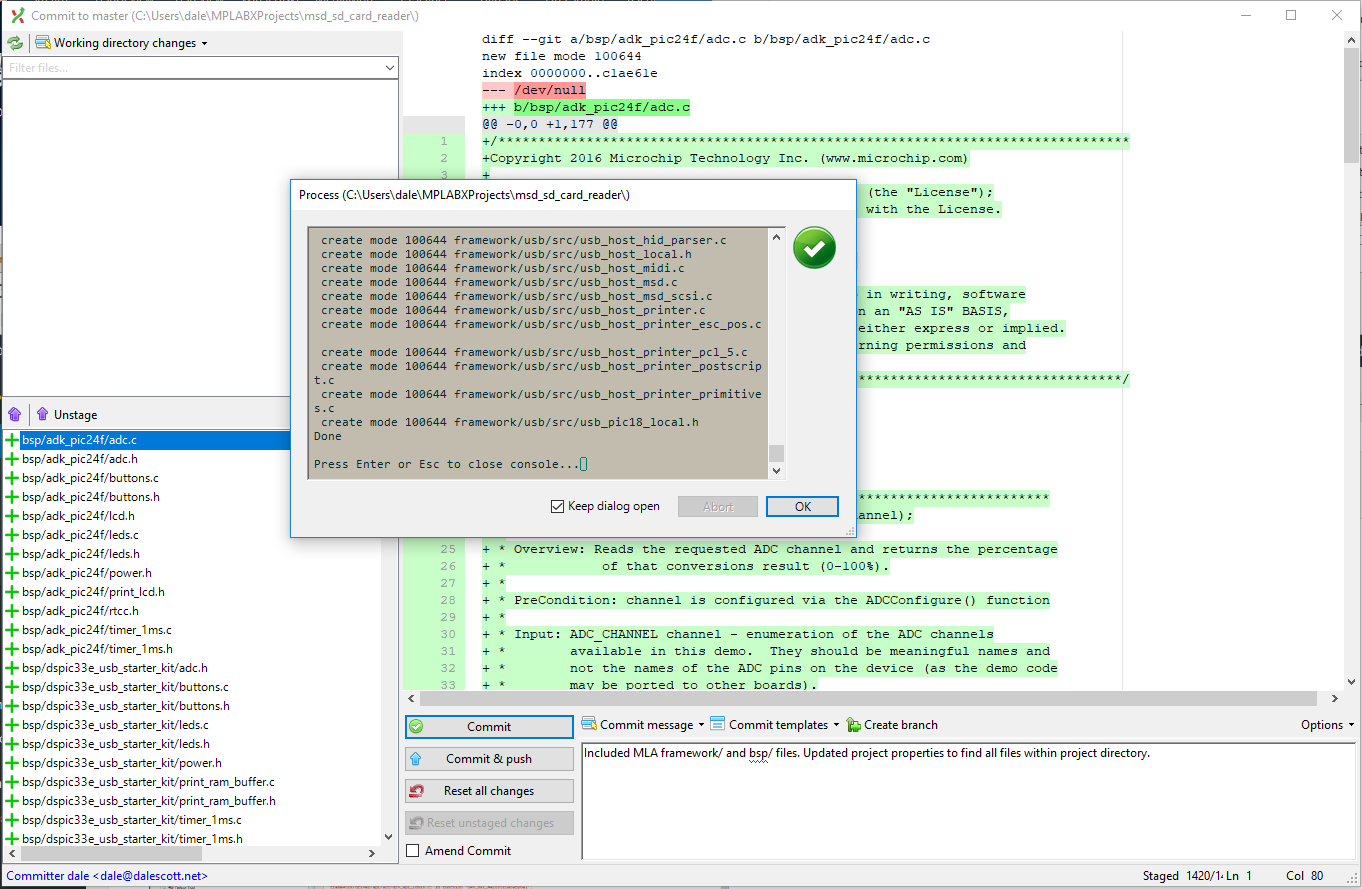
Now that all the files are found, I will commit the updated project to the Git repo.

In upcoming posts, I will fix the undeclared symbol errors, push my local dev repo to a Dropbox repo to share with others, and finally integrate the demo app with the Microchip Easy Bootloader.

For Followup

The correct use of include directory settings is still not clear to me. Manually removing and re-adding each source file would be extremely laborious and error prone in a significant project, and I am concerned I may have made the project non-portable in the process.

There is a note in the Getting Started document for the Microchip Libraries for Applications on this topic, which I need to explore in the future. Point 1 seems to imply though that at least the framework directory must be in the same location on each development system.

Project Include Path Settings

1. Path to the framework folder: In order for the projects to build, the include path up to the framework folder should be
provided for each build configuration and must be placed in the “Includes directories” list in the compiler properties for the
project. The framework module header files expect this. It is already done for the examples provided with MLA, but for the
customer specific project, this needs to be done.

2. Path to system_config.h: For each build configuration, the path to system_config.h needs to be provided.

3. Path to the application project src folder: The hardware independent code resides in the src folder for the application.
The path to the src folder needs to be provided for each build configuration.

For a project to be portable from one machine to another, it is recommended that the paths in the MPLAB X are relative,
while adding files to MPLAB X and while specifying include paths.

(Getting Started, Microchip Libraries for Applications. (c) 2013 Microchip. help_mla_getting_started.pdf, page 11.)


PLM using Parts&Vendors

Parts&VendorsTM from Trilogy Design was the seminal PLM (Product Lifecycle Management) software in the late 90’s for small teams who needed to manage design and purchasing information. A spreadsheet approach can be perfectly adequate if you have only one BOM (Bill of Materials) and each part is sourced from only one supplier, but quickly loses effectiveness when planning or purchasing for product builds with the same part being used in multiple sub-assemblies, and it gets worse if a part is available from multiple sources. Parts&Vendors uses a database, which allows the same part to be referenced by as many assemblies as needed, or as many sources as needed.

Parts&Vendors was originally released for Windows 98SE, and provided a single point of truth for everything to do with product development (parts, BOMs, suppliers, purchasing, supporting documents, etc.) that could be accessed by anyone in the team. It even even included rudimentary inventory and build management. Parts&Vendors enabled teams to work more efficiently with more cooperation and less bureaucracy, and was affordable by the smallest businesses – only US$69/user if you didn’t need per-user login, creating purchase orders or an ECO workflow (and only slightly more if you did).

Parts&Vendors was discontinued in January 2014 when Trilogy-Design folded operations, essentially a casualty of insurmountable technical debt. Although no longer available for purchase, Parts&Vendors is the oldest software I use on a daily basis, and my gold standard for evaluating software PLM features for use by SMEs – both dedicated PLM software as well as general purpose ERP software.

Parts&Vendors Overview

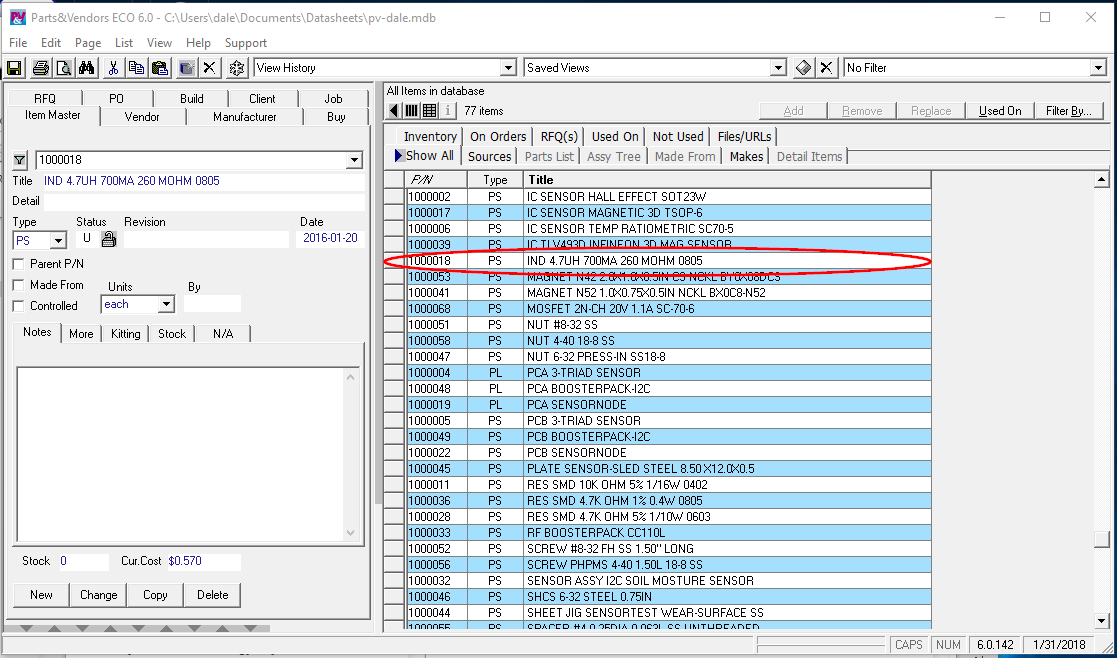
Item Master Tab

Parts are accessed through the Item Master tab, and the list of parts can be sorted, filtered or searched as needed.

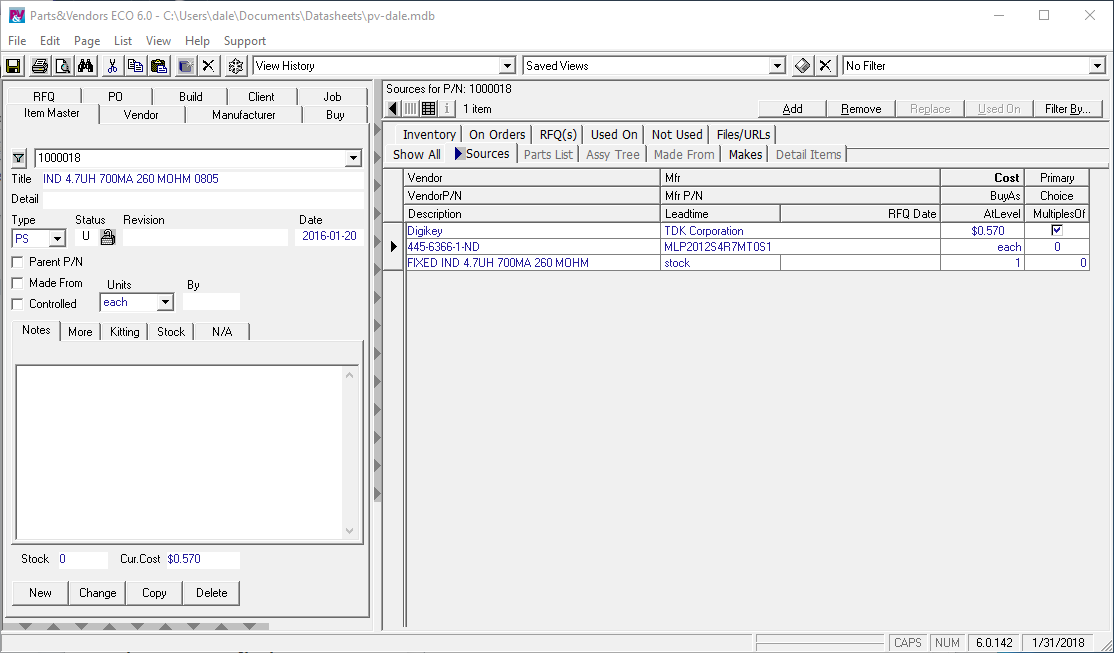
Item Details

Selecting a part provides detailed information on sources (vendors) as well as other useful information.

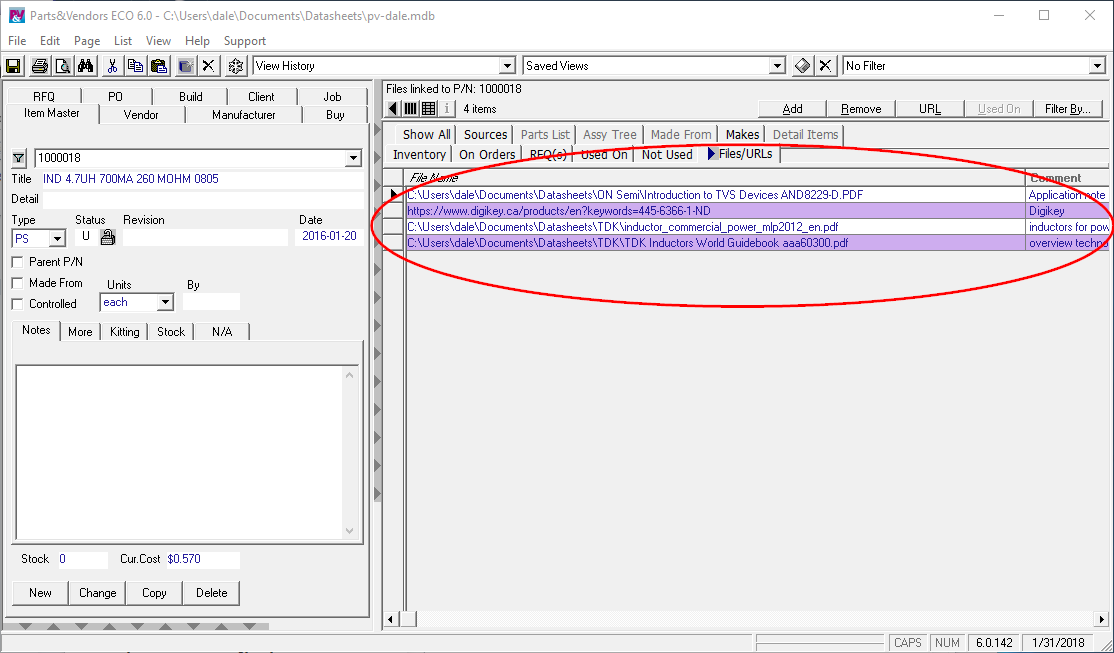
Files and URLs

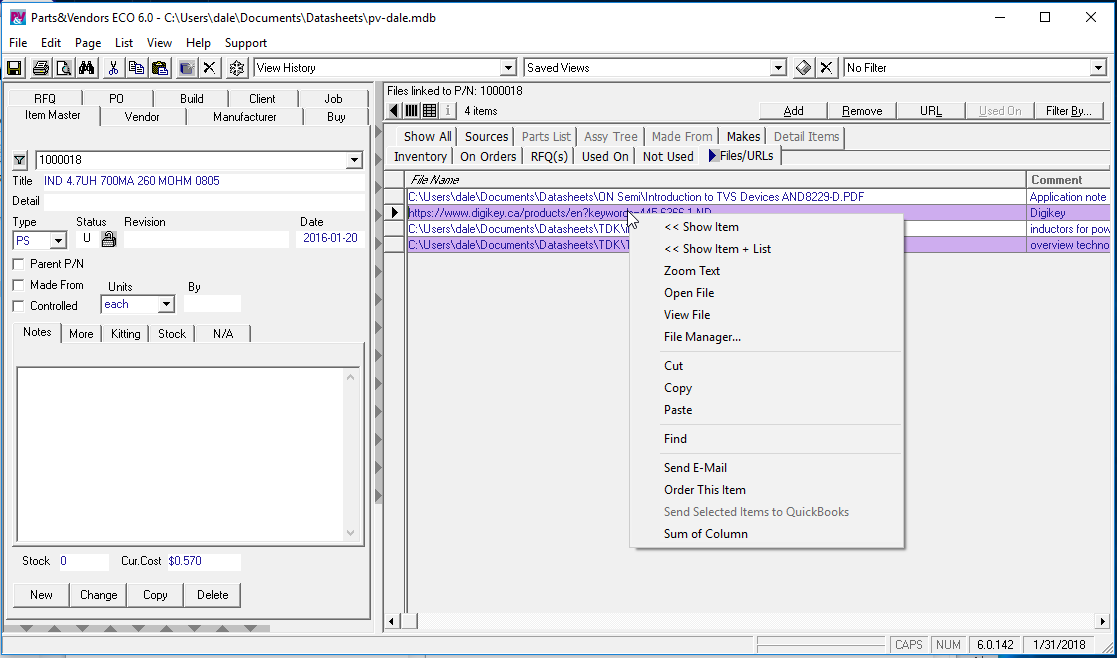
Documents and web sites can be associated with a part,

making it easy to access saved documents or a web page for reference.

Although it wasn’t formal document control with a submit/approve/check-in/check-out type workflow, the simple approach was adequate for a conscientious team.

Assemblies

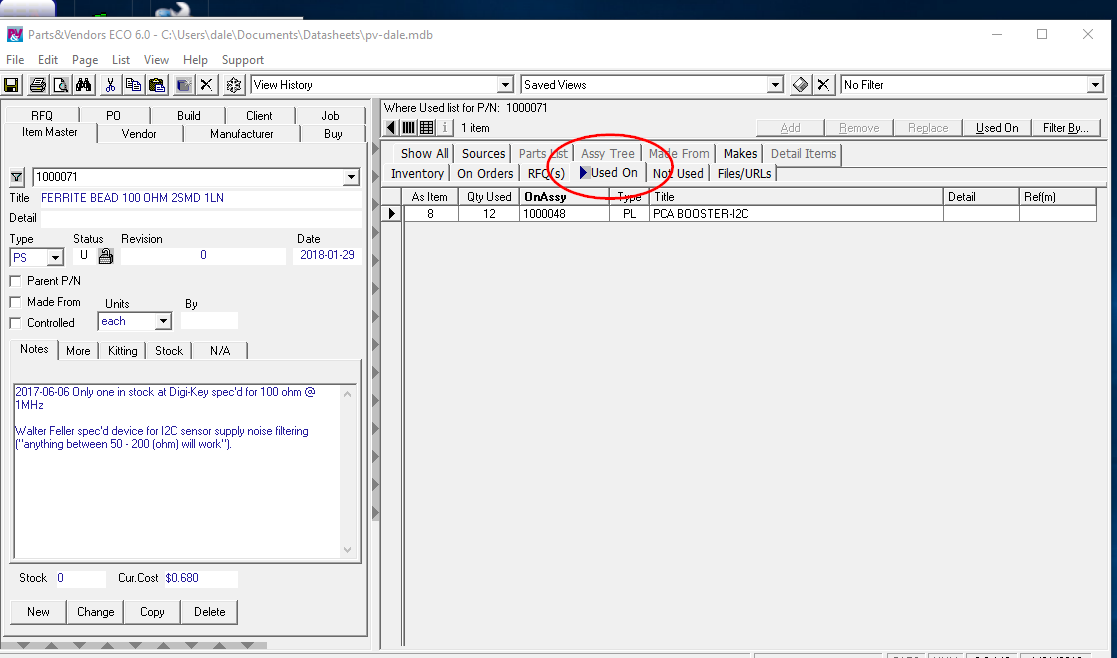
A part may be grouped with others in an Assembly. You can easily tell what assemblies include a particular part in PV from the part’s Used On tab. 

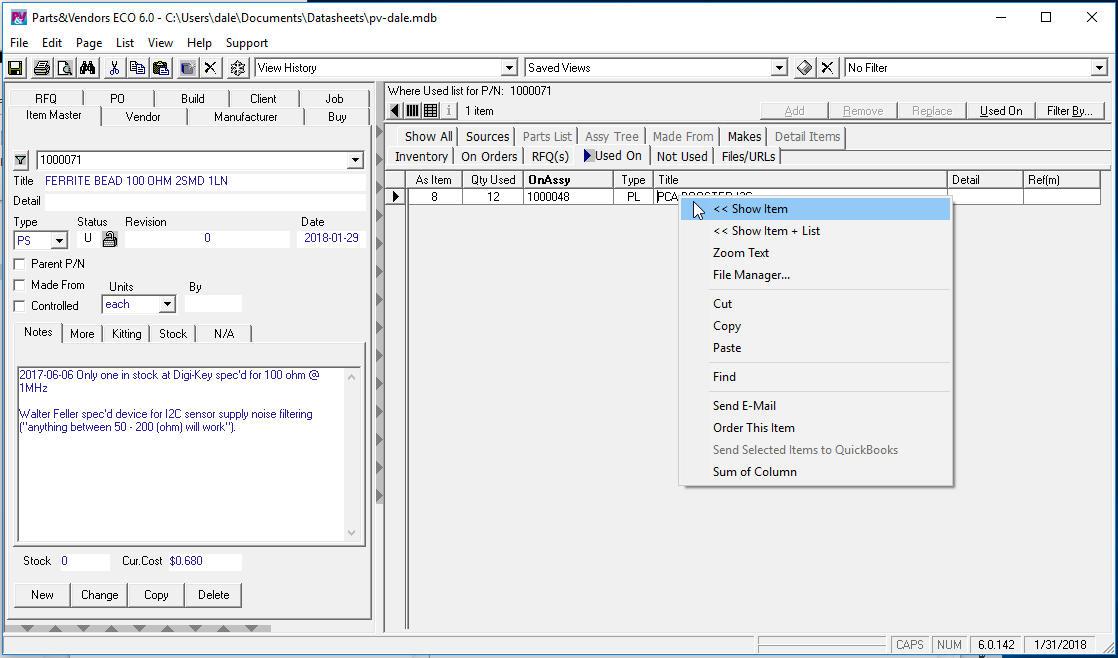
It’s also easy to navigate from a part to a containing assembly, and back. This is also called traversing a product tree containing child parts and parent parts.

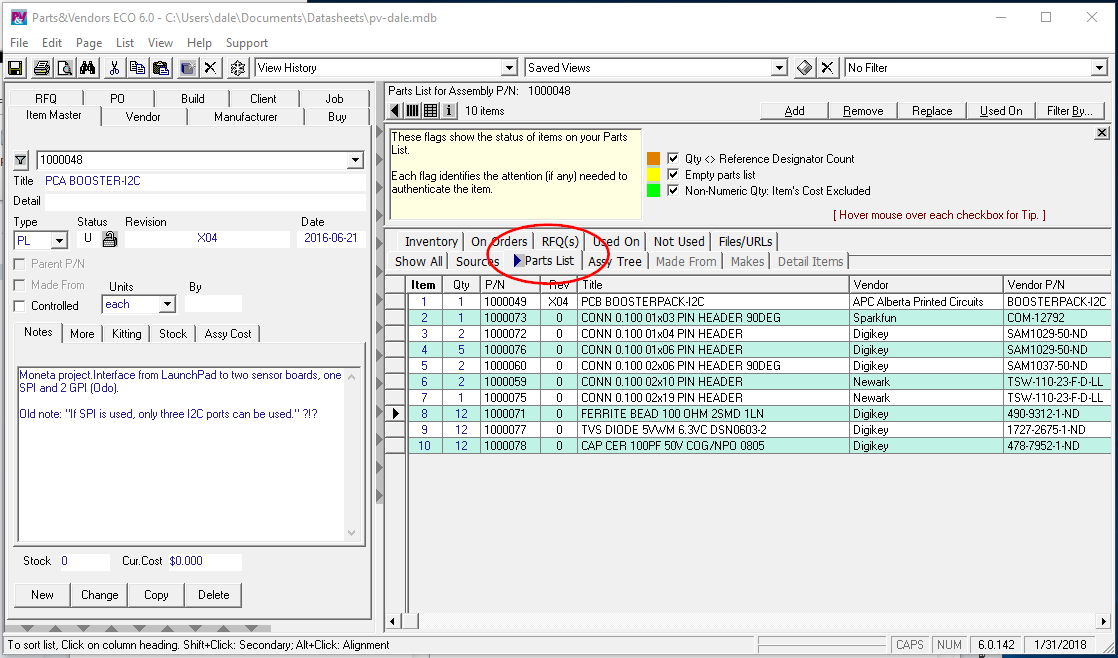
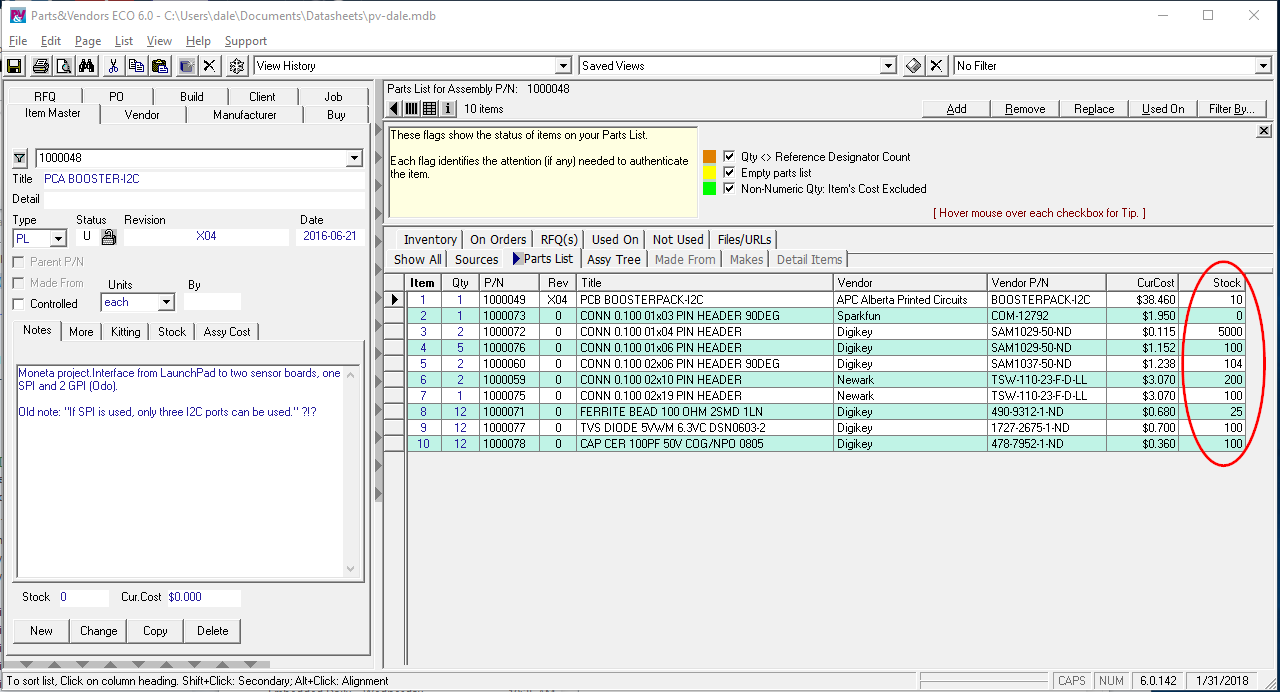
An assembly has a Parts List (aka Bill-of-Materials or BOM) that lists its child parts.

Purchasing

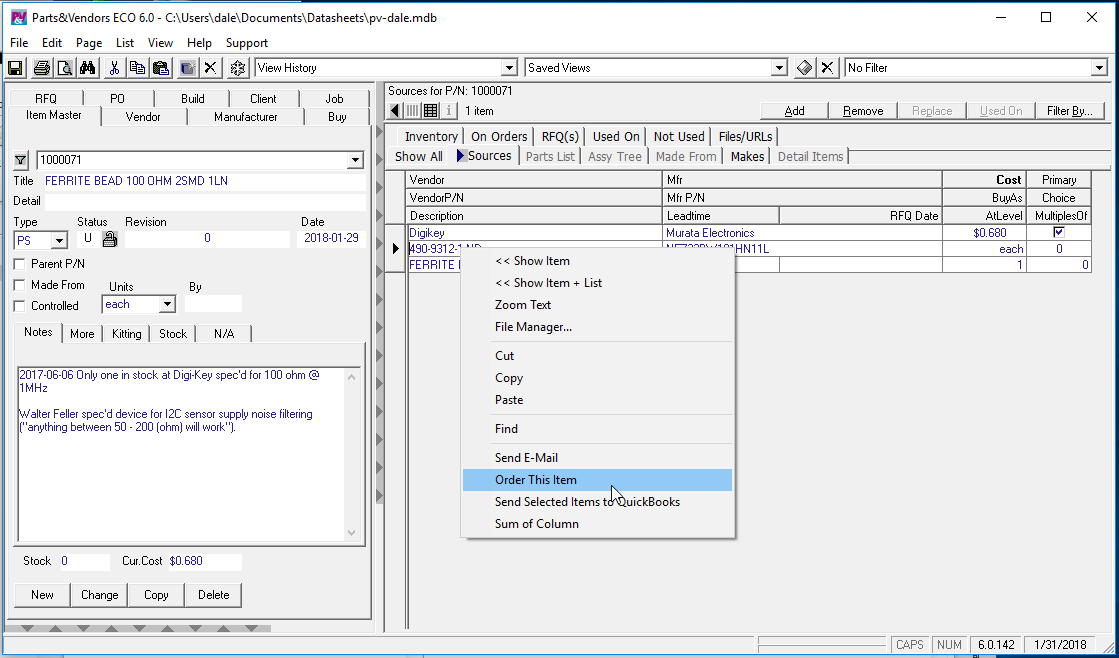
Parts can be easily ordered,

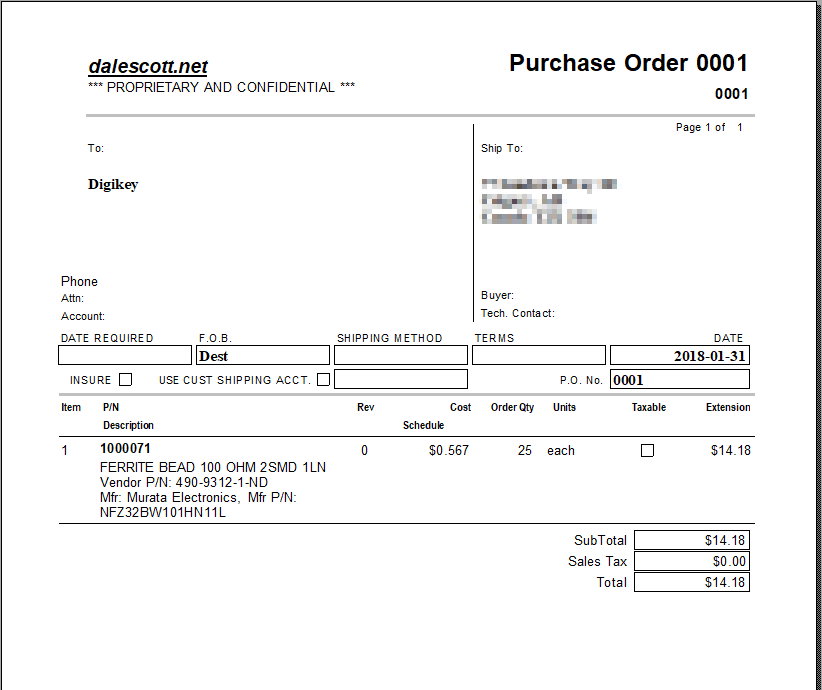
and an order can be left “open” to accumulate parts until it was decided to place the order, resulting in a purchase Purchase Order (PO). In some organizations the PO would be sent directly to the vendor, while in other organizations the PO would be sent internally as a “purchase request” to issue a “real” PO.

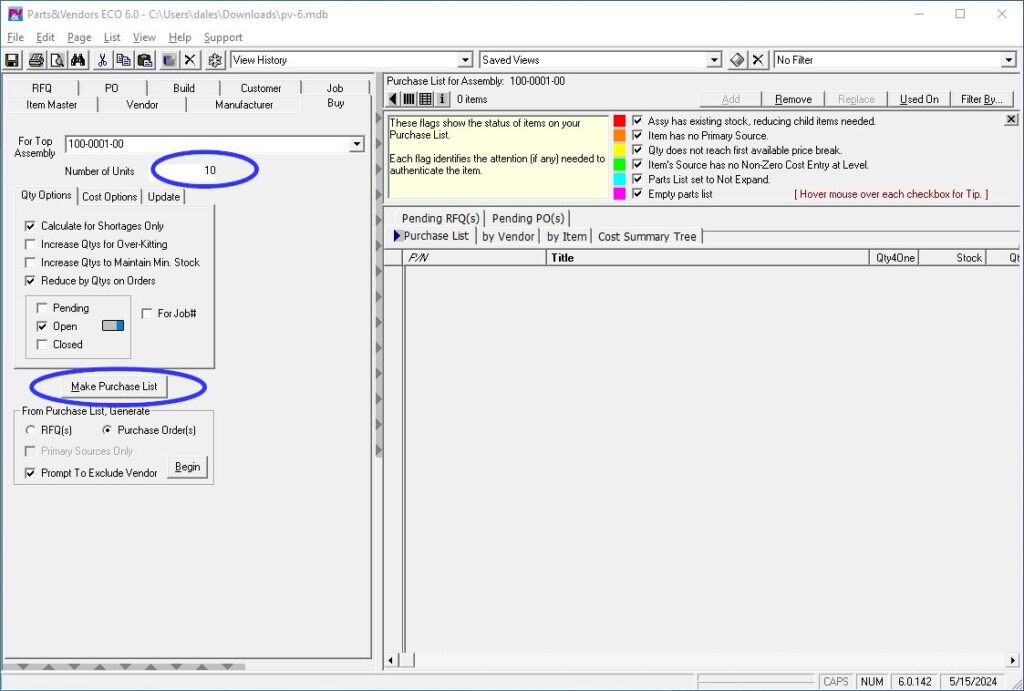
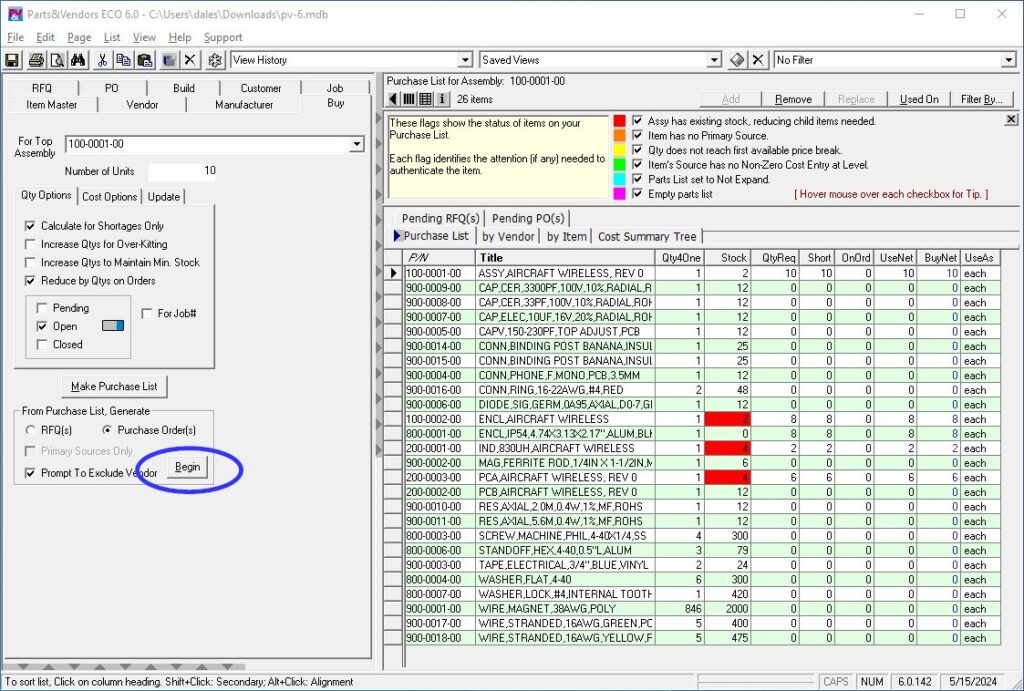
Purchasing could also be performed for a BOM, including any sub-assemblies, by selecting the top-level BOM and quantity, and generating a Purchase List,

and then generating Purchase Orders from the Purchase List.

Receiving

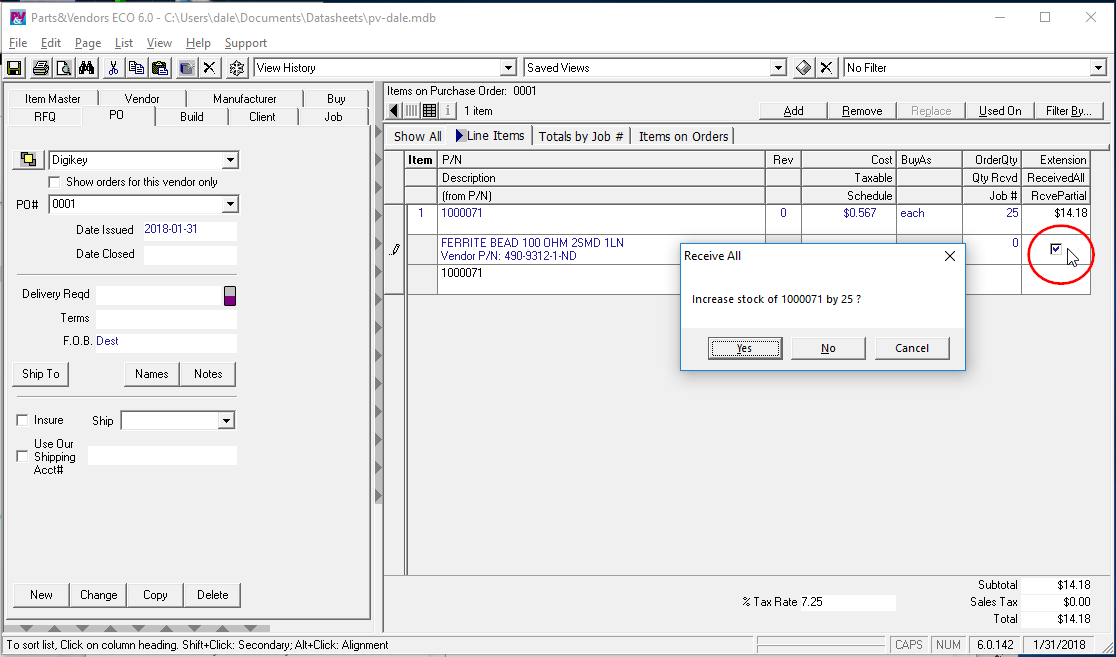
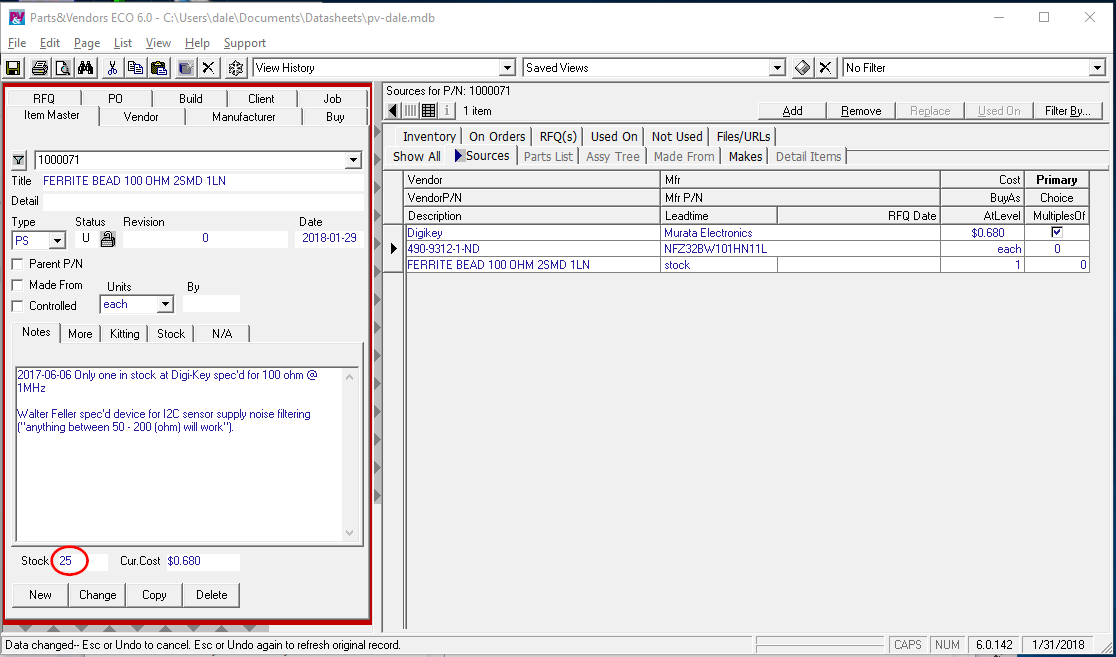
When the ordered parts arrive, the PO is retrieved and the order item marked received, 

which updates the stock on hand.

The assembly Parts List is one way to see when the parts necessary to build an assembly are in stock.

Manufacturing

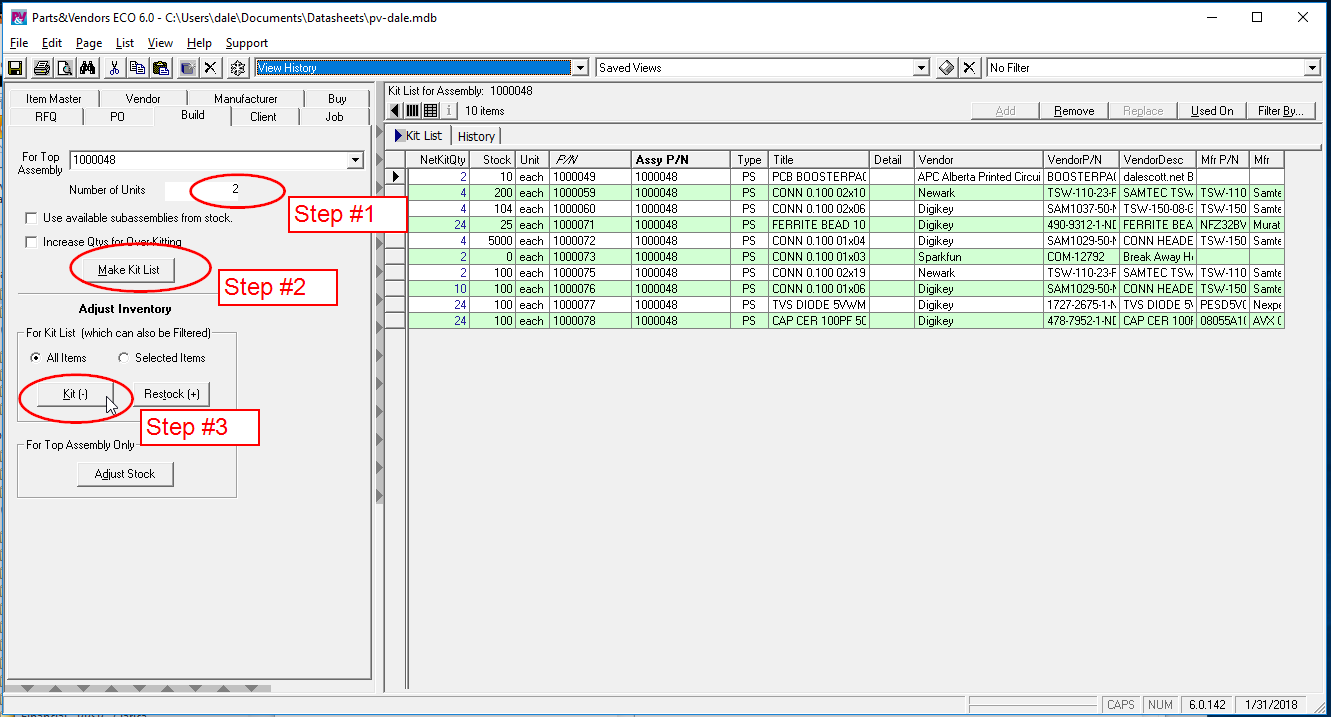
Once all the child parts for an assembly are in stock, a “Kit List” is generated from the “Build” tab for manufacturing. Stock on hand can be reduced for the kitted items, and later increased for the finished assembly when completed. 

Customers

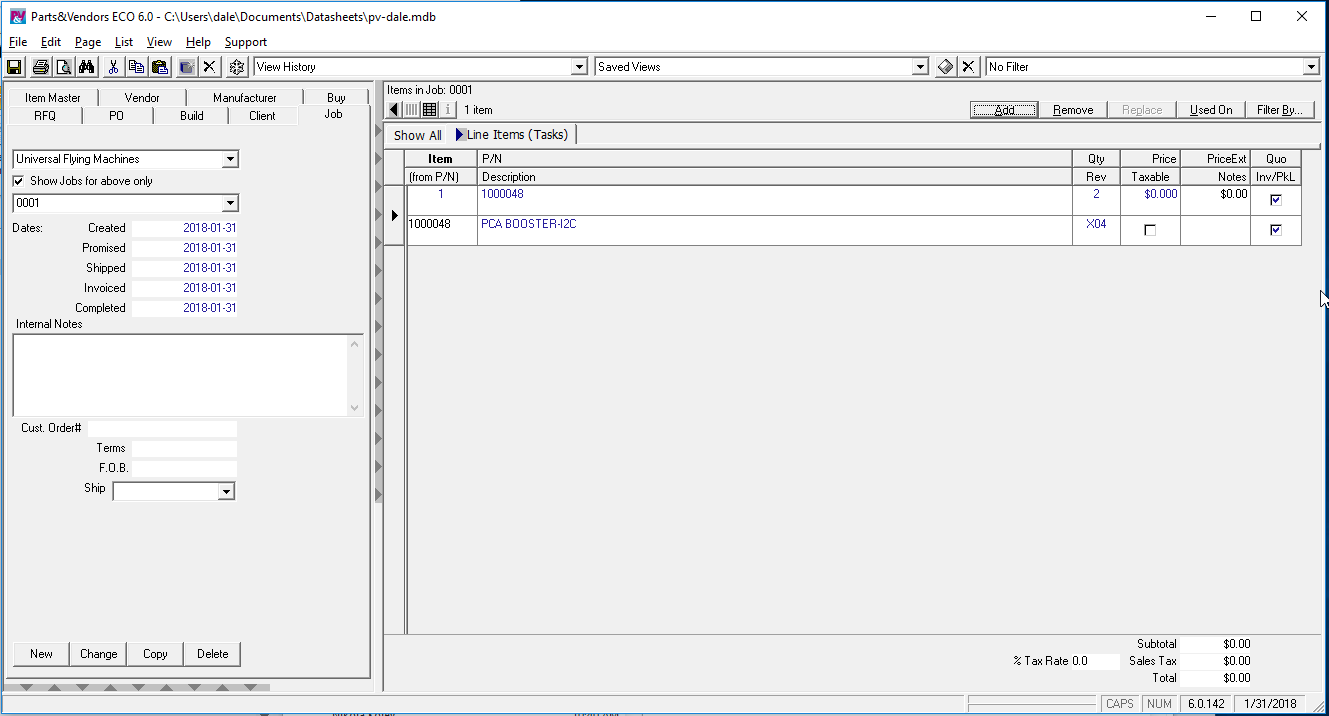
PV can also manage clients and client orders, although the functionality is not integrated with stock control and closing an order does not reduce quantity on hand of the ordered items. However, the limitations were acceptable given the it was never the intent of P&V to also be a first-class POS (Point Of Sale) or CRM (Customer Relationship Management) system. 

Security and User Permissions

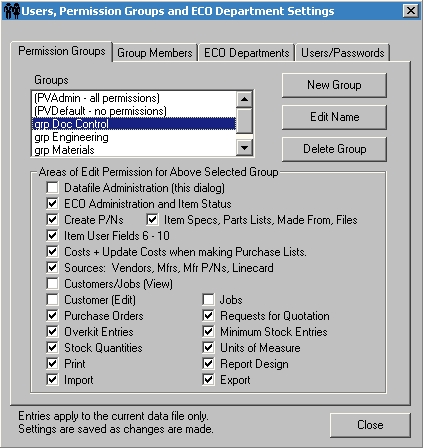
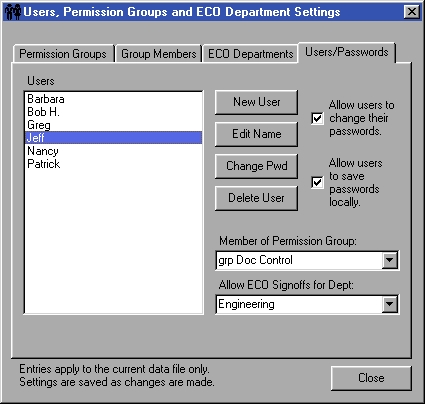
Out-of-the-box, Parts&Vendors allowed anyone to do anything, which made setup easy and promoted user adoption. If more control was needed to prevent users from inadvertently causing trouble, user logins could be used and assigned to groups with assigned role-based permissions.

First, create a group with appropriate permissions.

Then create a user and assign to the appropriate group.

Conclusion

I hope you have enjoyed this limited look at Parts&Vendors. In my experience, it combined the features and ease of use needed for small teams to be efficient, without imposing overhead they are unable to support. The paradox of enterprise software is that you may need it once you are successful, but you won’t have the resources to use it until you are successful.

If you are using Parts&Vendors and need advise or help migrating to a new system, please contact me using the Contact form. Parts&Vendors includes built-in export capability that can be used if you are methodical, and there are also ways to access database data directly without using Microsoft AccessTM (JET database schema and user interface IDE) or if using a Unix-type operating system.