Embedded Command Line Interface (CLI)

What’s a CLI?

A command-line interface (CLI) is a way to interact directly with a software program in the form of text commands and responses. Just as source code is a typed set of commands to produce a result, the CLI is also a typed set of commands to produce a result. The difference is that the commands are typed in real-time by a person (although may be captured for replay later). 

In embedded system development, a CLI is often developed to aid initial driver development and debugging. This CLI may become the interface (or one of the interfaces) used by a sophisticated end-user to interact with the product. Think of typing commands to control a machine, such as a spacecraft or NC mill, or perhaps for low-level access to the control system of an undersea ROV as a development tool, tweaking time-constants and monitoring low-level system performance during testing. 

One of my current projects, a scientific instrument, incorporates a home-grown CLI that has evolved with the project. It has limited functionality and supports simple commands only.  However, the potential exists that eventually a sophisticated end-user might appreciate more advanced functionality, including command history, variable substitution and simple scripting, akin to a unix shell such as csh or bash.  Should that become true, the current CLI will need to evolve, which will have a cost in time and effort. There is no customer demand now that would justify the effort, but it made me wonder if there was any open-source off-the-shelf CLI code that could be used.

CLI projects

Some concerted web searching identified the following projects:

Some general articles on creating a CLI interface are:

Future work

Once the project at hand has passed the basic data collection milestone, I think it will be time to think about the future of the CLI. The complexity of the home-grown solution will not have increased significantly, and there will be time to think through the amount of work to switch to any of the shortlist candidates.

 

Code Composer Studio v7

Code Composer Studio (CCS) is an excellent free IDE from Texas Instruments for TI processors.  CCS is based on Eclipse and TI recently released CCS v7 in December 2016 based on Eclipse 4.6 with CDT 9.0 and JRE 8. This is reported to be the first CCS release both free of charge and without limitations for all devices and debug probes, although I started using CCS just after v6 was released and it was free then, including the debug probe for the MSP432 and without code limitations when compiling using gcc (included). 

I had been put off Eclipse by its complexity several years ago when settling on an IDE for web app development (at the time I selected NetBeans, and still like its simple elegance), but the MSP432 was the processor of choice for a project and that meant using CCS/Eclipse. Although I was initially apprehensive, TI had made CCS extremely accessible by providing Simple, Edit and Debug perspectives. CCS is now my preferred development environment for embedded work, which works great since I’m also a fan of TI’s 32-bit ARM Cortex-M4 MSP432 and 16-bit MSP430 processor families.

CCS is not without its foibles though. For one, it takes a long time to start up. For quick or limited editing I prefer NotePad++, and if I double-click a file in Explorer, NotePad++ is launched not CCS. Also I continue to use TortoiseSVN and GitExtensions outside of CCS. I’ve read there are Plugins available, but that means more learning. NetBeans came with a git GUI built-in and I rarely needed a separate tool.

Here is a quick a refresher for starting a new project after having been away from CCS for a while (it should also apply to CCS v6). 

Tabs vs Spaces

The coding standard followed by the msp432logger project stipulates using tabs to indent code, with a tab width of four spaces. This can be difficult due to how CCS manages tab vs spaces.

CCS provides tab vs spacing preferences (Window -> Preferences -> General -> Editors -> Text Editors “Insert spaces for tabs” enabled or disabled). However, CCS appears to indent a new line according to the convention of the old line (whether tabs or spaces) when Enter is used to create a new line, or when CCS automatically indents based on parentheses (at least with C files). This is regardless of the Preferences setting, and in addition, there is a context menu selection “Uses Spaces for Tab” which must be disabled (right-click in an editor).

Because of the various settings affecting whether indenting will be done with tabs or spaces, it is easy to accidentally introduce and propagate space-based intending within a file. Time will tell if I’ve finally got my preferences set correctly, and it may be simpler to use space-based indenting with CCS if you have the choice. I’m currently watching for spaces in pre-commit diffs, and manually searching and replacing 4-spaces with a tabs using Notepad++ (I haven’t figured out how to specify non-printable characters in CCS search & replace yet). 

Code Folding

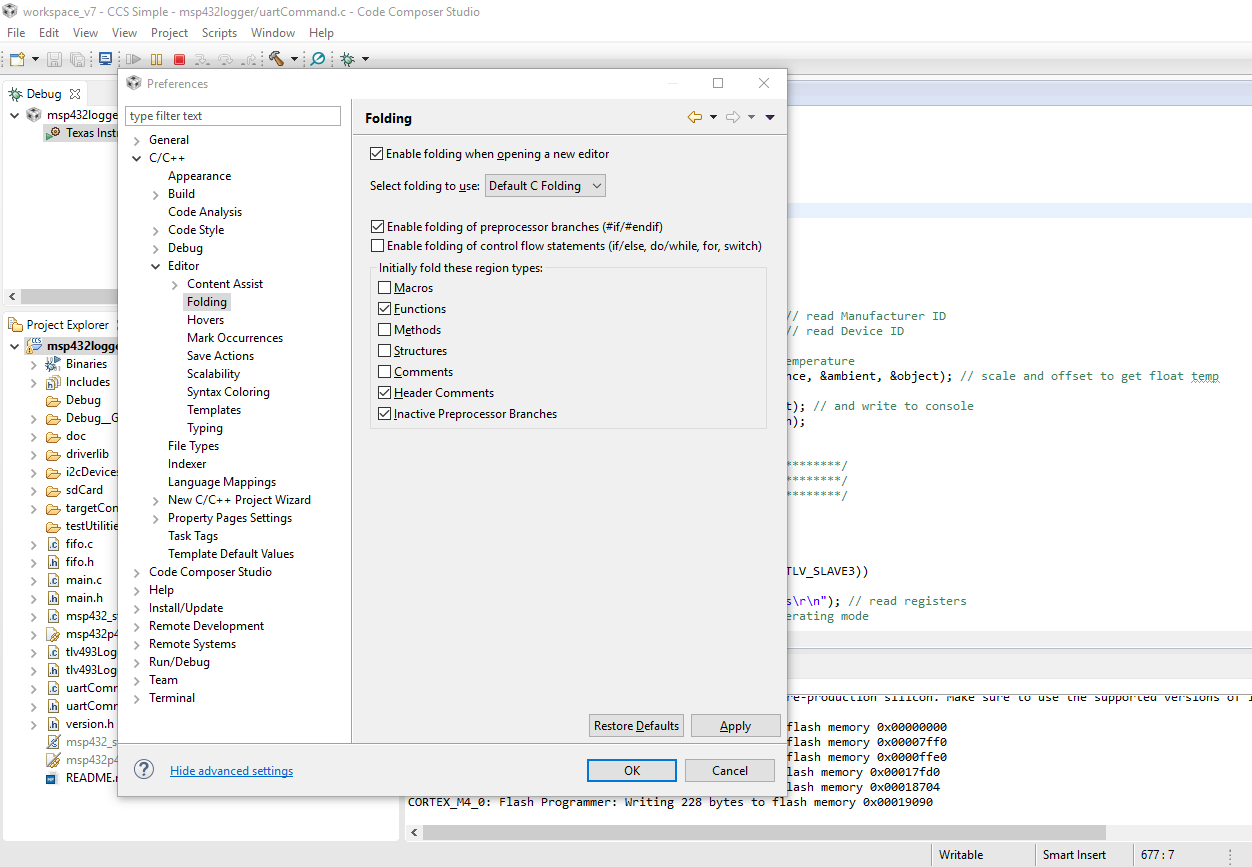
Code folding must first be enabled in the Preferences window (Window > Preferences > C/C++ / Editor / Folding) with Show advanced settings selected. Open edit windows must be closed and re-opened before folding will be available.

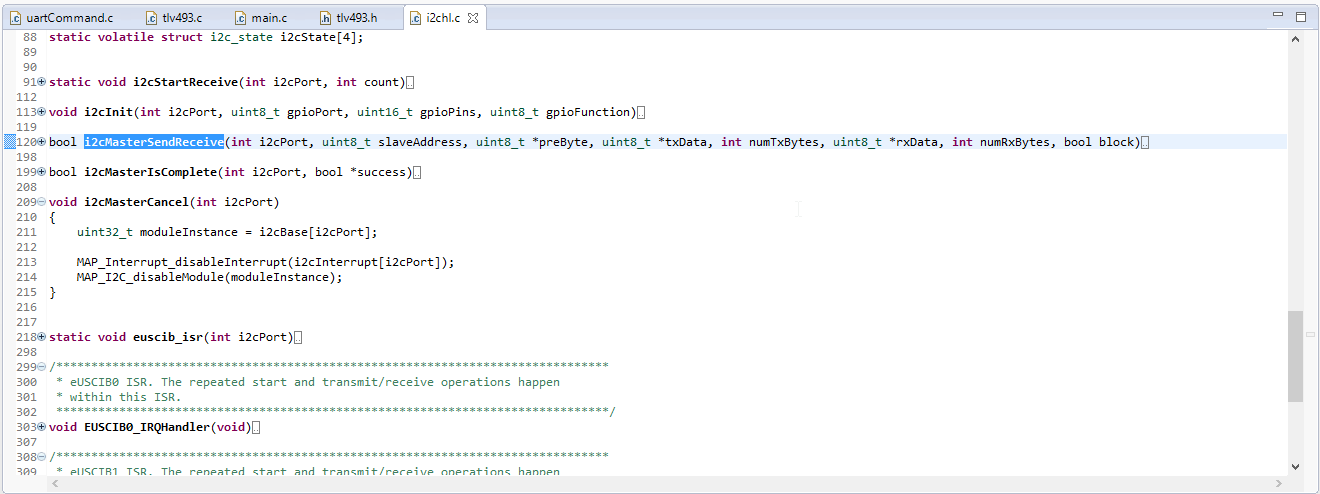
The configured preferences specify that functions and header comments are to be initially folded. In the screenshot below, the i2cMasterCancel() function has been  expanded.

To quickly expand or collapse all folding, right-click in the left margin of an editor and select Folding from the context menu. 

Split Edit Window (different files)

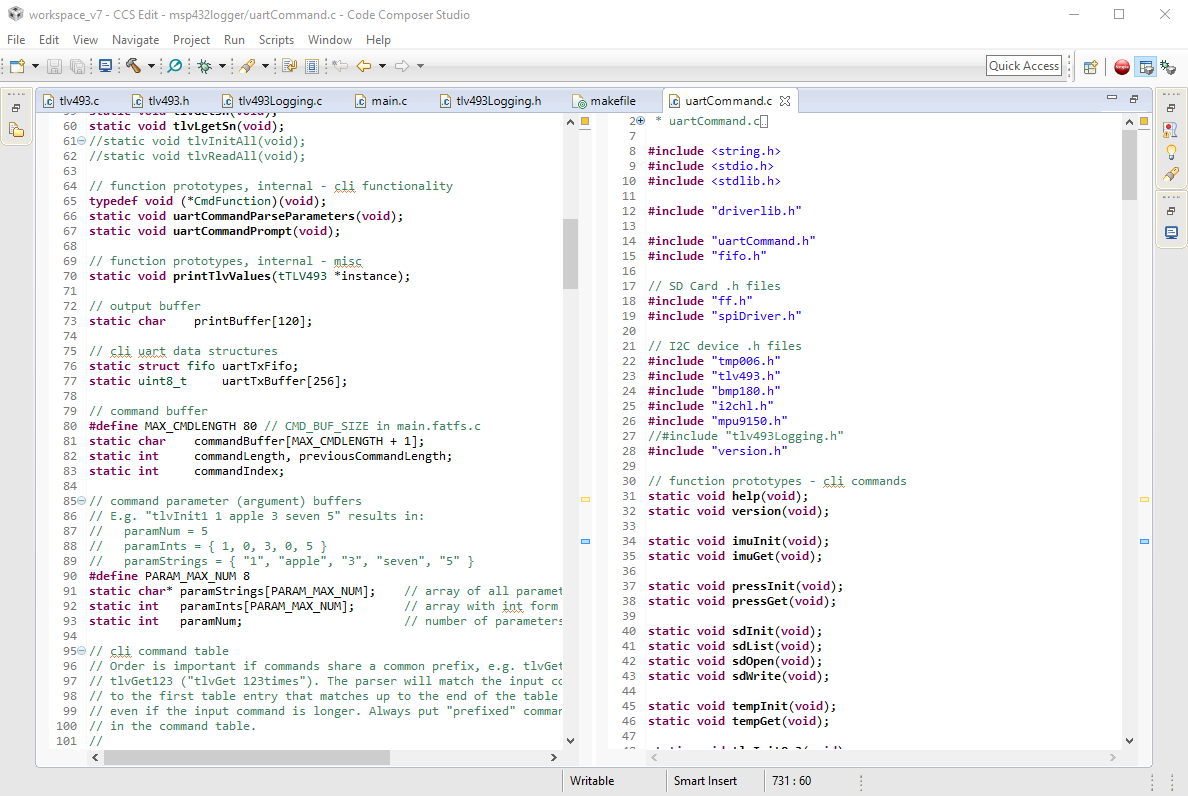
CCS typically displays files in tabs using the same editor window. To split the editor window and view content from two (or more ) files side-by-side (or top-and-bottom), simply drag the desired tab to the side (or top or bottom) of the editor window.

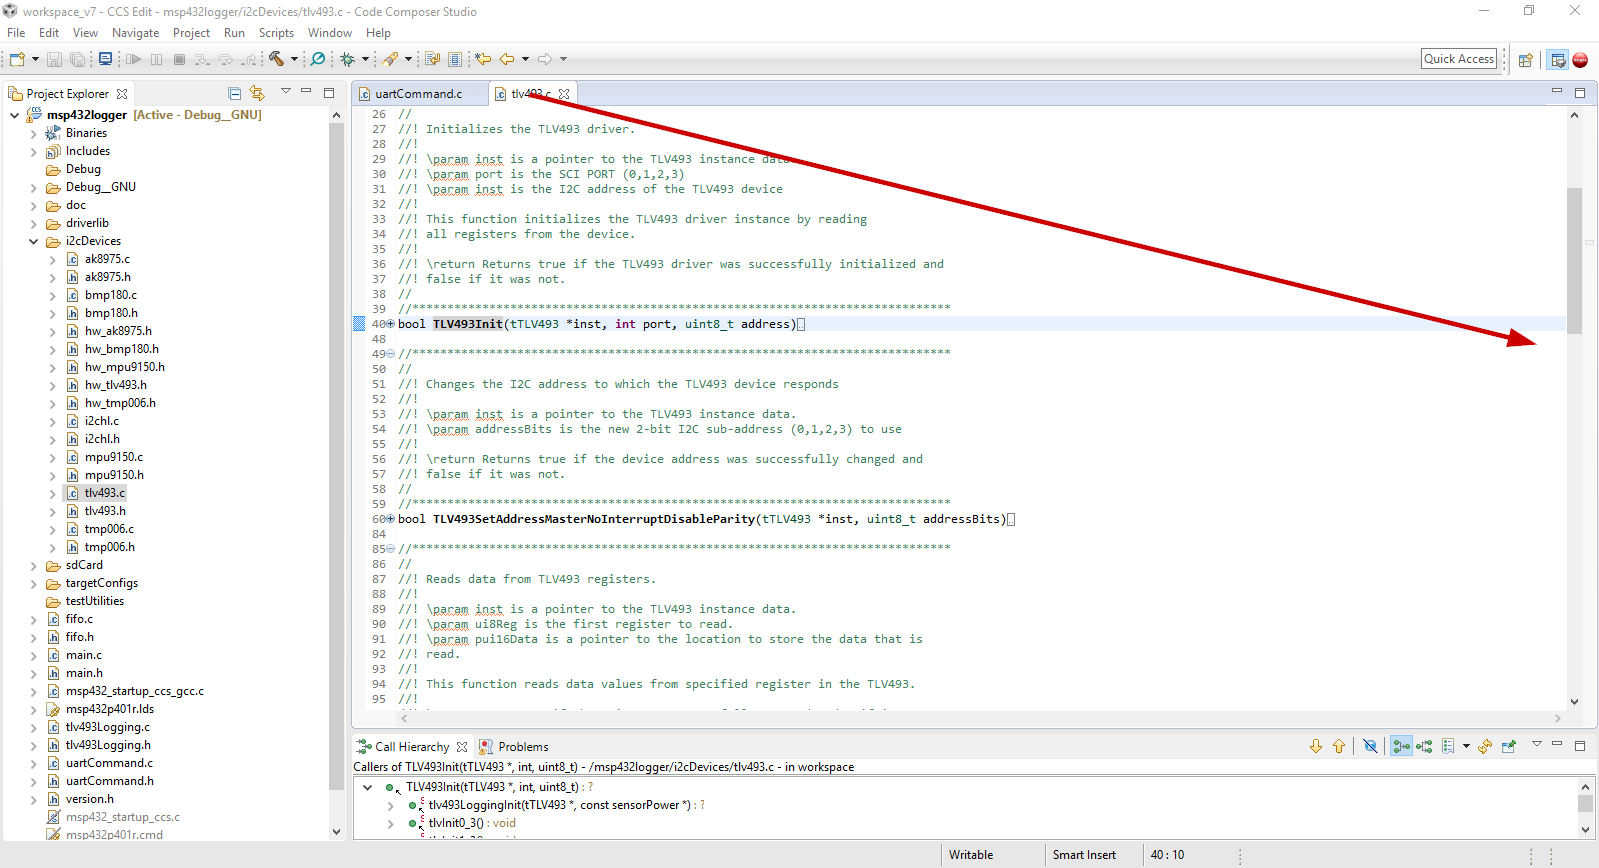
For example, drag an editor tab to the right margin,

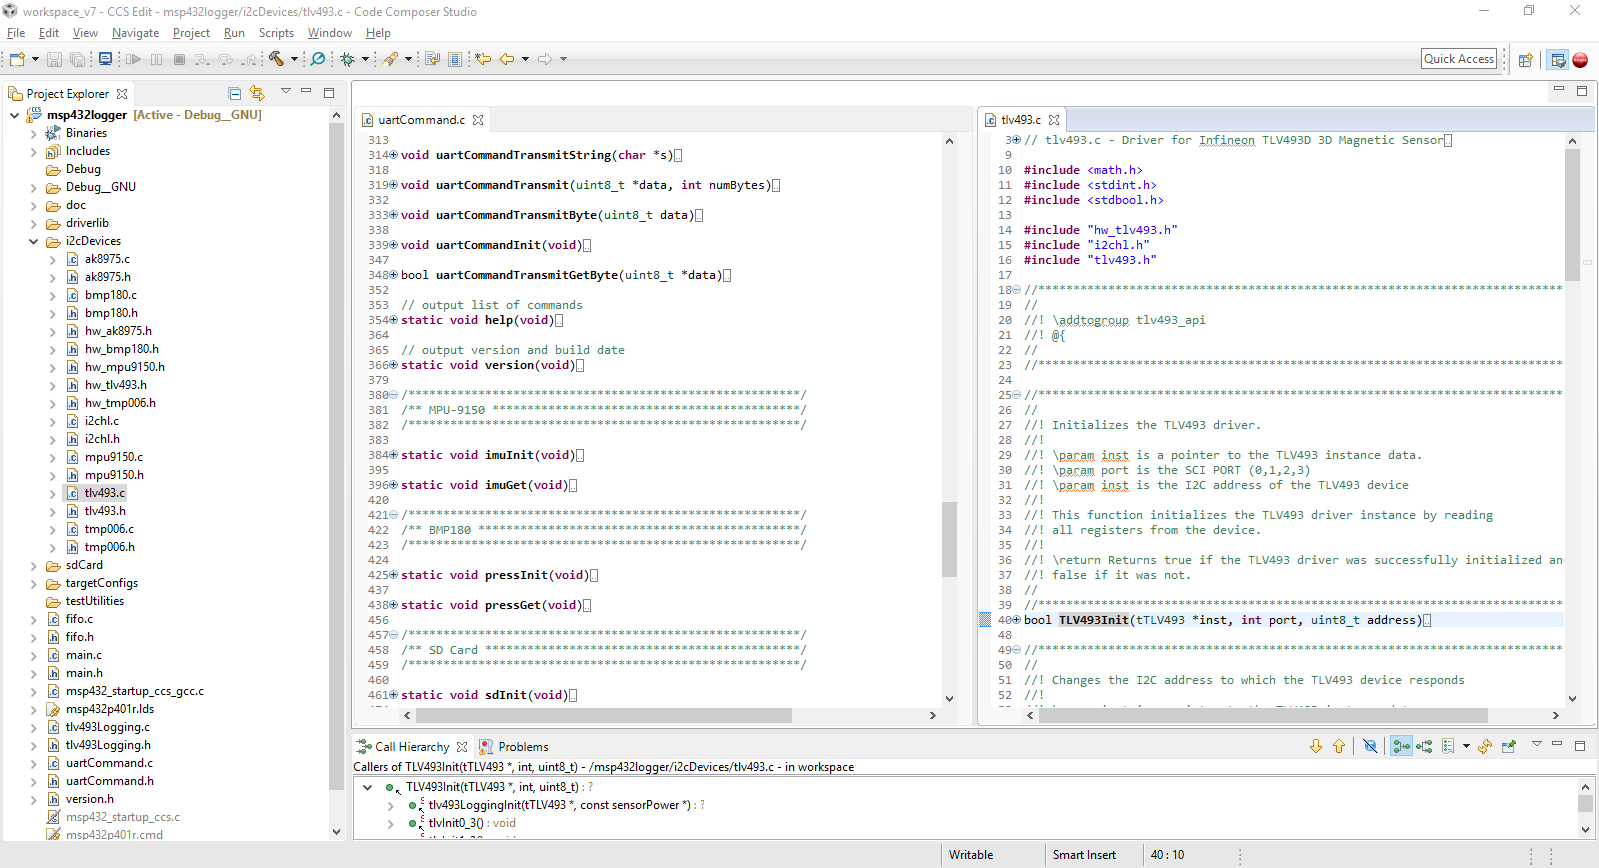
which results in the file appearing in a new editor window to the right.

Split Edit Window (same file)

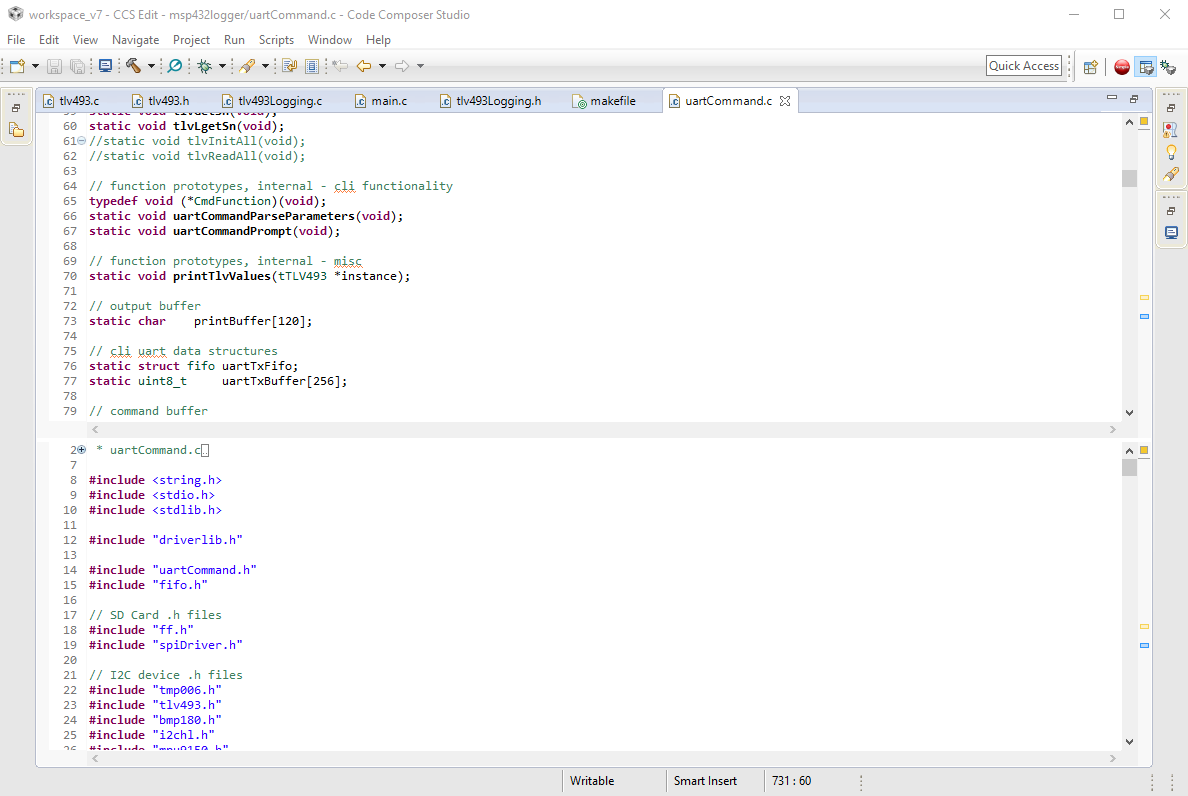
The method above (moving an editor tab to a new editor) doesn’t work to view different parts of the same file in separate windows. Instead, use

  • Ctrl Shift [
  • Ctrl Shift –

to split the edit window either vertically or horizontally (or to un-split).

So from a single tab,

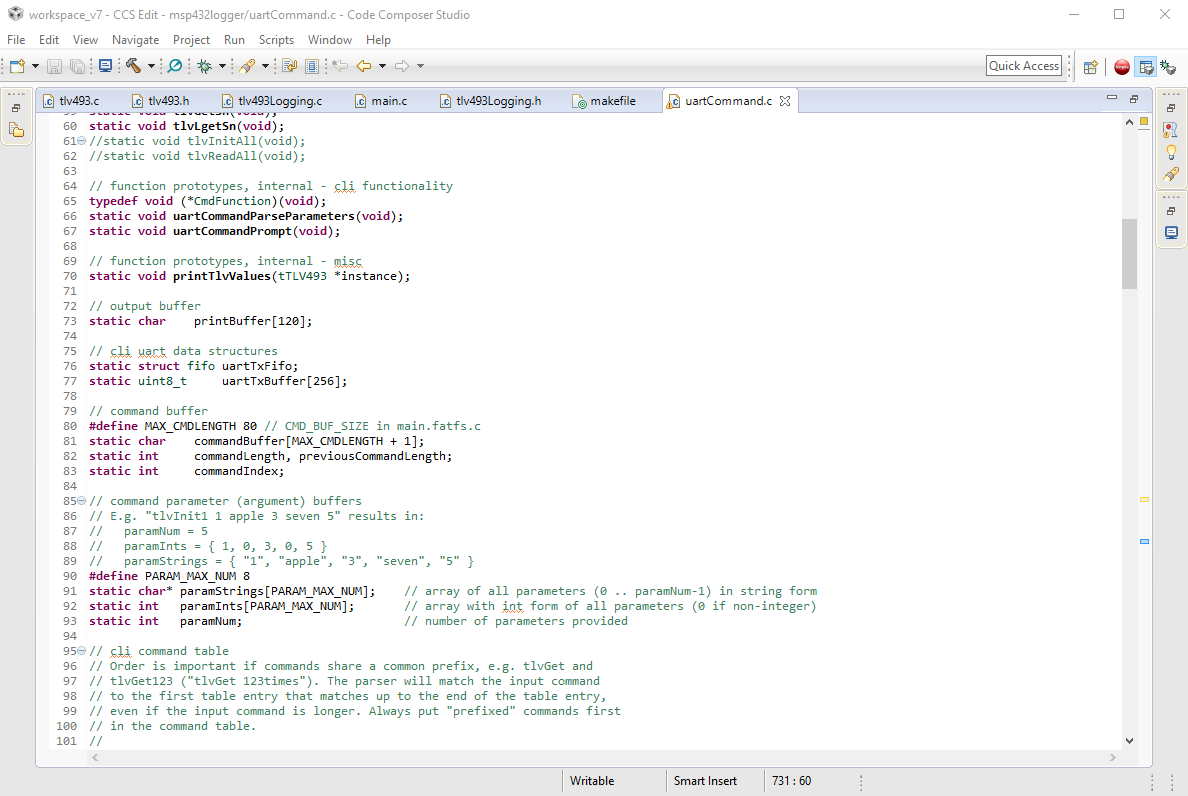
press ‘Ctrl Shift [‘ to see uartCommand.c in side-by-side panes, 

or ‘Ctrl Shift -‘ to see uartCommand.c in top-and-bottom panes.


View Call Hierarchy

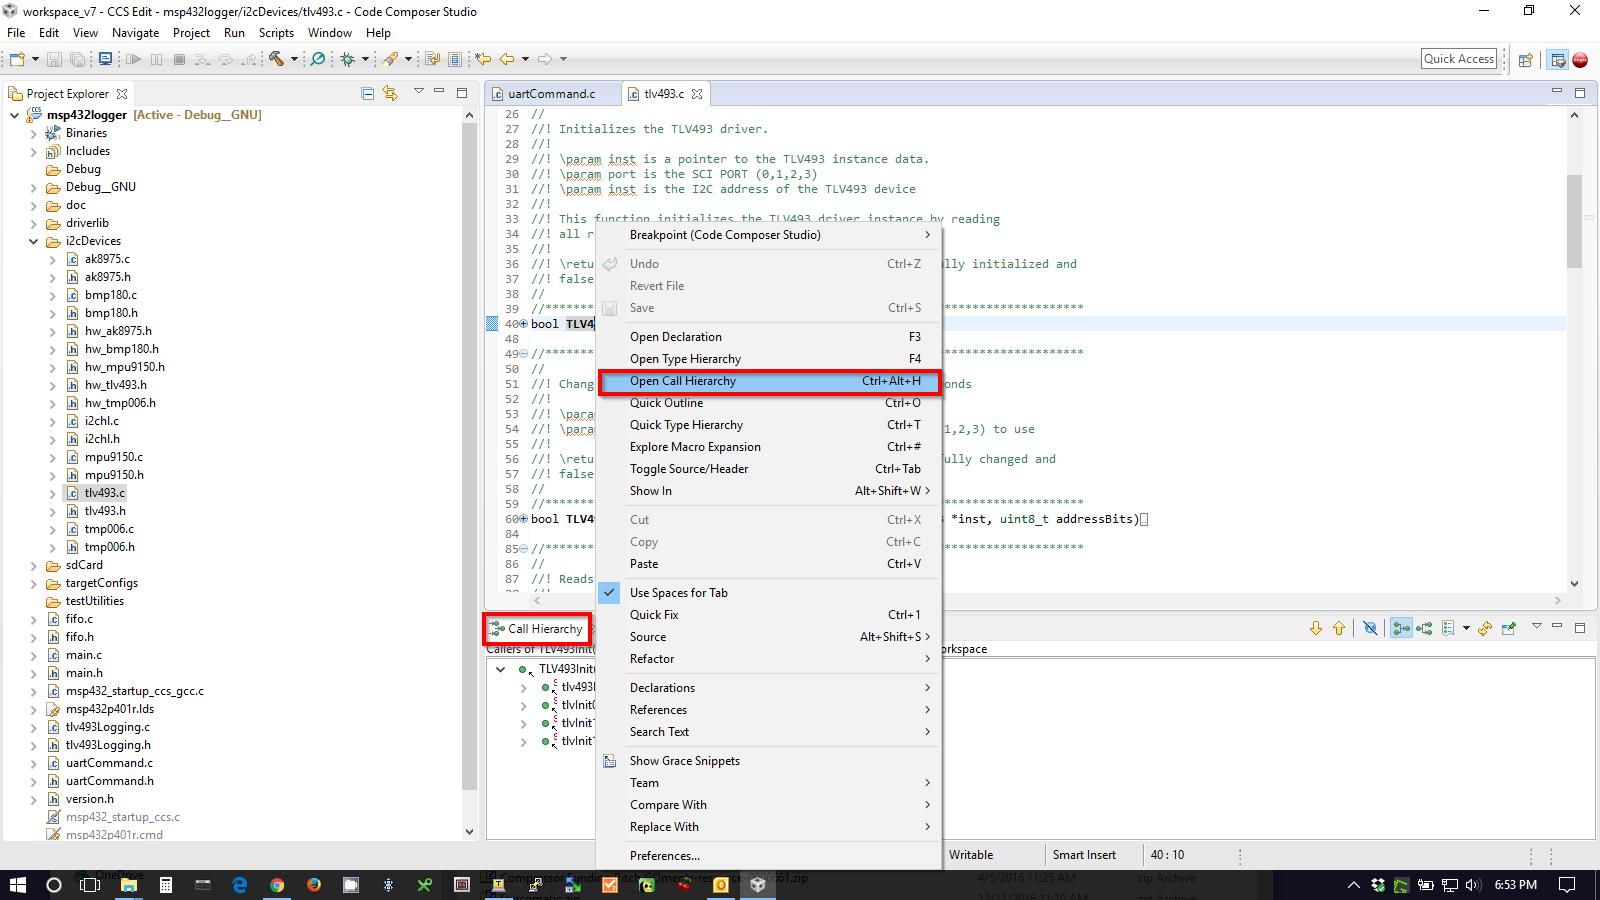
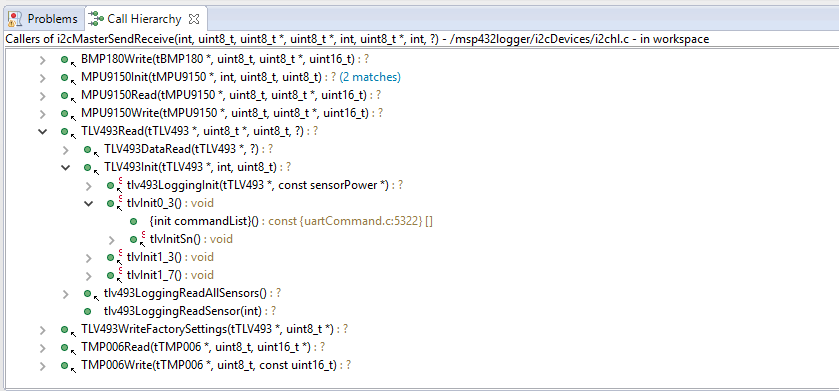
CCS show the call hierarchy for a function (i.e. a list of callers of the function). From the CCS Edit perspective, you can right-click on a function and select Open Call Hierarchy from the context menu. 

The screenshot below shows how the i2cMasterSendReceive() is called from the tlvInitSn cli command.

Missing Debugger Buttons in Simple Perspective

The Simple perspective in CCS should show debugger buttons in the toolbar (Run,  Step Into, Step Over, Pause, Stop, etc.) when a debugging session is active, but I have lost the buttons several times now. While switching to the Debug perspective is an option (which should be present in a debugging session) to use the buttons there, I have been able to restore the buttons in the Simple perspective by right-clicking on the menu bar and selecting Restore Hidden Toolbar Entries, then switching perspectives to something else and then back to Simple.


Branching in Subversion using TortoiseSVN

It is generally considered good practise with Subversion to keep trunk for stable useable code, and create a development branch from trunk for new development. The new development may be used, for example, to code a new feature, to perform release stabilization, or to experiment with refactoring, and will be merged back into the main branch when the work is complete.

Working on the msp432logger project, I wanted to refactor the code to create a distinct logging application, separate from the driver level, and created a new branch for the work called TRY-loggerapp

Create a development branch

I’m following Subversion best practices for my project directory structure, using trunk, tags and branches sub-directories.

Foresight

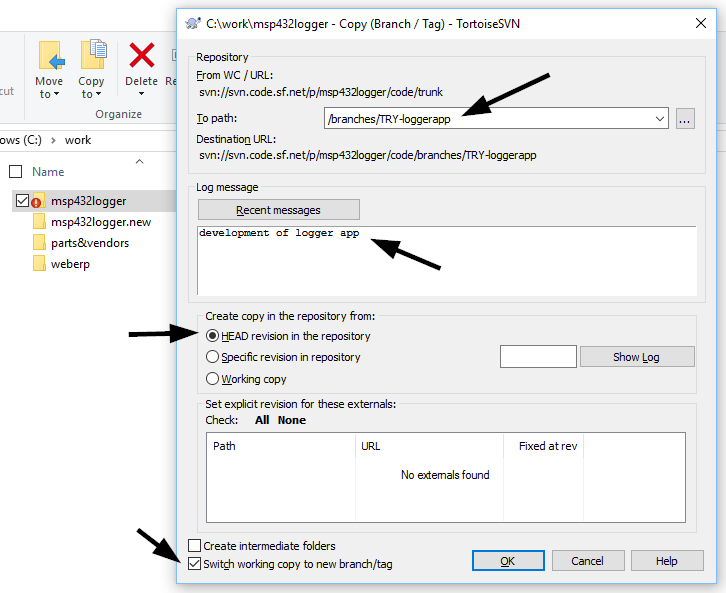
Right-click on the local repository workspace folder in Windows Explorer and pick TortoiseSVN -> Branch/tag… from the Context menu. Select the path for the branch, a log message, and the base for the branch. You can select HEAD or a specific version to base the branch on. If there are no edited files in the working copy, the Copy dialog will default to using the most recent version as the base for the branch.

tortoisesvn-07-create-branch-from-head-ok-comments

Hindsight

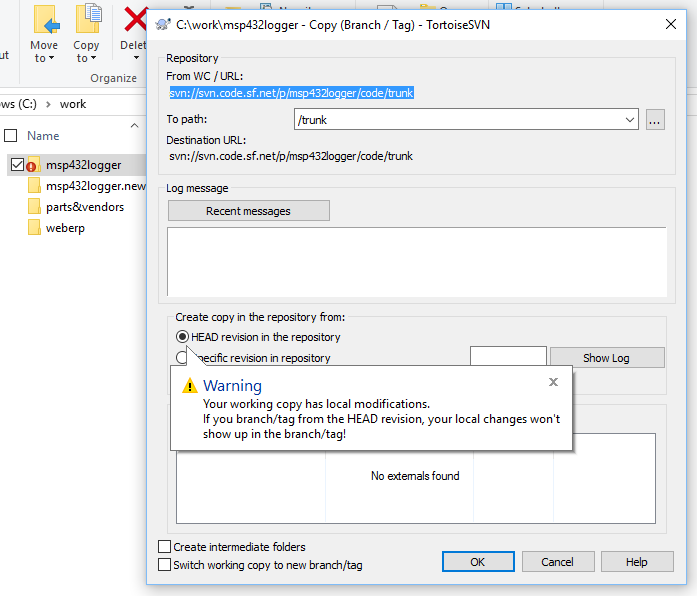
If you are creating the branch in hindsight and have already made file edits, TortoiseSVN will warn you that basing the branch on HEAD will result in loss of those edits.

tortoisesvn-01-create-branch

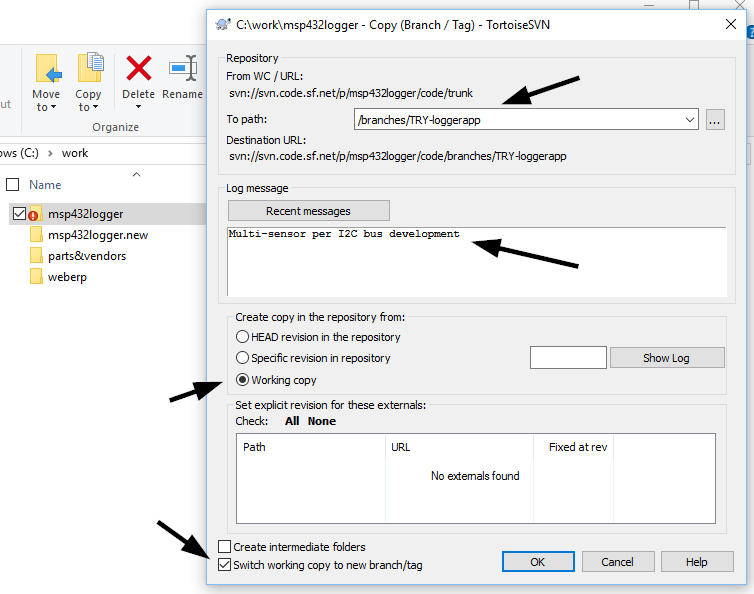
In this case, you will likely want your edits (and any new files) to become the first commit in the new branch. In this case, close the warning and select Create copy in the repository from: Working copy.

tortoisesvn-05-create-branch-ok-comments

Work in the dev branch

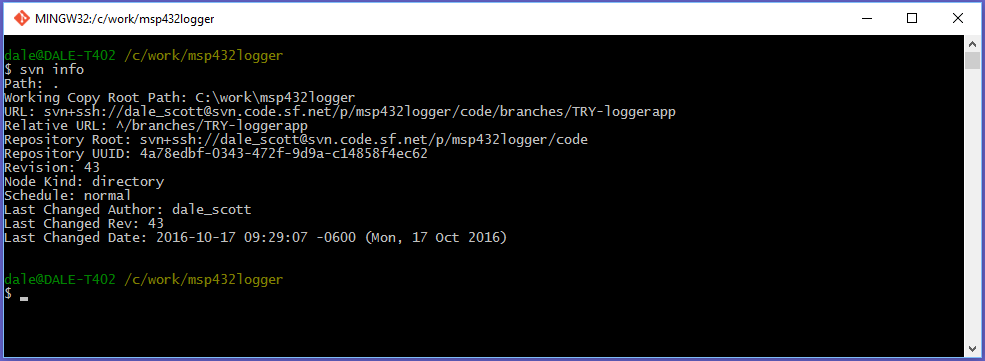
I selected Switch working copy to new branch/tag in the Copy dialogue when I created the branch. The current branch in the working copy can be verified using the svn info cli command.

tortoisesvn-09-svn-info

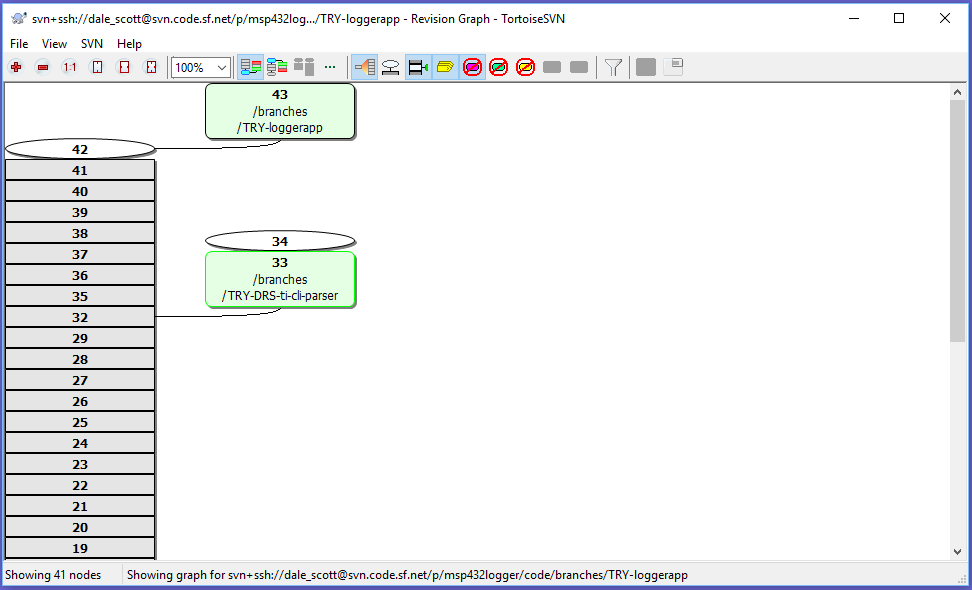
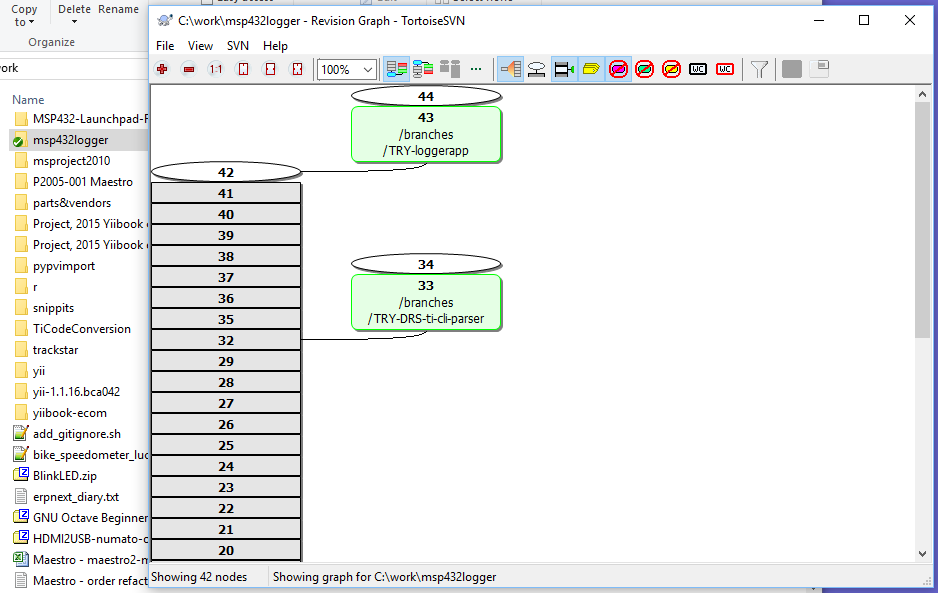
You can also see the new branch in TortoiseSVN’s Revision Graph.

tortoisesvn-10-svn-revision-graph

If I hadn’t checked Create copy in the repository from: Working copy when I created the branch, I would have had to Switch to the branch in a separate step.

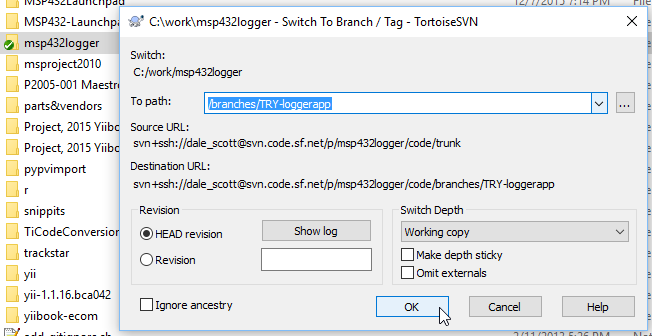
Right-click on the local repository workspace folder in Windows Explorer and pick TortoiseSVN -> Switch… from the Context menu, and select the path for the branch to switch to.

tortoisesvn-10-switch-to-branch

You can confirm your working copy has switched to the desired branch using the Subversion cli command “svn info” as previously described before continuing development in the new branch.

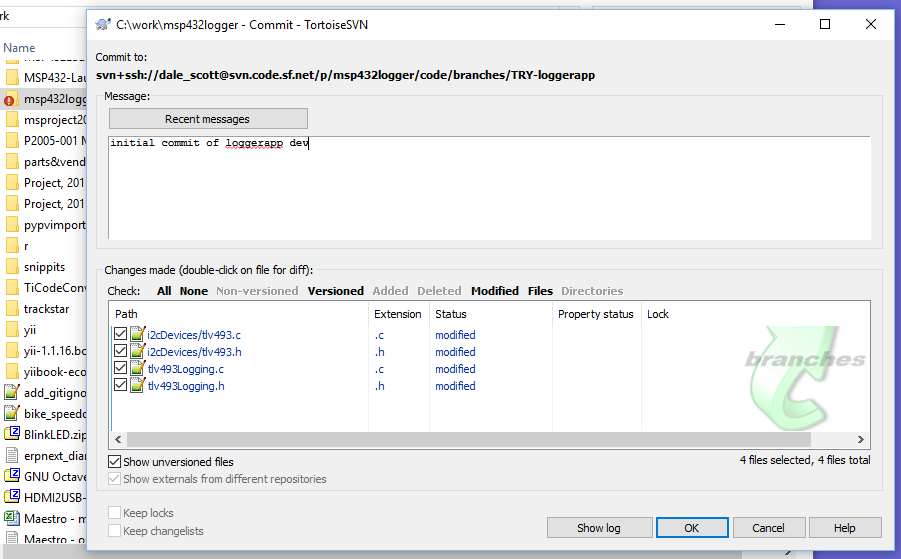
Checking in code is as before, but first check the Commit to: line at the top of the Commit dialogue to confirm the code will be checked into the correct branch.

tortoisesvn-11-first-commit

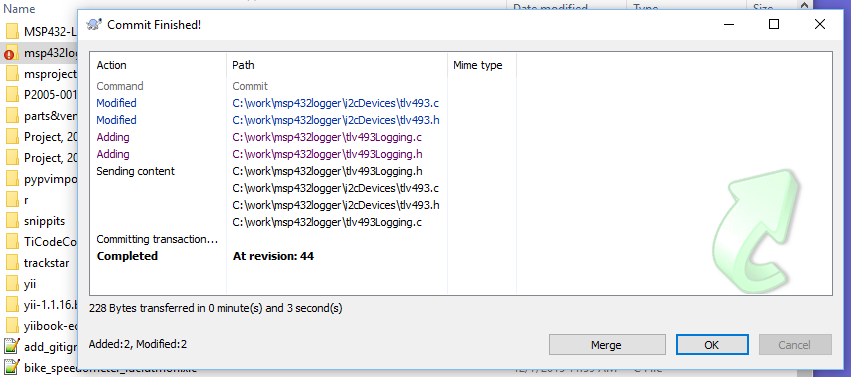
After clicking OK, you should see that the check-in completed successfully.

tortoisesvn-12-first-commit-finished

and the Revision Graph now includes the check-in.

tortoisesvn-12-new-revision-graph

Merge dev branch back into trunk

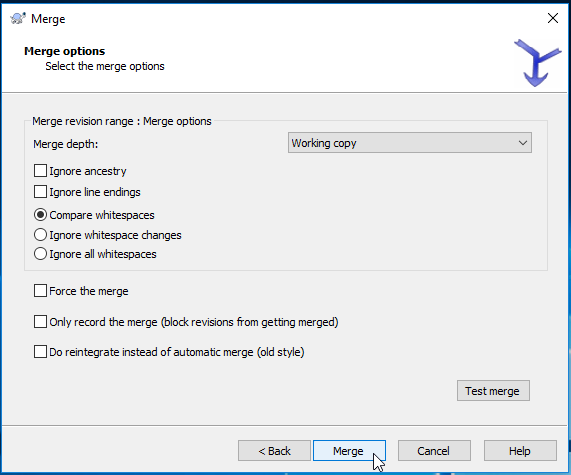
Eventually you want to merge the development branch back into trunk. The preferred method is to start with a clean working copy, check out the branch to merge into (i.e. check out trunk), then use the TortoiseSVN Merge Wizard to merge the desired branch into trunk.

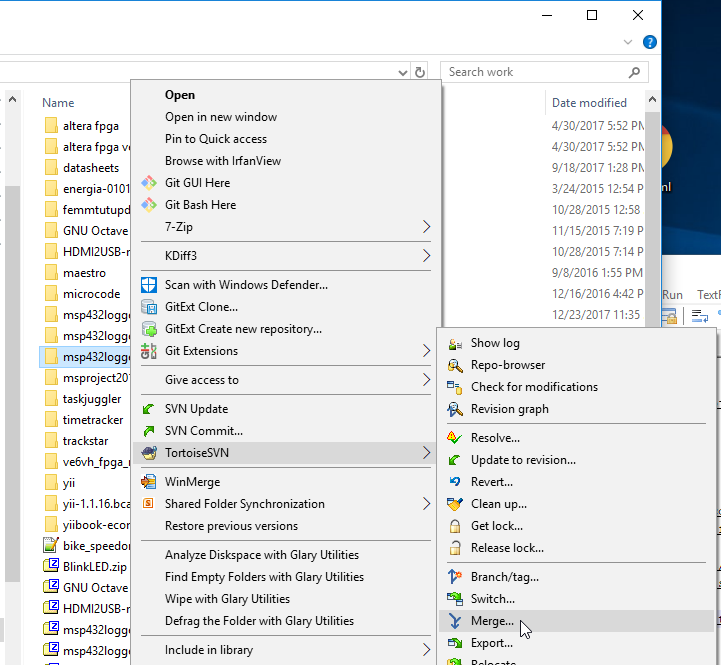
 Start the Merge Wizard.


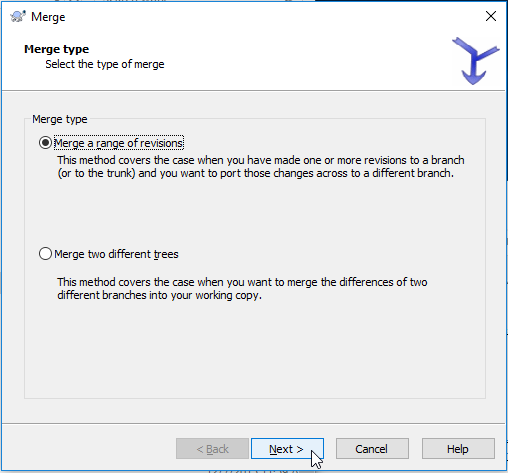
Select Merge Range of Revisions.

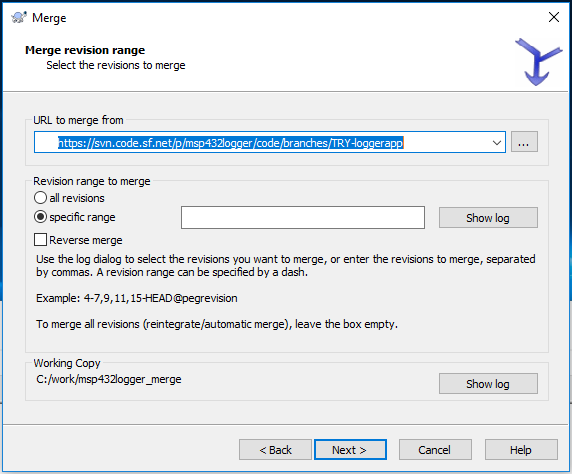
Select the branch to merge into the current branch.

Options will not be necessary for basic operation.

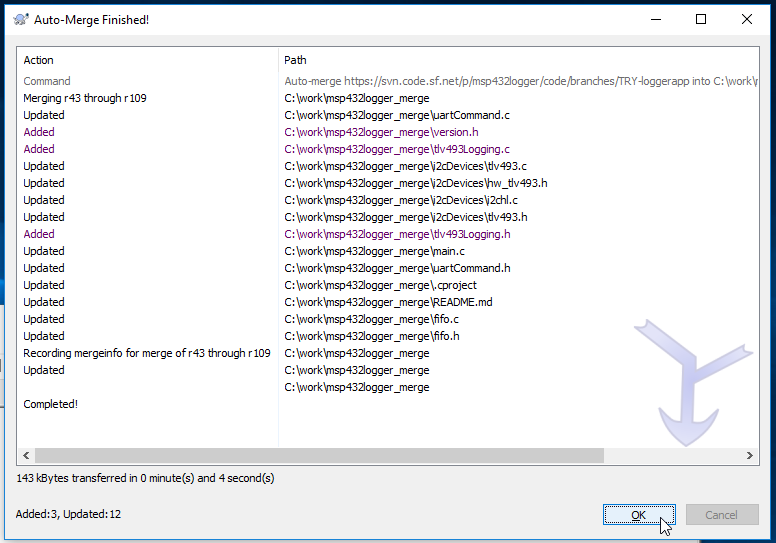
The results of the auto-merge will be shown.

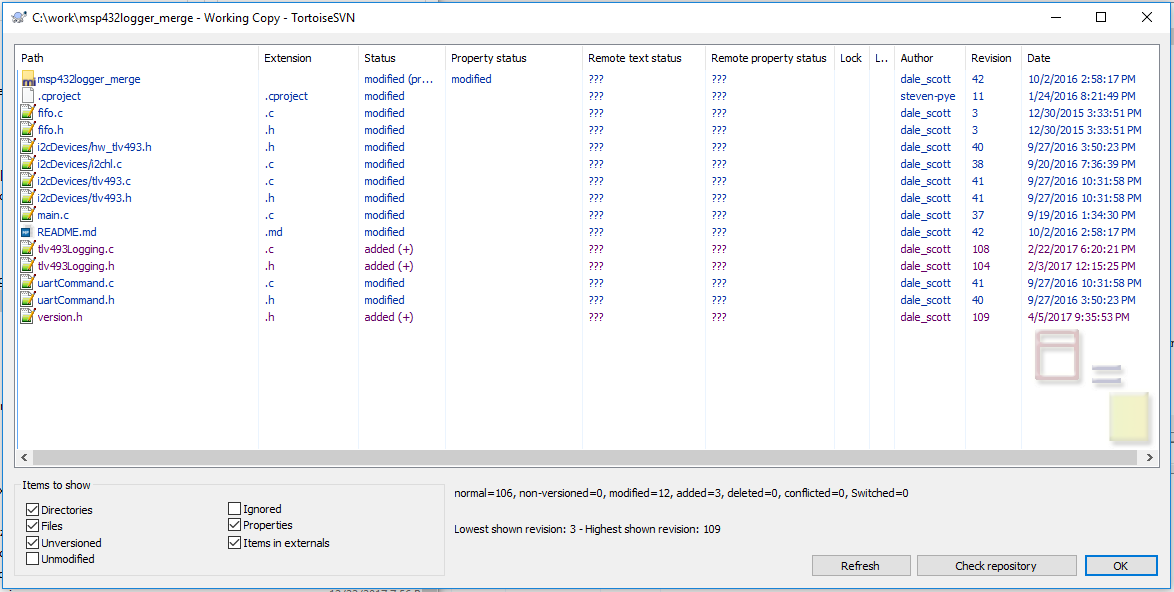
The working copy is now modified with the results of the merge.

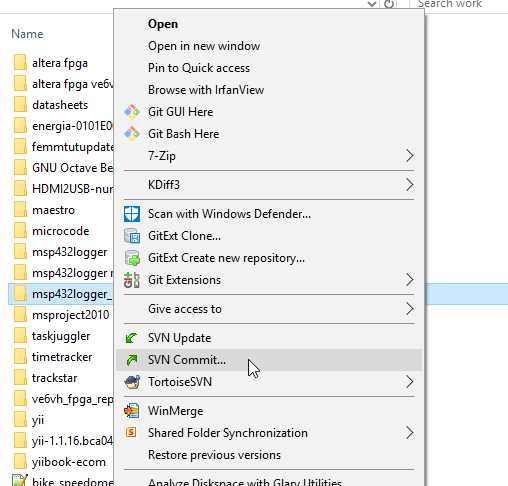
Test the modified working copy as needed, then commit the modified trunk branch back to the project.

Easy  Peasy!

Cheers,
Dale

Sub-1 GHz Wireless IoT Sensor Network

I have been investigating “Sub-1 GHz Wireless” (also known as “the 900 MHz ISM band”) for a new product proof-of-concept. The use-case is a network of 5 to 50 sensor nodes that send data to a hub node, where it is stored temporarily on an SD card and then transmitted over WiFi to an internet server for archiving, analysis, and reporting. The wireless technology needs to have a range of 2 to 3 km (sensor-to-hub or sensor-to-sensor), and very low power for a sensor node to have 1+ year operation using a CR2016 or AA primary cell. The hub node does not have the same power limitation, and can be always-on.

I will present the sensor and hub node hardware and software in this post, and in a subsequent post the cloud service that stores, processes and reports on the sensor data.

Sensor-Node Hardware

I’ll admit I’m somewhat of a TI fanboy at the moment, working with TI’s new 32-bit ARM Cortex M4-F development system now for several months. Although I don’t have many other recent comparison points, the experience was trouble-free and has given me no reason to switch from low-cost development boards with integrated debugging, an excellent software development environment, and business-friendly BSD-licensed support software. Consequently I looked first at devices with LaunchPad / BoosterPack support.

I decided to use a Sub-1 GHz transceiver for the best compromise between range and power consumption. Although the choice may have been somewhat arbitrary and naive, not considering such factors such as modulation technique, allowed transmit power, and antenna design, it allowed development to continue and is still the right choice. Sometimes an exhaustive analysis also means never releasing product, which doesn’t help anyone.

Perhaps fortuitously, the only Sub-1 GHz transceiver BoosterPack is the 430Boost-CC110L, which uses the Anaren A110LR09x, a certified FCC/IC/ETSI-compliant module containing a TI CC110L together with a PCB antenna. The CC110L BoosterPack has been available since December 2011, and is currently available in-stock from Digi-Key for $25 (a quick supply chain test). I have also received assurances from Anaren that their customers demand long lifetimes and the A110LR09x will be available for many years to come. As additional risk mitigation, the CC110L is a cost and feature-reduced version of the TI CC1101, which is also available from Anaren in a certified module, should a higher performance device become necessary, or should any supply issues arise (although unfortunately the CC1101 is only FCC/IC certified at this time).

Sensor-Node Software

The 430Boost-CC110L is provided with BoosterStack LITE, an application for the MSP430G2553 MPU. BoosterStack LITE was reportedly derived from the TI SimpliciTI stack to create a light-weight, single-channel protocol to demonstrate creating a simple star network, presumably removing features to be compatible with the MSP430G2553. For new applications, Anaren recommends using the Anaren BaseLink driver library (instead of modifying BoosterStack). However, I don’t understand yet how BaseLink relates to SimpliciTI, and whether a SimpliciTI-based networking would sit on top of BaseLink, the other way round, or if BaseLink is effectively included in SimpliciTI. For a more fully-featured protocol, Anaren recommends simply using SimpliciTI.

I need to build at least a minimal stack for software technology option before deciding which to proceed with.

Anaren BoosterStack LITE

  • Provided by Anaren with the 430Boost-CC110L as a demo app using the TI MSP430G2553 MPU.
  • Allows creation of a 3-node network (two sensors and one hub node) compiling with mspgcc, or a 5-node network (four sensors and one hub node) if compiling with IAR. I’m anticipating using a TI MSP432 32-bit ARM processor for production, which should alleviate any practical node limitation.
  • Anaren also provide a PC-based GUI – Air Traffic Control (ATC), but unfortunately ATC is missing features like data logging, and source code is not available.
  • BoosterStack LITE was reportedly derived from the TI SimpliciTI stack to create a light-weight, single-channel protocol to demonstrate creating a simple star network, and presumably was cut-back in order to use a low-cost MSP432 MPU. The source appears to depend on binary library (mspgcc and IAR versions are provided), but it is not clear if the library source is available.
  • Anaren recommends new applications use the Anaren BaseLink driver library.
  • For browsing convenience, I have created a GitHub repo with the BoosterStackLite source (https://github.com/dalers/airboosterstack).

TI SimpliciTI

SimpliciTIā„¢ is a low-power RF protocol aimed at simple, small RF networks. It is open-source software, intended as the basis for building a network with battery-operated devices using a TI low-power RF System-on-Chip (SoC) or an MSP430 ultra-low-power MCU and TI RF transceiver.

LarsRF

LarsRF is a simple RF library for a TI MSP430G2553 LaunchPad and CC110L RF Boosterpack, using the low-level TI SLA3325 library for interfacing to the CC1101. It is BSD licensed in intent, although restricted to TI MPUs and wireless transceiver devices.

Phase 1 MSP430 Node

In Phase 1, the 430Boost-CC110L out-of-box demo application is evaluated using the provided pre-programmed MSP430G2553 MPUs (and two MSP-EXP430G2 LaunchPads) in a two-node network (one sensor node and one hub node).

Although the pre-programmed MSP430G2553 MPUs provided with the 430Boost-CC110L Sub-1 GHz transceiver BoosterPacks support a five-node network, the network is effectively constrained to three nodes when the executable is compiled from source using mspgcc (which must be done to use any sensor other than the MSP430 on-chip temperature sensor). Since the use-case requires a network of five to fifty nodes, as well as SD local data storage and internet connectivity, in Phase 2 the MSP430 MPU will be upgraded to an MSP432. 

CC110L_proto1_IMG_0449
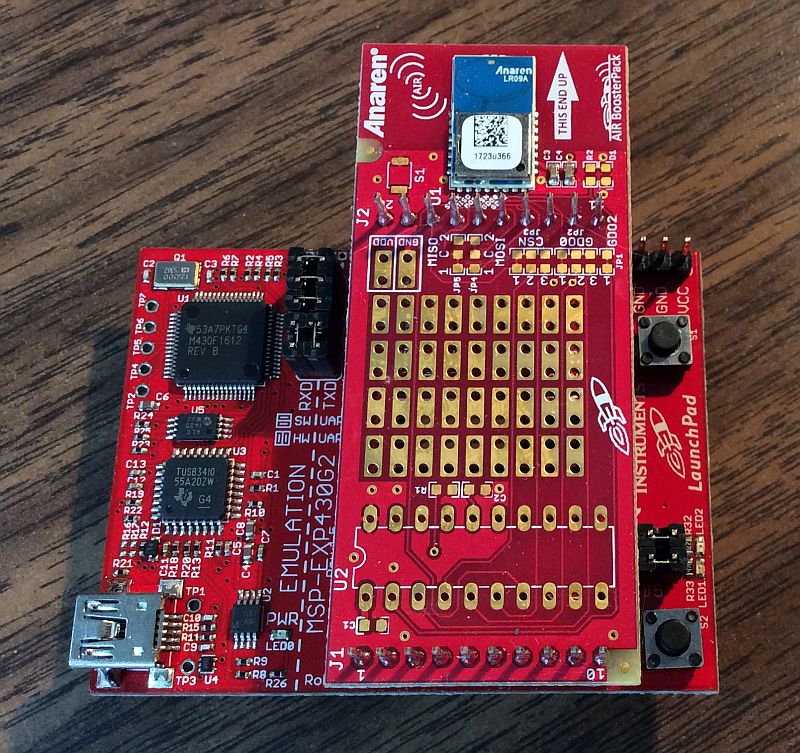
Figure 1 – MSP-EXP430G2553 LaunchPad with 430Boost-CC110L.
CC110L_proto1_IMG_0450
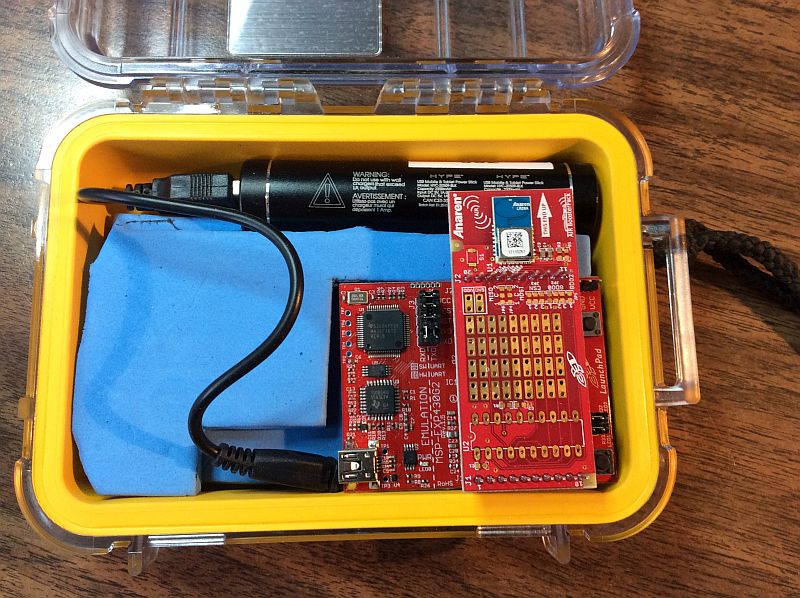
Figure 2 – Using a Pelican Case for Environmental Protection.
CC110L_proto1_IMG_0451
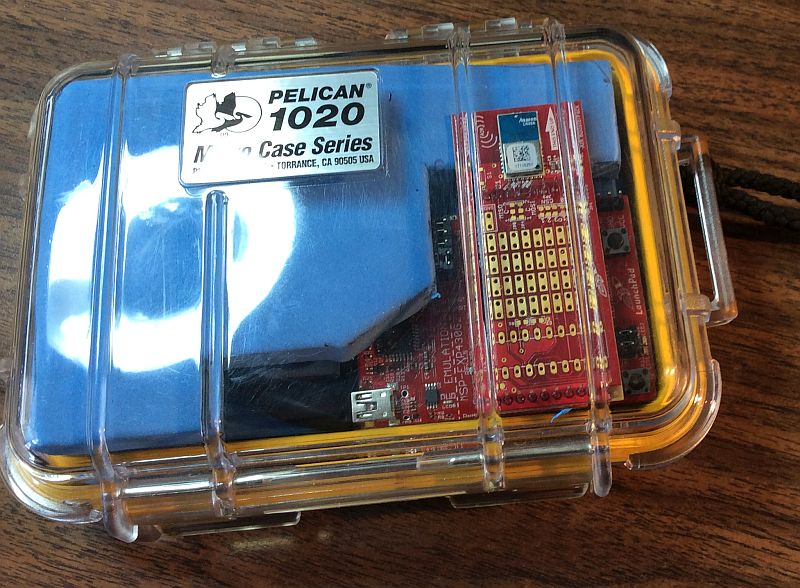
Figure 3 – Ready for the Rain!
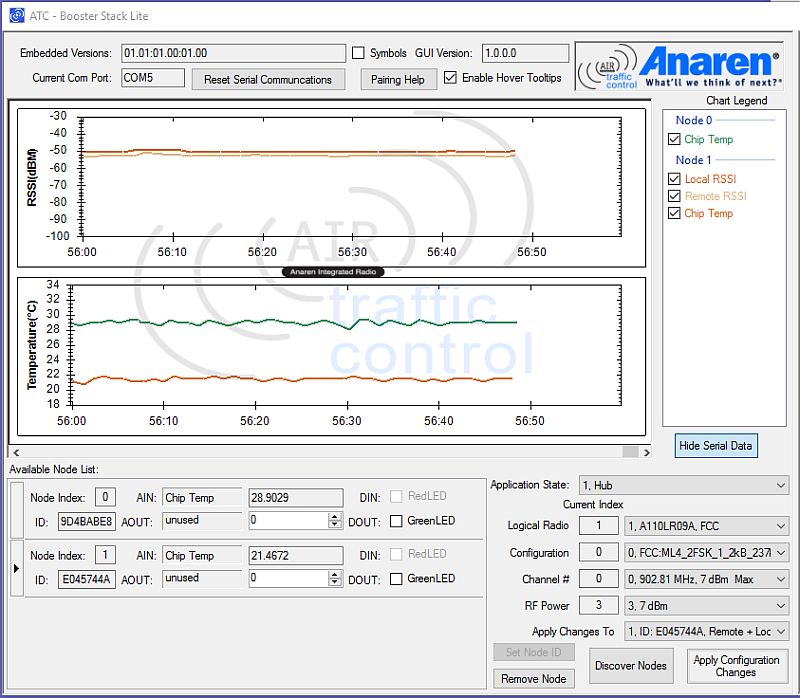
Figure 4 - PC Air Traffic Controller GUI showing initial testing with a 2-node network (one hub node and one sensor node).
Figure 4 – PC GUI (Anaren Air Traffic Controller) showing a 2-node network.

Phase 2 MSP432 Node

In Phase 2, the MSP430 MPU will be upgraded to a 32-bit MSP432P401R (with 64 Kbytes RAM and 256 Kbytes non-volatile memory) to support more than three nodes, as well as local SD data storage and WiFi internet connectivity.

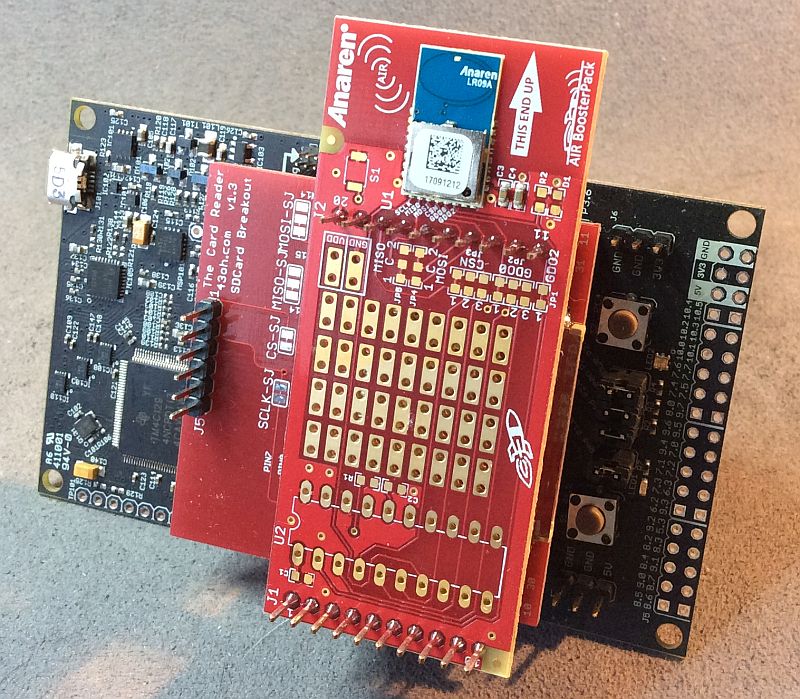
Figure 5 MSP432 LaunchPad with SD card BoosterPack and 430Boost-CC110L
Figure 5 MSP432 LaunchPad with SD card BoosterPack and 430Boost-CC110L.