I made my 2023 contribution to support FreeBSD – an island of calm in the stormy sea of Unix-like operating systems!


Technology Project Management and Services
I made my 2023 contribution to support FreeBSD – an island of calm in the stormy sea of Unix-like operating systems!
First, NEVER use a file synchronization service such as Nextcloud or Dropbox to synchronize git repos among multiple users. These and similar services should NEVER be used to synchronize git repo’s because they don’t synchronize everyone simultaneously.
For example, if I push to a local repo in my ~/Nextcloud directory, another developer could be pushing to their local repo at about the same time, and there will be a race between our Nextcloud clients to see whose updates make it to the Nextcloud server first. The best outcome is that Nextcloud will notify the loser of a sync collision (a file was modified locally at the same time it was modified on the server), and that the collision will need to be corrected manually. The worst outcome is that the loser will lose their commit entirely (their local repo will be overwritten by the copy on the server from the winning user), or the server repo will be corrupted with some files from the first user and some from the second user. Uggg! This is NOT what you want to have happen.
Only a git push command should be used to update an upstream server. The upstream repo will be locked and the push will be done in an atomic action. This is the only way to preserve repo integrity!
Here is my setup, note that it requires having ssh login capability to the server. I use FreeBSD for my server OS, but this procedure applies equally to Linux.
Step 1. Create a system login user (e.g. “git”), the git repos will be stored in the “git” user home directory. You can put more than one git repo in the user directory, but all the repos will have common access (i.e. control is to the user directory, not to the repos in the directory).
Step 2. Create a public/private ssh key to access the git repo with (more correctly, to access the user account that has the git repos), and add the public key to the /home/username/.ssh/authorized_keys file.
You can use a single ssh key and give the private key to each real user who needs access, or better, each real user has their own ssh key and you add all their public keys to the authorized_keys file (this way you can easily remove access from a single user by removing their public key from the authorized_keys file).
Step 3. Create a bare repo in the user directory. E.g. sudo -u username git init –bare repo_name.git
Now you have two choices, depending on whether you have started writing code yet.
Step 4a. If you have not started development yet, commit a README.md file from the server so the repo has at least one commit. Then from your dev workstation, clone the repo using the ssh protocol.
dale@firefly:~$ git clone ssh://git@dalescott.net/home/git/hydra.git hydraAfter that you write code, commit locally, and push your commits to the upstream origin repo as you would with any other cloned project.
Step 4b. If you have started writing code already (i.e. if you already have a repo with commits), add an origin or upstream ssh protocol remote to your local repo and push it to the empty repo on the server.
This approach maintains complete control over the repo and is easy to setup. It has worked well for me with small projects and a few developers. Compared to GitHub, the primary technical difference is the loss of pull requests (which is a GitHub workflow, not a feature of Git), but in a small team everyone is likely committing directly anyway.
Happy coding.
Dale
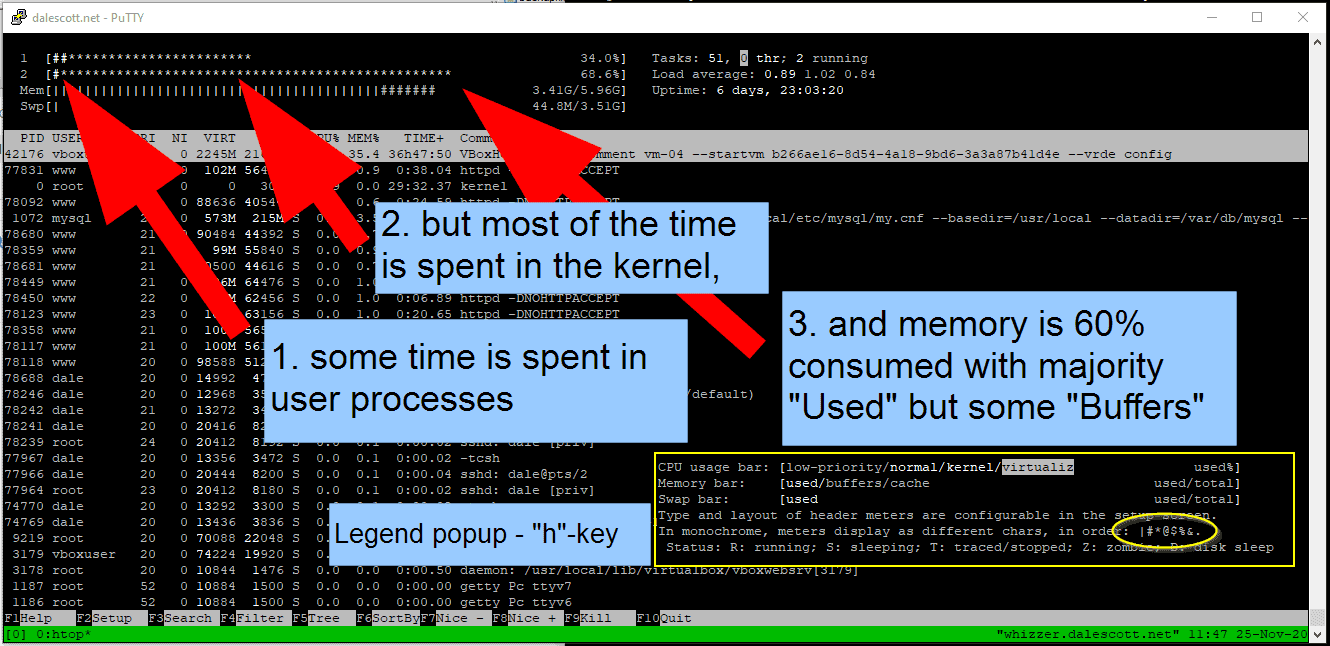
htop is a great tool for viewing the basics of what a server is doing, in particular the real-time CPU and memory graphics. However, the colors in the bar graphs can make it difficult to distinguish between CPU tasks being executed (low-priority, normal, kernel and virtualiz), and the type of memory in use (used, buffers and cache).
In this case, the “no-color” option can be used which causes the bar graphs to use characters instead of colors for sub-categories.
% htop -C
I recently replaced the server for dalescott.net after a drive failure using a faster system, but my initial perception was that it was slower!
The “new” server is a Intel Core2 CPU 6600 2.40GHz with 6GB of RAM. In addition to the services running on bare metal, VirtualBox is used to host ERPNext using one core and 2GB RAM. It was the ERPNext response that seemed particularly slow. Investigating, I found a combination reasons as is typical of most problems.
First, I examined the apache logs and found the server was the target of a penetration attack around the time I had noticed response was “slow”. The server regularly shows 1000+ penetration attempts in a 24hr period, which tend to occur in clusters. However they have been more an annoyance than a significant concern, as I had not noticed them having a significant effect on server performance. Next, I examined virtual machine performance and found CPU use was 100% when ERPNext was being accessed.
While not finding a definitive cause, it seems likely the additional CPU load from the penetration attack was starving the already high CPU requirements of ERPNext. While clearly ERPNext is processor-constrained, under normal load the server can still provide adequate performance for basic presentations or training with a limited number of concurrent users. However, not if someone is knocking on the front door trying to break in at the same time.
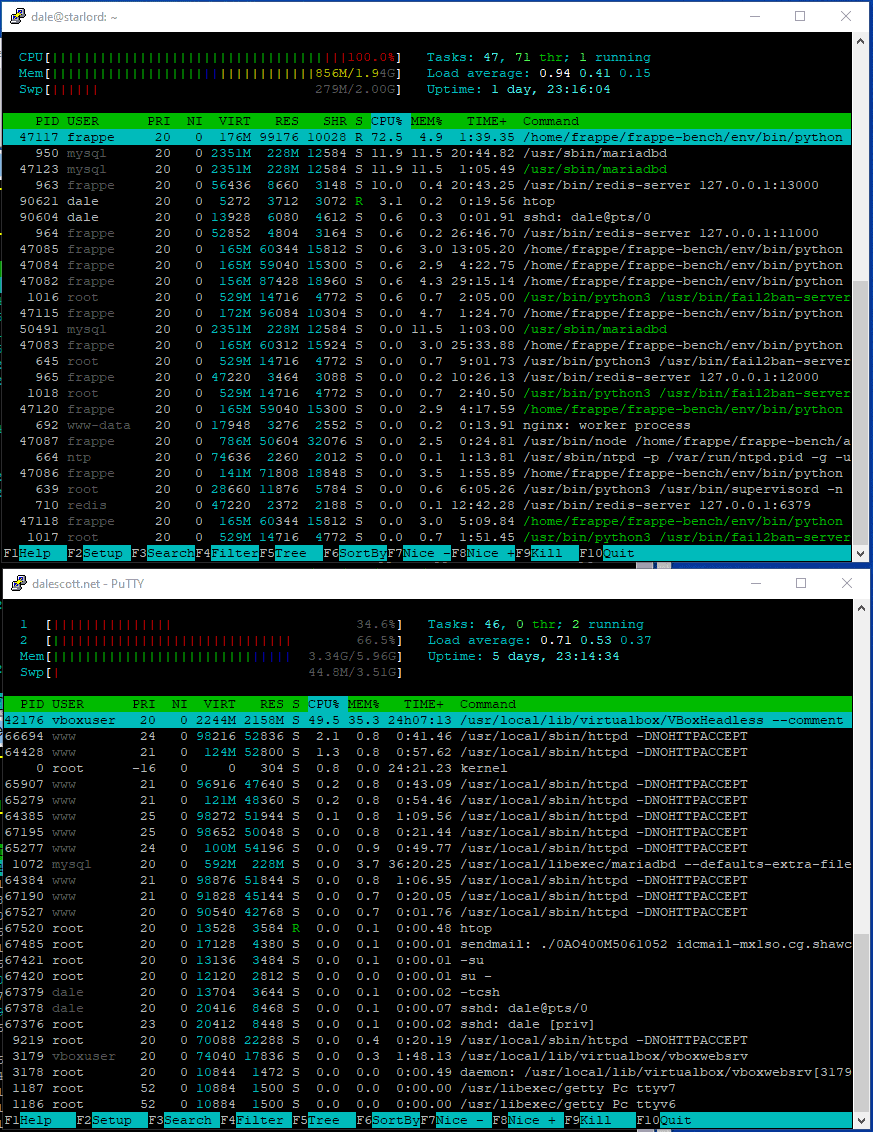
Below is the virtual machine and host server when at rest (no logged-in ERPNext users, and no on-going brute-force ssh or web app login attempts). The vm load (top) is 3% and the host (bottom) server cores are 5% and 2% (the 2% core is the erpnext server).
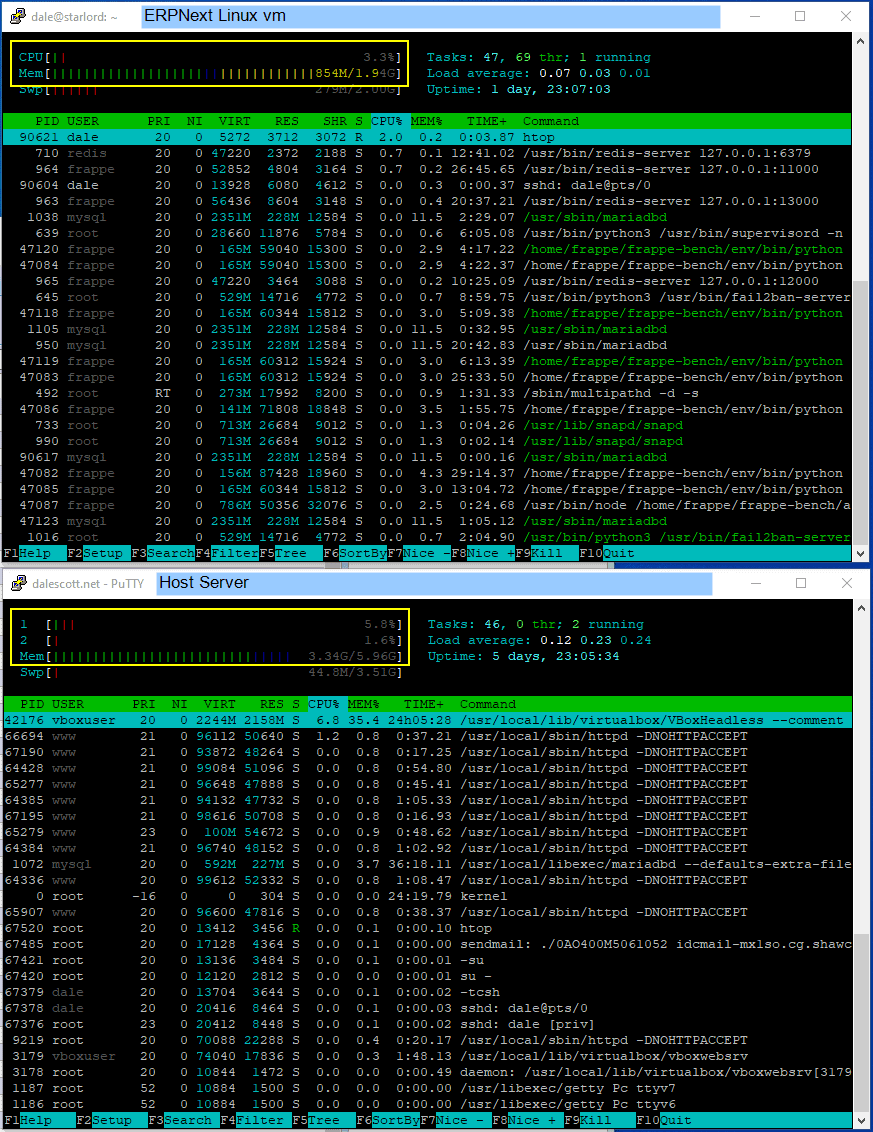
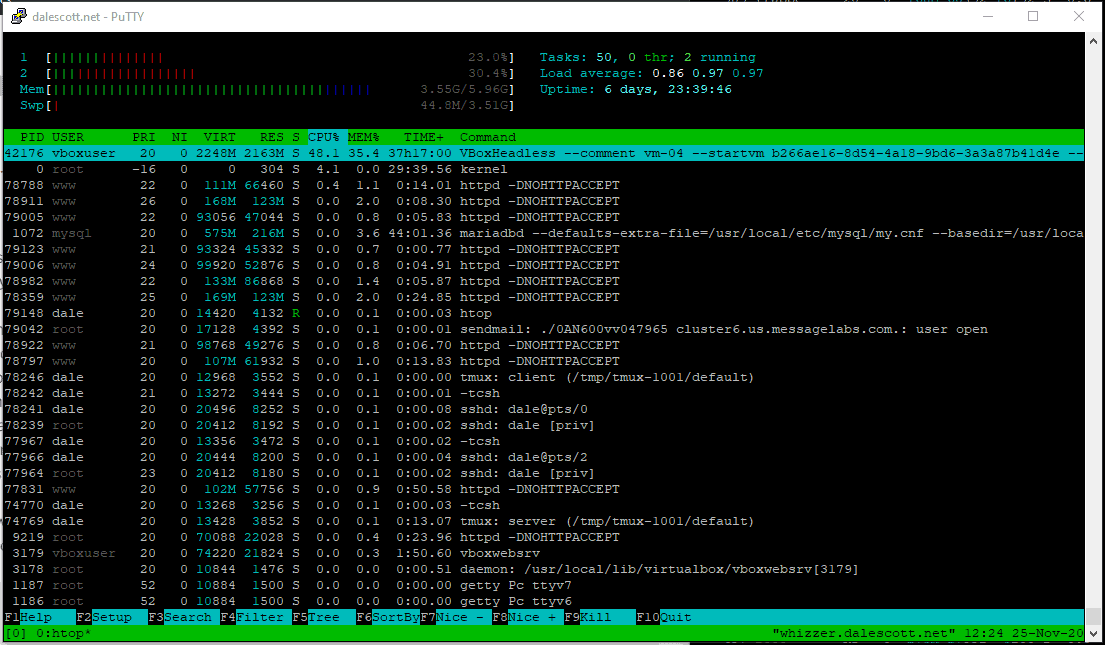
Below is the server when an ERPNext user logs in and accesses an Item list. The vm load (top) has maxed out at 100% and is using half its available memory. On the host (bottom), core #2 is almost 70% (erpnext), but core #1 is only 35% and only half the total available memory is being used, which is good.