Accessing the Catnip Electronics RS485 Modbus Moisture Sensor using Python3

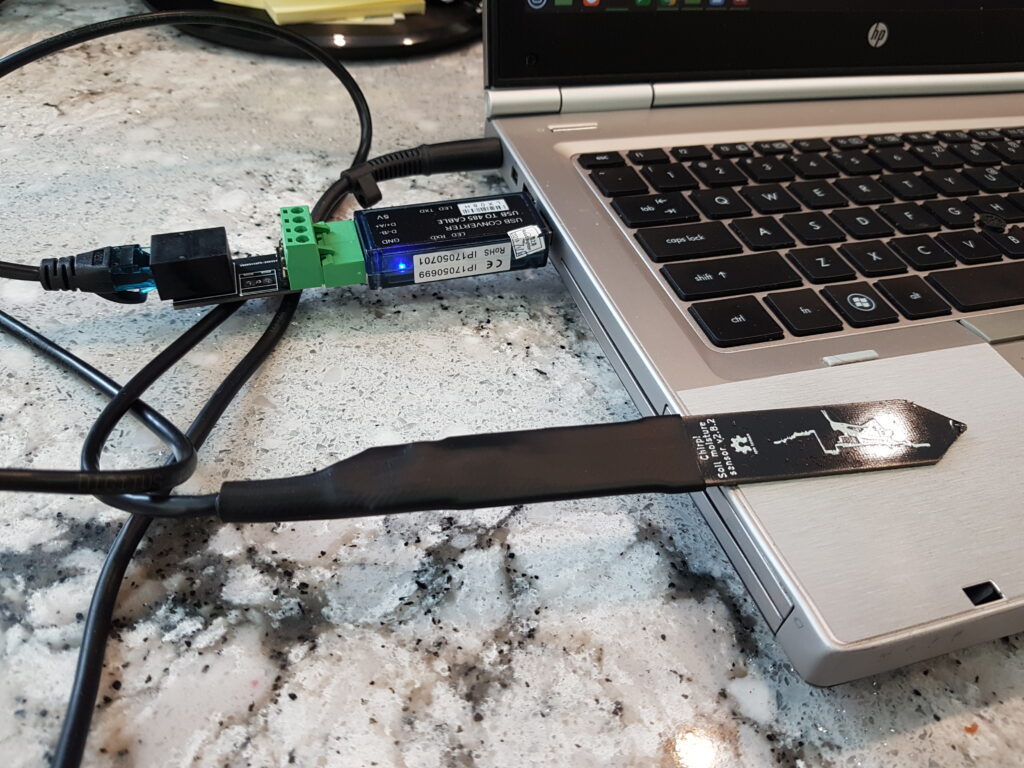
Catnip Electronics makes a robust capacitive moisture sensor with a Modbus RS-485 interface which allows the sensor to be over 1000m from the computer accessing the sensor (subject to cable properties and baud rate). This post is essentially an update to Catnip’s Rasberry Pi tutorial using Python 2 using Python3 on my Linux Mint laptop.

To connect to the moisture sensor, I will use the Taobao USB to RS-485 adapter sold by Catnip Electronics.

Start by installing python3-pip.

dale@firefly:~$ sudo apt-get install python3-pip
Reading package lists... Done
Building dependency tree       
Reading state information... Done
The following additional packages will be installed:
  build-essential g++ g++-9 libpython3-dev libpython3.8-dev libstdc++-9-dev python3-dev python3-setuptools
  python3-wheel python3.8-dev
Suggested packages:
  g++-multilib g++-9-multilib gcc-9-doc libstdc++-9-doc python-setuptools-doc
The following NEW packages will be installed:
  build-essential g++ g++-9 libpython3-dev libpython3.8-dev libstdc++-9-dev python3-dev python3-pip
  python3-setuptools python3-wheel python3.8-dev
0 upgraded, 11 newly installed, 0 to remove and 0 not upgraded.
Need to get 15.2 MB of archives.
After this operation, 70.0 MB of additional disk space will be used.
Do you want to continue? [Y/n] Y
...
dale@firefly:~$ 

Next, install the chip_modbus library (“Chirp” was the original I2C moisture sensor from Catnip Electronics, which was upgraded to become the Modbus sensor).

dale@firefly:~$ sudo pip install chirp_modbus
[sudo] password for dale:          
Collecting chirp_modbus
  Downloading chirp_modbus-1.0.2.tar.gz (2.5 kB)
Collecting minimalmodbus>=1.0.2
  Downloading minimalmodbus-2.0.1-py3-none-any.whl (33 kB)
Collecting pyserial>=3.0
  Downloading pyserial-3.5-py2.py3-none-any.whl (90 kB)
     |████████████████████████████████| 90 kB 1.9 MB/s 
Building wheels for collected packages: chirp-modbus
  Building wheel for chirp-modbus (setup.py) ... done
  Created wheel for chirp-modbus: filename=chirp_modbus-1.0.2-py3-none-any.whl size=2720 sha256=4a869530f8de35b421d5556e1677ca1d760bb48f7107510d6e8946b5130e7128
  Stored in directory: /root/.cache/pip/wheels/b8/e4/54/e09426372abf3522455f8c54ec6b7988e9f1c5e7a5a2f9b61d
Successfully built chirp-modbus
Installing collected packages: pyserial, minimalmodbus, chirp-modbus
Successfully installed chirp-modbus-1.0.2 minimalmodbus-2.0.1 pyserial-3.5
dale@firefly:~$ 

Now use the Python shell to access the sensor (on my laptop, the USB to RS-485 adapter is assigned port /dev/ttyUSB0).

dale@firefly:~$ python3
Python 3.8.10 (default, Mar 15 2022, 12:22:08) 
[GCC 9.4.0] on linux
Type "help", "copyright", "credits" or "license" for more information.
>>> import chirp_modbus
>>> sensor = chirp_modbus.SoilMoistureSensor(address=1, serialport='/dev/ttyUSB0')
>>> sensor.getMoisture()
277
>>> sensor.getTemperature()
25.1
>>> 
dale@firefly:~$ 

The chip_modbus library includes a number of other functions, view the source to see all capabilities.

Use ssh to host a remote git repo

First, NEVER use a file synchronization service such as Nextcloud or Dropbox to synchronize git repos among multiple users. These and similar services should NEVER be used to synchronize git repo’s because they don’t synchronize everyone simultaneously.

For example, if I push to a local repo in my ~/Nextcloud directory, another developer could be pushing to their local repo at about the same time, and there will be a race between our Nextcloud clients to see whose updates make it to the Nextcloud server first. The best outcome is that Nextcloud will notify the loser of a sync collision (a file was modified locally at the same time it was modified on the server), and that the collision will need to be corrected manually. The worst outcome is that the loser will lose their commit entirely (their local repo will be overwritten by the copy on the server from the winning user), or the server repo will be corrupted with some files from the first user and some from the second user. Uggg! This is NOT what you want to have happen.

Only a git push command should be used to update an upstream server. The upstream repo will be locked and the push will be done in an atomic action. This is the only way to preserve repo integrity!

Here is my setup, note that it requires having ssh login capability to the server. I use FreeBSD for my server OS, but this procedure applies equally to Linux.

Step 1. Create a system login user (e.g. “git”), the git repos will be stored in the “git” user home directory. You can put more than one git repo in the user directory, but all the repos will have common access (i.e. control is to the user directory, not to the repos in the directory).

Step 2. Create a public/private ssh key to access the git repo with (more correctly, to access the user account that has the git repos), and add the public key to the /home/username/.ssh/authorized_keys file.

You can use a single ssh key and give the private key to each real user who needs access, or better, each real user has their own ssh key and you add all their public keys to the authorized_keys file (this way you can easily remove access from a single user by removing their public key from the authorized_keys file).

Step 3. Create a bare repo in the user directory. E.g. sudo -u username git init –bare repo_name.git

Now you have two choices, depending on whether you have started writing code yet.

Step 4a. If you have not started development yet, commit a README.md file from the server so the repo has at least one commit. Then from your dev workstation, clone the repo using the ssh protocol.

dale@firefly:~$ git clone ssh://git@dalescott.net/home/git/hydra.git hydra

After that you write code, commit locally, and push your commits to the upstream origin repo as you would with any other cloned project.

Step 4b. If you have started writing code already (i.e. if you already have a repo with commits), add an origin or upstream ssh protocol remote to your local repo and push it to the empty repo on the server.

This approach maintains complete control over the repo and is easy to setup. It has worked well for me with small projects and a few developers. Compared to GitHub, the primary technical difference is the loss of pull requests (which is a GitHub workflow, not a feature of Git), but in a small team everyone is likely committing directly anyway.

Happy coding.

Dale

MyWind MariaDb / MySQL Database

I was both surprised and pleased to see a flury of recent interest in my MyWind database on GitHub, there have been 18 forks in the last month!

MyWind is a re-engineering of the Northwind database provided with Microsoft Access for use with MariaDb and MySQL. Northwind was a sample database and tutorial schema for managing small business customers, orders, inventory, purchasing, suppliers, shipping, and employees.

I provided MyWind using the BSD license, meaning you are free to use MyWind as you please, including commercially, so long as you keep my copyright notice and accept my disclaimer of liability. Enjoy!

Configure Tryton to use PostgreSQL


In this tutorial I will install PostgreSQL and configure it as the Tryton data tier. If you have not installed Tryton yet, see Install Tryton on FreeBSD 13.

In Install Tryton on FreeBSD 13, I used SQLite for for basic testing. However, real-world enterprise use with multiple users interacting simultaneously requires high concurrency and ACID compliance for effective and reliable operation. For production, Tryton uses PostgreSQL for its backend or data tier.

Install PostgreSQL

Install the latest version of PostgreSQL (currently 14.1).

% sudo pkg install postgresql14-server

The installation procedure creates a “postgres” user who owns the PostgreSQL files and the postgres server process. The installed configuration file (/var/db/postgres/data14/postgresql.conf) allows access only from the localhost, which will be sufficient since trytond is running locally.

Confirm PostgreSQL installed correctly.

% pg_config --version

Edit /etc/rc.conf to start the server at startup.

% sudo vi /etc/rc.conf
...
postgresql_enable="YES"

Initialize a database cluster (one or more databases managed by a single postgresql instance) and start postgresql.

% sudo /usr/local/etc/rc.d/postgresql initdb
% sudo service postgresql start
% sudo service postgresql status

Use the PostgreSQL createuser command to create a “tryton” PostgreSQL super-user. The “tryton” user will be able to create databases and roles.

% sudo su postgres
$ createuser -sdrP tryton
Enter password for new role:
Enter it again:
$ exit
%

and restart PostgreSQL.

% sudo service postgresql restart

Confirm that the “tryton” user on localhost can connect to the PostgreSQL server (the “-W” switch causes psql to prompt for the user password).

% psql --username=tryton -W --list
Password: 
List of databases
   Name    | Owner    | Encoding | Collate | Ctype   | Access privileges
-----------+----------+----------+---------+---------+-----------------------
 postgres  | postgres | UTF8     | C       | C.UTF-8 |
 template0 | postgres | UTF8     | C       | C.UTF-8 | =c/postgres          +
           |          |          |         |         | postgres=CTc/postgres
 template1 | postgres | UTF8     | C       | C.UTF-8 | =c/postgres          +
           |          |          |         |         | postgres=CTc/postgres
(3 rows)
%

Install psycopg2

trytond uses psycopg2 to connect to postgresql. Install psycopg2 into the virtual environment created for trytond.

(env) [~/work/trytond]$ pip install psycopg2

Edit trytond.conf to use PostgreSQL

Edit ~/work/trytond/trytond.conf to specify using PostgreSQL backend.

[database]
# connect to postgresql using a TCIP/IP port
#uri = postgresql://tryton:password@localhost:5432
# connect to postgresql using a Unix socket
uri = postgresql://tryton:password@/

[web]
listen=0.0.0.0:8000
root = /home/dale/work/sao

Create a Tryton database

I need to use the PostgreSQL createdb command to create a database for Tryton,

% sudo su postgres
$ createdb scc

I will use the psql utility to verify the database was created, and then return to my own user name.

$ psql
psql (14.1)
Type "help" for help.

postgres=# \l
                              List of databases
   Name    |  Owner   | Encoding | Collate |  Ctype  |   Access privileges
-----------+----------+----------+---------+---------+-----------------------
 postgres  | postgres | UTF8     | C       | C.UTF-8 |
 scc       | postgres | UTF8     | C       | C.UTF-8 |
 template0 | postgres | UTF8     | C       | C.UTF-8 | =c/postgres          +
           |          |          |         |         | postgres=CTc/postgres
 template1 | postgres | UTF8     | C       | C.UTF-8 | =c/postgres          +
           |          |          |         |         | postgres=CTc/postgres
(4 rows)

postgres=# \q
$ ^D
%

Finally I will initialize the database using the Tryton trytond-admin utility.

I will need to activate the virtualenv created for trytond in order to use trytond-admin.

% bash
[~/work/trytond]$ source env/bin/activate
(env) [dale@starlord ~/work/trytond]$ trytond-admin -c ./trytond.conf -d scc --all -v
"admin" email for "scc": dale@dalescott.net
"admin" password for "scc":
"admin" password confirmation:
(env) [~/work/trytond]$

Start trytond

Start trytond specifying the updated configuration file. Notice I will not specify a database as I did when using SQLite. The database will be selected by the Tryton client.

(env) [~/work/trytond]$ env/bin/trytond -c ./trytond.conf

Access Tryton

You can now use the Tryton client to connect to the Tryton server (trytond). A wizard will lead you through the interactive configuration, which will be covered in a seperate post.